Get started with TensorFlow object detection in your home automation projects using Home-Assistant.

Introduction
WARNING: there are currently issues with the Tensorflow integration in Home Assistant, which arise due to complexity of supporting Tensorflow on multiple platforms. I do not recommend attempting to follow this guide unless you are very confident at debugging installation issues. Otherwise I recommend waiting until Tensorflow 2 has become the standard.
TensorFlow is a popular open source machine learning framework that may be used for a wide range of applications in image processing, in particular for object detection. There are many applications for object detection in home automation projects, for example for locating objects such as vehicles or pets in camera feeds, and then performing actions (using automations) based on the presence of those objects. Home-Assistant is a popular, open source, Python 3, platform for home automation that can be run on a Raspberry Pi. TensorFlow object detection is available in Home-Assistant after some setup, allowing people to get started with object detection in their home automation projects with minimal fuss. The Home-Assistant docs provide instructions for getting started with TensorFlow object detection, but the process as described is a little more involved than a typical Home-Assistant component. As the docs state, this component requires files to be downloaded, compiled on your computer, and added to the Home Assistant configuration directory. I've hosted some code on GitHub to simplify the setup process, and this guide walks through the simplified setup process on familiar Raspberry Pi hardware.
Home-Assistant Setup
I am using the Hassbian deployment of Home-Assistant version 0.98 on a Raspberry Pi 4, but note that the steps should be identical on other deployments of Home-Assistant (caveat, Hassio does not yet allow install of TensorFlow so don't even try it). A note on hardware, TensorFlow models require around 1 GB RAM, so whilst is is possible to run on an RPI3 the experience is so poor I wouldn't even recommend trying. As a minimum I recommend an RPI4 with > 2GB RAM.
Please refer to the Hassbian docs for more information on setting it up, but the basic process is:
- flash the Hassbian disk image to an SD card (I use Etcher)
- add your Wifi credentials to a text file on the SD card
- insert the SD card to into your Pi
- plugin a keyboard and display to the Pi to monitor the install process
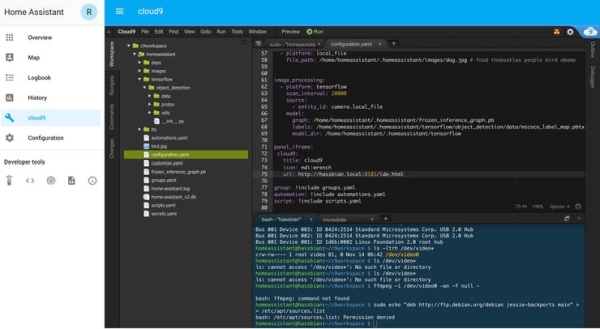
You can do the whole TensorFlow setup from the keyboard hooked up to your Pi, but I recommend installing the Cloud9 web IDE via a Hassbian script. This IDE allows you do do the TensorFlow setup process via the Home-Assistant front-end, from any computer on your network. To install Cloud9 follow the instructions here, and navigate to http://hassbian.local:8181 You can now display the Cloud9 IDE on the Home-Assistant GUI using a panel iframe, configured by adding to the Home-Assistant configuration.yaml file (edit via the Cloud9 IDE):
panel_iframe:
cloud9:
  title: cloud9
  icon: mdi:wrench
  url: http://hassbian.local:8181/ide.html
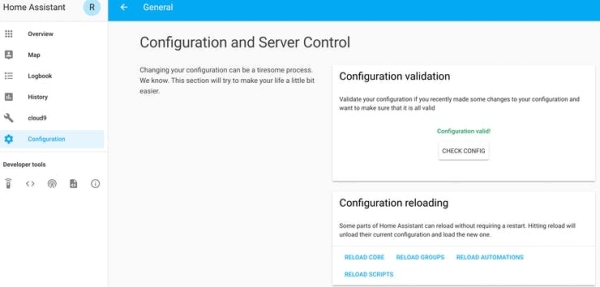
After editing the file its a good idea to use the configuration validation tool. To use it, from the side panel, Configuration -> General -> CHECK CONFIG (under Configuration validation)).

If you get the OK from the configuration checking tool you then need to restart Home-Assistant for the changes to take effect (from side panel Configuration -> General -> RESTART (under Server management)). On restart you should see the following:

TensorFlow Setup
Make sure you are running the lates release of Home-Assistant. I recommend you read the TensorFlow component docs to understand the setup process, but in this guide we skip a few steps since I made the required code available on GitHub.
Step 1 : Install TensorFlow. We need TensorFlow available to Home-Assistant. From the command line in the Cloud9 IDE:
sudo apt-get install libatlas-base-dev libopenjp2-7 libtiff5- Switch from Pi to homeassistant user ->
sudo -u homeassistant -H -s - Activate the homeassistant python environment ->
cd /srv/homeassistant/thensource bin/activate - Install tensorflow from pypi ->
pip3 install tensorflow==1.13.2(check current version requirements)
Step 2 : Get files TensorFlow requires from my GitHub. From any computer, navigate to: https://github.com/robmarkcole/tensorflow_files_for_home_assistant_component and either download the ZIP file or clone the repository. Using the Cloud9 IDE copy the folder tensorflow/object_detection from the repository into the configuration folder of Home-Assistant. The resulting folder structure is shown in Figure 2.
Step 3 : Choose a suitable model for the object detection. I give this step a section of its own.
Model Selection
TensorFlow ‘models' are binary files with the extension .pb that contain the weights for the neural network that TensorFlow will use to perform object detection. This is a detail you don't need to worry about, but what's required is to select an appropriate model and place it in the configuration directory. As the component docs advise, there are a range of models available on the internet, or you could even create your own. Generally there is a trade-off between a models accuracy and its speed. As the Raspberry Pi has limited CPU and RAM, we should select a light-weight model, for example one of those designed for use on a mobile phone. The TensorFlow model zoo provides a list of downloadable models, so navigate to the zoo readme and choose a model. Here we will follow the docs advice and select the ssd_mobilenet_v2_coco model. From the command line, and noting that we are still using the homeassistant user profile:
TENSORFLOW_DIR="/home/homeassistant/c9workspace/homeassistant/tensorflow"
cd $TENSORFLOW_DIR
curl -OL http://download.tensorflow.org/models/object_detection/ssd_mobilenet_v2_coco_2018_03_29.tar.gz
tar -xzvf ssd_mobilenet_v2_coco_2018_03_29.tar.gz
Note that we set the environment variable TENSORFLOW_DIR to ensure we put the downloaded files in the location required for the configuration instructions in this article. Now we have a model file available, we can configure the TensorFlow component.
TensorFlow Component Configuration
You will need a camera source to provide images. I just setup a local_file camera, but you can use any camera source. Note the entity_id of your camera (mine is camera.local_file) and add the following to your configuration.yaml file:
image_processing:
 - platform: tensorflow
   scan_interval: 20000
   source:
     - entity_id: camera.local_file
   model:
     graph: /home/homeassistant/c9workspace/homeassistant/tensorflow/ssd_mobilenet_v2_coco_2018_03_29/frozen_inference_graph.pb
Again check your configuration changes are valid and restart Home-Assistant.
TensorFlow Component Usage
Now the fun part, using the TensorFlow component! Note that on restart Home-Assistant will issue a warning in its logs about OpenCV not being installed, you can ignore this as TensorFlow can use Pillow instead. Also note that we configured scan_interval: 20000 which means that TensorFlow image processing will not be performed automatically (every 10 seconds by default) but only when we trigger it by calling the scan service, which you can do from the Services developer tool on the Home-Assistant front end. The image below show you how the TensorFlow component displays its results:

