
This blog is the second installment of a review of the Ultimate Raspberry Pi Bundle provided by element14. I have been waiting for parts and struggling a bit with getting everything working, but finally all electronics are kluged together and functional. Also all software for a working project is written and working.
System Diagram
This illustration shows the components of the SofballCam and how they are connected. The two main functions of the SoftballCam video recording and camera panning are divided between the Raspberry Pi and the ChipKit Pi with the Raspberry Pi performing the video recording functions and the ChipKit Pi performing the camera panning functions. The ChipKit Pi is stacked on the Raspberry Pi which is used to develop the software for the ChipKit Pi. The microphone is connected to a digital input on the ChipKit Pi to trigger panning cycles on the servo motor. The servo motor is also connected to a PWM output on the ChipKit Pi. This arrangement allows the ChipKit Pi to operate completely independently of the Raspberry Pi. The wireless microphone link has not arrived, but the microphone circuitry works fine connected directly to the ChipKit Pi.
Packaging Diagram
My plan is to mount everything on a fibreglass chassis and wrap it with foam, then place the bundle inside a strong container and wrap the container in 2 more layers of foam sandwiching a stiff load distributing layer. The servo motor would operate a rotating pad which would allow the entire self-contained package to be knocked off the stand in the event of a direct impact. A bungee chord would prevent the package from flying too far. I'm still pessimistic about the robustness and heat dissipation of such an arrangement, but it is about the best compromise solution given the constraints. The strong containers investigated so far do not seem adequate to the task, partly because the required size is larger than anticipated, due to all the connectors, so I am still looking.
Development
Installation of the ChipKit Pi on the Raspberry Pi and installation of the MPIDE development system on an SD card went fairly smoothly, except I ran into further issues with USB power. Currently I have one power supply for the Raspberry Pi and ChipKit Pi and including the WiPi. I have a second power supply running a USB hub with keyboard, mouse, wireless keyboard dongle and USB memory stick. I have a third power supply running the small display. 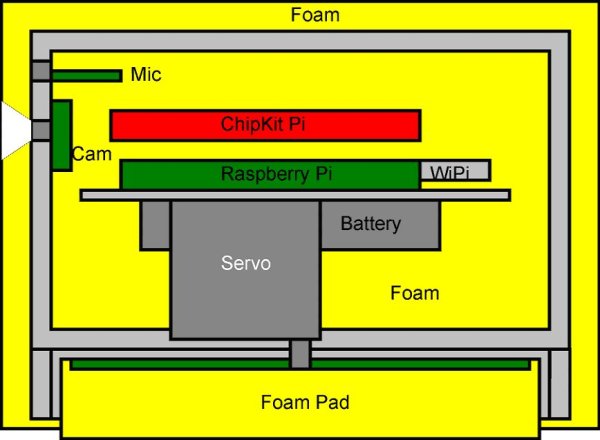 I have a fourth power supply running the microphone and servo motor. All of these except the display (which needs an additional DC-DC converter) can be run directly from a 5 V battery pack with appropriate wiring harness.
The symptoms of power inadequacy were the keyboards would appear to have a stuck key – just repeating the last pressed key forever – so if this is happening to you, try a more robust power supply arrangement.
The ChipKit Pi only needs 2 signal wires connected – pin 9 for the servo output and pin 8 for the digital panning trigger. Of course there is also a ground connection. These two signal pins needed both jumper 12 and jumper 13 to be moved to the positions closest to the LEDs in order to connect the CPU to the connector pins as shown here.
For more detail: The Ultimate Raspberry Pi Bundle – SoftballCam – 2