
Zipwhip is a cloud texting company. That means our goal is to give users a way to send and receive their texts from the cloud. Texting is a very important medium in our lives and yet it’s been stuck on our mobile phones forever. Why can’t we send a text from the web, our desktops, tablets, iPads, Kindle Fires, or even the family T.V.? We can send email from all those places so why not texts? With Zipwhip you can.
The first thing Zipwhip has to do to solve cloud texting is get your texts into the cloud. Once they’re there you can do all sorts of fancy things. By installing our background app on your Android phone your texts are synced in real-time. In addition to our mobile solution, we’ve recently launched our landline service that allows users to send and receive texts from their existing business or residential landlines. That’s right, you can now order dinner via text from a restaurant with a Zipwhip enabled landline. It’s a powerful platform with thousands of use cases. So powerful that last year, as you may recall, we were able to create the world’s first text enabled espresso machine as a way to show off just how cool the SMS medium really is.
We were already working on a version of Textspresso you could own yourself when we heard that the Raspberry Pi team had moved into their first office. We knew they needed one. It was meant to be a nice way to thank them for revolutionizing the computing industry with their $25 credit card sized Linux computer. This project wouldn’t have been possible without their amazing new device. We decided to document the whole process so you can make your own over a long weekend. Below you’ll find all the gory details.
Completed Circuit Board
Part 1
Steps to Build Your Own
- Get yourself a Textspresso circuit board
- Get the parts
- Buy the machine
- Setup Raspberry Pi
- Create a Zipwhip account
- Configure your Zipwhip account to the machine (the software step)
- Text yourself a coffee
1.) Get Yourself a Textpsresso Circuit Board
We used to have our circuit boards available on Batch PCB but the site has closed. You can download the Eagle files below and then upload them directly to OSH park (they take the files natively). Unfortunately you’ll have to buy the boards in batches of 3 for $17.60 and upload them yourself. You can also download Eagle via the link below if you don’t already have it.
Eagle: http://www.cadsoftusa.com/
Hardware Files: http://ftp.zipwhip.com/public/textspresso/textspressohardware/schematics.zip
2.) Get the Parts
We created a list of parts from four different sites: Digi-Key, Samtec, Allied, and Amazon. The heavy lifting is done. You can click right through to the exact part you need inside the table. Although the capacitors aren’t absolutely necessary, they help smooth out the electrical currents running through the board and lessen the chance that you’ll have isues with your circuit board. The parts at the bottom of the list are for your Raspberry Pi. Instructions on how to configure your Model A are below. You’ll be soldering the circuit board yourself, so get that magnifying glass ready. Some of these parts are extremely small.
| Supplier | Quantity | Part Number | Item |
| Digi-Key | 2 | 445-1265-1-ND | Capacitor 0.1uF |
| Digi-Key | 6 | 445-1237-1-ND | Capacitor 15pF |
| Digi-Key | 1 | 541-348LCT-ND | Resistor 350OHM |
| Digi-Key | 4 | 541-499LCT-ND | Resistor 499OHM |
| Digi-Key | 1 | 541-1.21KLCT-ND | Resistor 1.2k |
| Digi-Key | 4 | 541-3.57KLCT-ND | Resistor 3.57k |
| Digi-Key | 3 | 541-100KLCT-ND | Resistor 100k |
| Digi-Key | 1 | 541-4.7KJCT-ND | Resistor 4.7k |
| Digi-Key | 1 | 541-20KJCT-ND | Resistor 20k |
| Digi-Key | 4 | 568-1633-1-ND | NPN Transistors |
| Digi-Key | 1 | 497-1857-1-ND | Shift Register |
| Digi-Key | 3 | HCPL2631SDCT-ND | Optocouplers |
| Samtec | 1 | TSW-111-26-F-S | Ribbon Cable |
| Samtec | 1 | SSW-113-01-F-D | GPIO Port |
| Sametc | 1 | ESQ-111-24-G-S | ESPR_BRD Connector |
| Allied | 1 | 70266830 | Raspberry Pi Model A |
| Allied | 1 | 70232557 | Power Supply |
| Allied | 1 | 70235238 | SD Card |
| Amazon | 1 | EW-7811UnR2 | Wireless USB Adaptor |
3.) Buy the Machine
Seattle Coffee Gear has the Delonghi Magnifica Super Automatic espresso machine available for purchase on their site. They are a great company with stellar customer service, but you’ll be hacking this machine at your own risk. Once that cover comes off there is no going back. The direct link to the machine is below.
http://www.seattlecoffeegear.com/delonghi-magnifica-esam3300-superautomatic-espresso-machine
4.) Setup Raspberry Pi
When you start this step, you’ll probably have all of your parts in a nice pile ready to go. If you already have an imaged card you can jump right to the second paragraph in this section which covers enabling WiFi. If you have a blank SD card (we recommend 8GB) copy the Raspian Wheezy OS on it. If you’re not sure how to do that, follow the link below. Just a heads-up for newbies to the code/tech/electronics hobby, the “image” you’ll see referenced isn’t a picture. It’s the operating system that will be running on your Pi and acting as the brains of the operation. All you have to do is download a free disk-imager, download and extract the latest version of Raspian Wheezy, get the image onto your card and you’re done. Below you see a screen grab of a successful “write.”
Once your SD card has the Raspian Wheezy OS on it, you can insert it and complete the initial setup of the Pi. If you’re working with a keyboard made in the U.S., remember to make that change as U.K. is the default style. Once that’s done you can setup WiFi for your Pi. How exciting! Plug in your dongle and then use sudo nano /etc/network/interfaces to access your network configuration files. Then, enter the WiFi file information below (you have to add your own network name and password). Once you’ve saved and exited out of that file, you can check to see if you are setup correctly with a ping http://www.XXXX.com command. You’ll get an error message back if something isn’t setup correctly.
- Disk Imager: http://sourceforge.net/projects/win32diskimager/
- Steps to download the image to your SC card: http://elinux.org/RPi_Easy_SD_Card_Setup
WiFi network interface file:
auto wlan0
iface wlan0 inet dhcp
wpa-ssid wifi_ssid
wpa-psk wifi_password
wpa-key-mgmt WPA-PSK
wpa-pairwise TKIP CCMP
wpa-group TKIP CCMP
wpa-proto WPA RSN
wpa-ap-scan 1
wpa-scan-ssid 1
5.) Create a Zipwhip Account
In order for all of this to work, you need to have an account for either your Android smartphone, 800 number, or landline. All coffee orders sent to the number associated with the machine will be routed through our cloud and then down to the machine. Links to our registration pages are below.
To register with your Android smartphone: http://webapp.zipwhip.com/#register
To register with your landline: http://zipwhip.com/landlines
To register with your 800 number: http://zipwhip.com/text-enable-your-1-800-number
6.) Configure Your Zipwhip Account to the Machine (the software step)
On your Pi run the following commands to download and install the Zipwhip Textspresso software package:
sudo wget http://ftp.zipwhip.com/public/textspresso/install-textspresso.sh
sudo chmod 755 install-textspresso.sh
sudo ./install-textspresso.sh
Configure the software with your account info:
sudo python /opt/zipwhip/bin/cmdconfig.py –write –write-phonenum <your-zipwhip-phonenumber> –write-password <your-zipwhip-pasword> –write-getnewsessionandclientid
Start it up and watch the logs:
sudo service zwtextspressod start; tail -f /opt/zipwhip/log/zipwhip-textspresso.log
7.) Text Yourself a Coffee
You can text in 3 different orders: “coffee single” for a small coffee, “coffee double” for a bigger coffee, and “The Zipwhip” for a triple coffee . You can also text in “status” to see if the machine is on or off, and “menu” just in case you forget what your order options are.
Part 2
A Deeper Look Into the Hack
- The machine
- Hacking into the machine
- Ribbon cable
- The control panel circuit board
- The shift register
- How the push buttons work
- The board layout
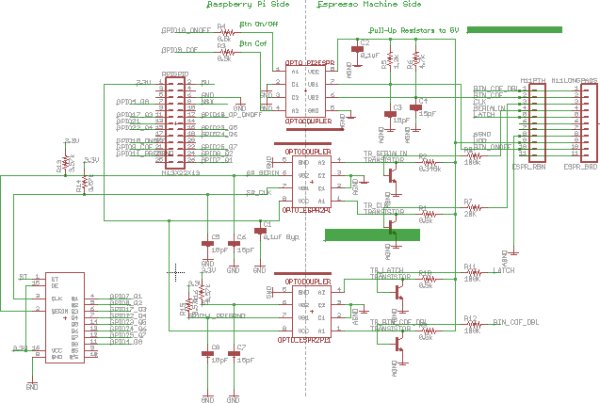
- Our schematic design
- Octocouplers
- Powering the pi
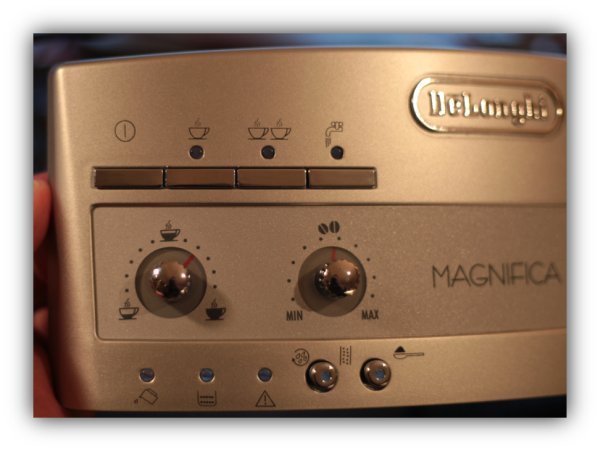
1.) The Machine
Below you’ll see a shot of the front of the machine. With the custom software and hardware of this hack, you’ll be recreating the pushing of a button without actually touching the buttons. Pretty cool, right. *Hot tip: Once your machine is up and running, you can reset the machine by holding the preground button (the one with the scooper) down for 10 seconds.
| Button Placement |
| On/Off Far Left |
| Coffee One Cup |
| Coffee Double Two Cups |
| Hot Water Faucet |
| Decalcify Bottom L |
| Pre-Ground Beans Bottom R |
2.) Hacking Into the Machine
It just takes a few screws to open the machine. Take off the back first and then slide the side panel off. Here are the inside guts of the machine. One of the things you’ll notice is that the area where the Pi will eventually go looks like it was custom made for our hack. It fits in there perfectly.
After opening up the DeLonghi we noticed a PIC microcontroller at the heart of the main board. You can read more about this chip on the Microchip website (http://www.microchip.com/wwwproducts/Devices.aspx?dDocName=en010296). We know this chip runs at 5 volts and thus is operating at normal TTL logic levels. That’s good because that’s easy to interface with. We figured the best place to start tapping into the machine was on the ribbon cable that ran from the main board to the front control board.
.) Ribbon Cable
There is a ribbon cable on the main circuit board of the espresso machine that connects to the front control panel. This was our key area to try to interface with the machine since all of the LEDs tell us the state of the machine and it let’s us mimic button presses from a text command rather than pressing the button itself.
After some deep probing of the circuits here is what we determined all of the functions of the ribbon cable are for.
| Pin | Description | Voltage | Waveform |
| 1 | Push Button Signal for Coffee Double / Use Pre-Ground Beans | 5V | Square Wave to PIC Microcontroller. 1.04ms On. 1.04ms Off. Inverted for 2nd button. |
| 2 | Push Button Signal for Coffee / Decalcify | 5V | Square Wave to PIC Microcontroller. 1.04ms On. 1.04ms Off. Inverted for 2nd button. |
| 3 | Clock Signal | Sinking to GND and rising to 5V | 8-bit Pulse to Shift Register |
| 4 | Serial In to Shift Register | Sinking to GND and rising to 5V | 8-bit On/Off Values to Shift Register |
| 5 | Latch/Strobe to Shift Register Indicating Data Done | Sinking to GND and rising to 5V | 1 Pulse to Latch on Shift Register |
| 6 | Potentiometer for Coarse / Fine Beans | GND to 5V depending on pot setting | Varying voltage |
| 7 | Potentiometer for Amount of Water Per Cup | GND to 5V depending on pot setting | Varying voltage |
| 8 | GND | GND | Ground |
| 9 | VDD | 5V | Straight voltage |
| 10 | Push Button Signal for On/Off / Hot Water | 5V | Square Wave to PIC Microcontroller. 1.04ms On. 1.04ms Off. Inverted for 2nd button. |
| 11 | Alt GND (Don’t think this is used) | -20V | Alt GND |
4.) The Control Panel Circuit Board
Here is a front and back picture of the control panel circuit board. We had to figure out how this whole thing worked so we could correctly reverse engineer how the signals communicated between the main board and this control panel. There are LEDs, some simple push buttons, a couple potentiometers, a shift register, and two transistors labeled “Q1” and “Q2”. Those ended up being quite important for how the shift register worked. If you look at your finished circuit board, or the one from above you’ll notice some pieces that look exactly the same (the shift register), and you’ll notice that other pieces look completely different (the resistors).
For more detail: The World’s First Cloud Texting Enabled Raspberry Pi Powered Espresso Machine