Lighting Up An Led Using Your Raspberry Pi and Python
Once you've setup your Raspberry Pi according to my getting started tutorial, you are ready for your first real project. Let's light up an led using the Python programming language and the GPIO pins on your Raspberry Pi, hereafter called RPi.
What You Will Learn:
- You will construct a basic electrical circuit and attach it to your RPi GPIO pins
- You will write a simple Python program to control the circuit using IDLE IDE
What You Will Need:
- Raspberry Pi configured with the GPIO library
- 1 – small led, any color
- 1 – 50 ohm resistor
- Some small-gauge solid core wire
- Breadboard and/or alligator clips to hold connections
Let There Be Light
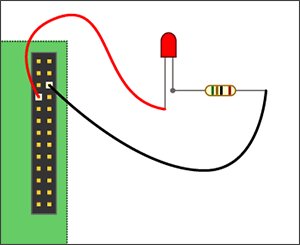
Before we get around to writing any code, let's first get acquainted with the pin numbering of our RPi and create a simple circuit. We'll start by simply lighting our led using the 3.3v pin and the ground pin on our RPi. We will use the following schematic for our circuit:
Before starting, unplug your RPi. You wouldn't want to risk shorting it out while working with it ‘powered on', especially since this is our first project.
- Using your assortment of materials, create the circuit on either your breadboard, or using your alligator clips.
- Pin 1 (+3.3 volts) should go to the longer leg of your led. This pin provides a steady supply of 3.3v. Unlike the GPIO pins on your RPi, this pin is not programmable, and cannot be controlled by software.
- Attach the shorter leg of the led to the resistor. Finally, attach the other end of the resistor to Pin 6 (- ground) on your RPi.
Controlling The Led With Python
Now that we've tested our basic circuit, it's time to move the positive lead from the ‘always on' 3.3v pin to one of the programmable GPIO pins. Here is what our circuit will look like:
- Power-off your RPi again before making any changes to your wiring.
- Move the positive lead from pin 1 to pin 7.
Writing The Code
I like to write my python scripts using the IDLE IDE because it comes packaged with the Raspbian distribution, it's free, and it makes writing and debugging code a bit simpler than when using Python command line or a text editor. It's important to note that when writing python scripts that utilize the GPIO pins, you must run them as a superuser or your scripts will not run properly.
- Power on your RPi and boot all the way into the operating system GUI
- Open the terminal and launch the IDLE IDE as a superuser:
sudo idle
- Wait for IDLE to open, then click File > New to open a new window (Ctrl + N)
- Type the following code into the window:
import RPi.GPIO as GPIO ## Import GPIO library
GPIO.setmode(GPIO.BOARD) ## Use board pin numbering
GPIO.setup(7, GPIO.OUT) ## Setup GPIO Pin 7 to OUT
GPIO.output(7,True) ## Turn on GPIO pin 7
For more detail: Third Eye Visions


