
Develop a Turing machine that is simple to program and easy to understand.
This tutorial is a follow-on to my TMD-1: A Turing Machine Demonstrator project.
I was really happy with the way that TMD-1 turned out. I believe I succeeded in creating a Turing machine that was both “simple to program” and “easy to understand”. To help accomplish those goals, the machine itself was limited to only 3 states, 3 symbols, and a small 10 cell bounded tape. Fine for educational purposes, but a bit anemic if you want to explore Turing machines with a little more depth.
For this project I wanted to “up the ante”. I made a 6 state, 6 symbol machine, with a large tape capacity. As much as possible I tried to bring forward the simple to use, easy to understand principles from TMD-1.
In this tutorial I will focus on the steps required to build a TMD-2. However I think that a little background will be required now and then to provide context to the build, like now for instance.
What is a Turing Machine?
The Turing machine was invented in 1936 by Alan Turing. By providing a mathematical description of a simple device capable of arbitrary computations, he was able to prove the properties of computation in general.
A Turing machine mathematically models a mechanical machine that operates on a tape. More explicitly, a Turing machine consists of:
A finite table of instructions that, given the state the machine is currently in and the symbol it is reading on the tape (symbol currently under the head), tells the machine to do the following transition steps in sequence:
- Write a symbol from the finite alphabet replacing the one that was there. Note that the symbol written might be the same as before or different.
- Move the head either one cell to the left or one cell to the right.
- Assume the same or a new state as prescribed by the go to state.
- A tape divided into adjacent cells. Each cell contains a symbol from some finite alphabet. The alphabet contains a special blank symbol and one or more other symbols. Cells that have not been written before are assumed to be filled with the blank symbol.
- A head that can read and write symbols on the tape and move on the tape left and right one (and only one) cell at a time.
- A state register that stores the state of the Turing machine, one of many. Among these is the special start state with which the state register is initialized.
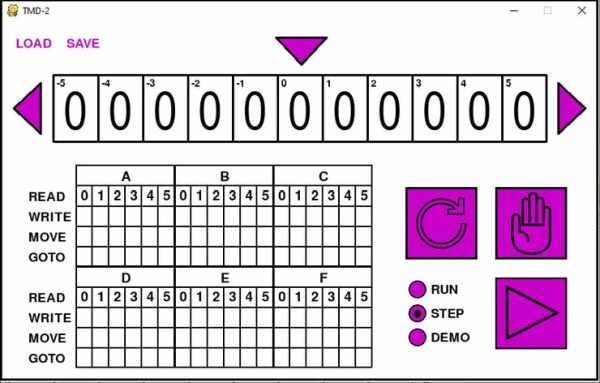
TMD-2
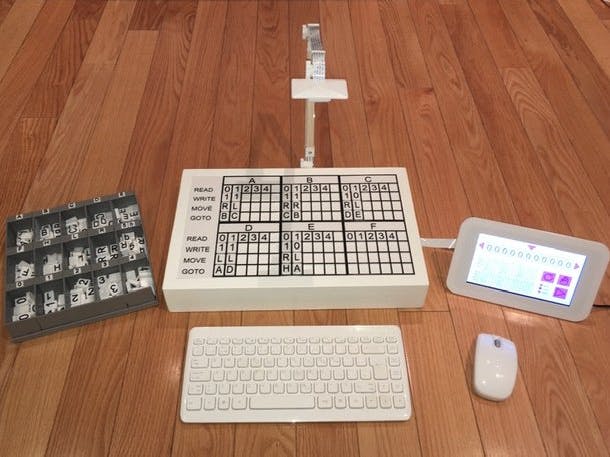
The Turing Machine Demonstrator Mark 2 (TMD-2) will have the following characteristics:
- One tape with 100, 000 cells and a single head.
- The alphabet used will have seven symbols: {0, 1, 2, 3, 4, 5, b}. 0 will be the blank symbol and b is an endmarker symbol that can be read from the tape but not written.
- There will be six states: {A, B, C, D, E, F}. A will be the start state plus there is a special HALT state H.
With TMD-2 you can perform the following tasks among others:
- Treating the input area as a binary number find the one's compliment.
- Find the two's compliment of the “binary” number in the input area.
- Count in binary (ascending and descending).
- Sorting. Move all the 1's in the input area to the right or left.
- Shift the input area one cell to the right or left.
- Run “busy beaver” programs with up to six states.
Additional Information
- If you are interested in more details about Turing machines in general the Wikipedia entry is very good.
- For background on TMD-2 in particular, I have a blog on Hackaday where I chronicle the journey I took conceiving and building the Turing Machine Demonstrator Mark 2.
- I have also written a small booklet, TMD-2 Quick Start Guide. It describes the operation of TMD-2 and helps the user run their first “program”. You will find the guide attached to this tutorial.
OK. Let's build a TMD-2.
Supplies:
In addition to the printed parts you might require:
- Raspberry Pi – Mine was a Raspberry Pi 4 with 2GB of memory.
- Raspberry Pi Camera Module – Mine was an 8-megapixel V2 model.
- Raspberry Pi Touch Display – The 7″ touchscreen monitor.
- Raspberry Pi Flex Cable – At least 1 meter, mine was 2 meters.
- 6 Feet of 3 1/2 x 3/4 inch lumber (approximately).
- 10 Feet of 1/2 x 1/2 inch doweling.
- 1 Piece of 1/8 inch plywood at least 364 x 224 mm.
Step 1: Decide How Much TMD-2 You Want to Make
At it's heart, TMD-2 is a stand-alone program written in Python. If you just want to try the application, it will run on any computer that supports Python (which is most machines), skip ahead to the Installing the TMD-2 Software step to get started.
I built my TMD-2 using a Raspberry Pi with a Raspberry Pi 7″ touchscreen display as my computer. A display holder was designed to house these parts and becomes the console for my overall project. You can load the “console” with the TMD-2 software and stop there. This configuration makes a nice “desktop toy” Turing machine. I added a wireless mouse and keyboard to my configuration but they are not required.
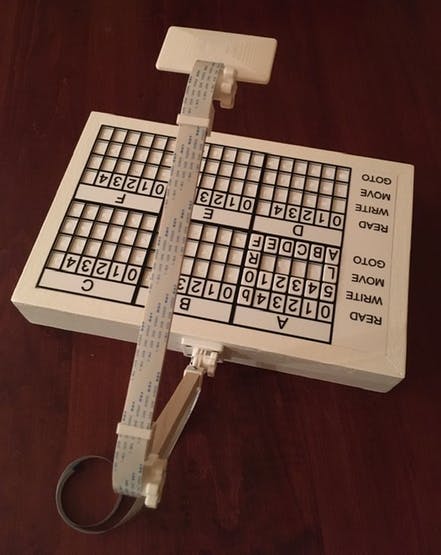
For a full blown TMD-2 experience you might want to build the Finite State Machine input panel. You can then program the Turing machine by populating this transition table with 3D printed “tiles”. Using a Raspberry Pi camera module, these tiles are “scanned” into the machine by processing an image from the camera with OCR software.
How much TMD-2 do you want?
Step 2: Print the Parts
Depending on what TMD-2 configuration chosen, you might be printing some or all of the parts listed here. I printed the parts with the following settings (unless other wise specified):
Print Resolution:.2 mm
Infill: 20%
Filament: AMZ3D PLA
Notes: No supports. Print the parts in their default orientation.
To make a TMD-2 you will need to print the following parts:
- 1 – Raspberry Pi Display Holder
- 4 – Display Locking Tabs
- 10 – Tile 0 Note: Print all of the tiles white. Pause the prints at the 6.2 mm mark and switch to black.
- 10 – Tile 1
- 10 – Tile 2
- 10 – Tile 3
- 10 – Tile 4
- 10 – Tile 5
- 10 – Tile b
- 10 – Tile L
- 10 – Tile R
- 10 – Tile A
- 10 – Tile Big B
- 10 – Tile C
- 10 – Tile D
- 10 – Tile E
- 10 – Tile F
- 10 – Tile H
- 1 – A State Transition Table Note: Print all of the tables white. Pause the prints at the 4.2 mm mark
- 1 – B State Transition Table and switch to black.
- 1 – C State Transition Table
- 1 – D State Transition Table
- 1 – E State Transition Table
- 1 – F State Transition Table
- 1 – State Labels
- 1 – Tile Bin Base Note: Only print the following if you want to make a bin for your tiles.
- 1 – Tile Bin Base Left Note: Only print the Left and Right bases if the base above is too big.
- 1 – Tile Bin Base Right
- 15 – Tile Bin
- 1 – Tile Bin Labels Note: Print in white. Pause the print at the 1.2 mm mark and switch to black.
Step 3: Assemble the Console

Not much to this step really. Attached the Raspberry Pi to the back of the display following the instructions that came with the display and can also be found here.
Set the display into the back of the Raspberry Pi Display Holder and secure in in place with the Display Locking Tabs as pictured above.
Step 4: Assemble the Finite State Machine Panel
A little background on finite state machines.
The Finite State Machine
The core of a Turing machine is the Finite State Machine, a finite set of instructions that, given the state the machine is currently in and the symbol it is reading on the tape (symbol currently under the head), tells the machine how to transition to the next state of the computation. These Finite State Machines are usually described in one of two ways. As state transition diagrams: