
It can be too easy to get stuck overthinking your ideas and letting your gears grind without making any progress. As makers, designers, engineers, hobbyists, etc. it is crucial for us to get out of our heads and sketch out our ideas as they come. It takes practice, but ultimately the more we sketch, the more we can create and the better we can share our ideas.
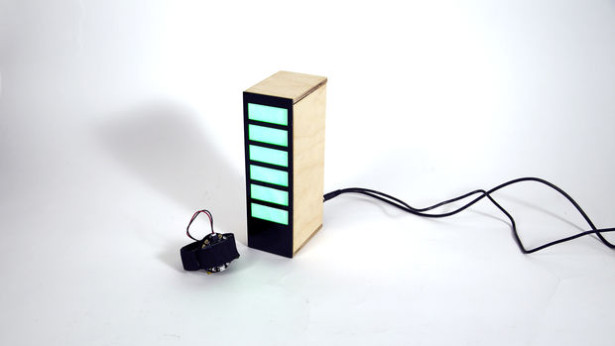
Inspired by Craighton Berman's Pencil Sharpener, this design allows you to measure your creativity based on how much you draw. The wearable tech form accommodates any tool preference – from pencil to sharpie to finger paint. This is a two part system including a wearable band that tracks your drawing and a desktop display of your progress.
Step 1: Materials
First things first, materials. For this project you'll need the following:
– Sheet of 1/16″ Black Acrylic (size determined by your laser cutter – I used 12″ x 24″)
– Sheet of 1/4″ Plywood (again determined by laser cutter dimensions)
– Wax Paper
– .09″ chipboard/cardboard (or thinner)
– 1/2 ” Black elastic (about 1 foot should be plenty)
– 3 x Pack of 5 RGB NeoPixels https://www.adafruit.com/product/1612
– 1 x FLORA https://www.adafruit.com/products/659
– 1 x Arduino UNO https://www.adafruit.com/products/50
– 1 x FLORA Accelerometer/Compass https://www.adafruit.com/products/1247
– Lithium Ion Polymer Battery https://www.adafruit.com/product/1578
– 2 x XBee Module Series 1 https://www.adafruit.com/products/128
– 2 x XBee Adapters https://www.adafruit.com/products/126
– USB Lipoly Charger https://www.adafruit.com/product/1304
– Solderable Breadboard
– 300 to 500 Ohm resistor
– 1000 micro Farad capacitor (6.3 V or higher)
– Female DC power adapter https://www.adafruit.com/products/368
– 5V Power supply https://www.adafruit.com/products/276
To start we need to wire up the accelerometer to the FLORA. Simply connect and solder the 3V, SDA, SCL, and GND ports of the accelerometer to the corresponding ports on the FLORA. To minimize the size of your circuit, solder the leads short enough that the acelerometer can lay flat on the bottom side of the FLORA, as shown. Before continuing you'll want to test that the accelerometer is functioning properly.
If this is your first time using a FLORA you'll need to make sure you have the board managers and libraries installed. See here for further instructions on getting this set up: https://learn.adafruit.com/add-boards-arduino-v164… You'll also need to install the LSM303 library and the Unified Sensor library for the accelerometer.
Then you can use the example code under File > Examples > Adafruit LSM 303 > test in Arduino IDE. A good way to test that the sensor is working properly is to open serial monitor and observe what happens as you rotate it. The sensor can detect gravity so you should see a large Z acceleration when holding the accelerometer flat, and large X or Y when you tilt it side to side or up and down.
For More Details: transmission: A Creativity Measurement System