
Why Launch A Weather Balloon?
There are a lot of reasons to put together a weather balloon launch. Its a great project for a STEM /STEAM class, it requires planning, electronics and programming, and teamwork. It has a lot of great classroom applications, giving a tangible demo of aerodynamics, physics, meteorology, geology, and more. Additionally its a great way to get amateur radio into the classroom and get a new generation into this great hobby. Outside of classrooms there is citizen science to be had, gathering your own data of atmospheric conditions or testing devices in space like conditions. And finally there are the amazing photos and videos that can be made only with weather balloons. Above all launching weather balloons is a lot of fun and a great challenge.
So You’re Launching A Weather Balloon:
Congratulations, you’ve decided you’re going to launch a weather balloon. Now what? The first step is to gather your equipment, there are only a few required components, the rest is up to you and your goals for the flight. These instructions are likely to be updated so check back for more info.
Required Components:
Know the laws where you are launching. There will likely be two authorities that you will have to comply with on your flight, take the time to find out who the authorities are and their rule and regulations for where you are launching / flying / landing your balloon. In the United States the FAA regulates flights, and FCC regulates radio equipment. FAA regulations can be found here and FCC regulations here. To boil it down, here are the basics:
1. Payloads cannot exceed a package weight/size ratio of three ounces per square inch. You can determine this by dividing the total package weight by the area in square inches of the smallest surface.
2. Rope or cable connecting your payload or balloon may not have a tensile strength greater than 50 pounds.
3. No payload package may weigh more than 6 pounds.
4. The entire weight of all payloads cannot exceed 12 pounds in total weight. This does not include the weight of the balloon.
5. Cell phones are not permitted to transmit in flight on high-altitude weather balloons
6. You may not launch a high-altitude weather balloon which creates a hazard to other people and property
7. No one may use a high-altitude weather balloon to drop objects
Balloon: You’ll need a balloon to fly. The size and type of balloon will depend on what you want to accomplish. For your first flight a latex weather balloon is the best place to start. This type of balloon will go up, pop, and come down within a few hours if all goes to plan. There are a lot of suppliers and brands. I haven’t tried them all yet but I suggest Scientific Sales, as their balloons have been very good performers on all of our flights. The next step to finding your balloon is determining the size for your flight. Balloons are measured by their weight when they are empty; the larger the number, the more gas it will hold, and the more payload you can attach. Here are a couple of handy charts for determining which size balloon is right for your flight.
Lifting gas: There’s generally two choices here, helium or hydrogen. Helium is expensive, non-renewable, and is slightly denser, providing less lift. However it is also inert, and much safer to handle than hydrogen. I highly suggest going with helium for your first flights while you get a hang of things. As you get more advanced hydrogen becomes an option, but is flammable. To see just how flammable it is, watch this video. To determine how much lifting gas you need, this chart will come in handy again.
Filler: Now you need a way to get your lifting gas into your balloon. You’ll have a large cylinder of lifting gas that you will likely have to rent. Some shops will rent you a regulator, while others will not, so you may have to purchase one that will fit your cylinder. I was able to build a simple filler using some brass fittings, hose, and PVC pipe from my local hardware store. You’ll want at least 2 feet of 1″ PVC pipe that will slide inside the neck of the balloon to fill it. About 6 feet of flexible hosing, I chose 1″ OD 3/4″ ID vinyl braided tubing, with 3/4″ plastic barb connectors and 2x 2″ hose clamps to keep it all gas tight. You’ll need some adapters from the barb to your PVC pipe. Lastly, a little PVC glue and teflon tape will seal up your joints.
String: You’ll need string to connect your payload to your balloon. Simple nylon string with a tensile strength of 30 pounds is very well suited for this and readily available from a hardware store. A bright color will make your payload easier to spot on the ground. I have found that using fishing lure spinners work very well for quickly connecting and disconnecting your payload. I suggest using super glue on all your knots to keep them from coming undone.
Packaging: You’ll need a box to put all of your electronics in. A simple foam box provides insulation from the extreme temperatures experienced during a flight as well as padding when your payload lands. I suggest using a brightly colored tape to seal up the box and keep electronics from falling out, and make the payload more visible for recovery. Additionally zip-ties offer a secure connecting between your payload box and string connecting the payload to the balloon, as well as closing the neck of the balloon once it is filled.
Tracker: You will need a way to track your balloon in flight so you can recovery your electronics. Per FCC regulations cell phones are out, additionally they do not transmit data at all above 20,000 feet. The ideal solution is an APRS transmitter, like Tracksoar, as they work well at extreme altitudes, are legal to fly, and use a very well-established network to report data to the Internet so you don’t need much equipment on the ground. As a backup I suggest using a SPOT3 tracker in addition to APRS. These devices use a satellite network to get your data to the internet where no other communication methods are available.
Launch and Landing site: Per FAA regulations, you may not launch near an active airport, or where your balloon will be over a densely populated area. This will limit your launch and landing sites. With a suitable launch site selected use a flight path predictor like this one to make sure your balloon will not fly over restricted airspace or land in a remote or inaccessible location. Flight predictors are not perfect, so run a lot of predictions, especially as the launch gets closer, and be prepared to adjust your launch site to make sure you land in an acceptable location. Avoid launch and landing sites near telephone or power lines, trees and water.
Ground crew: You’ll need a minimum of two people, but more people can come in handy and make the experience more exiting. If you chose to go with an APRS tracker you will need at least one licensed amateur radio operator in your crew for the duration of the flight. Additionally you will need a car or cars capable of carrying your crew and equipment as well as potentially getting to a remote landing site.
Parachute: These are generally considered to be the best parachutes available and include a handy sizing chart. The ideal speed for landing is a descent rate of 16 feet per second.
Free lift scale. To make sure your balloon has enough lift to fly your payload and ascend quickly enough to burst you’ll want about 2 pounds of free lift to get the ideal 1000 feet per minute ascent rate. A luggage scale is a low cost, simple solution to measure this.
With the necessities out of the way we can look at the fun part, the optional payload items.
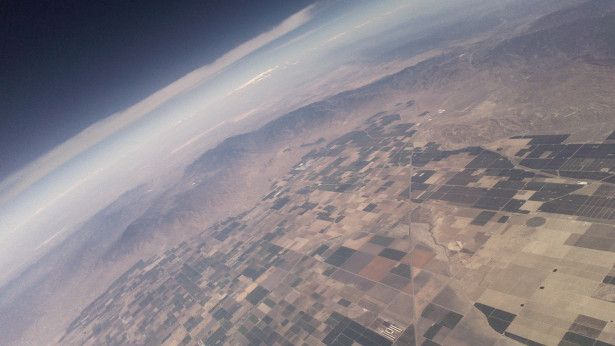
- Camera: Ideally your camera will be weather proof and shock-resistant. GoPros are a very popular option, they offer a watertight case, hi-def video, and time lapse photos. The stock batteries may not last a full flight so an add on battery is suggested, and even though it’s in a watertight case, insulating it will ensure the batteries last. If you want higher quality some of the Canon cameras can be modified with Canon Hackers Development Kit to shoot time lapse and video at custom intervals, a good example script can be found here. Lastly is my personal favorite, the ION SnapCam Lite. It’s lightweight, compact, shoots time lapse and is decent quality. Its weather resistant and as long as it will insulate it will last the full flight.
- Scientific experiment: Besides cameras scientific experiments are the most fun. Some examples of experiments are: tracking temperature, pressure, and humidity through the atmospheric layers (all these sensors are included in the Tracksoar), radiological (ie geiger counter to measure radiation), light frequency to measure the change in UV exposure, CO2 PPM to measure CO2 concentration, a marshmallow to show the effect of low pressure (placed in front of the camera) and many more.
- Mascot: To help garner extra attention maybe fly a mascot in front of your camera to capture images of it at high altitude
Now that you have your payload assembled, launch site picked, and predictions run, its time to launch. Plan your launch for early in the morning so you get good day lit photos and have plenty of daylight to track down your payload if it lands in a remote location. Depending how far you have to drive to your launch site this can easily be an all day affair.
The average flight is about 3 hours long, 2 1/4 hours up, and 3/4 hour back to earth. This time will vary by balloon and payload size but is a reasonable rule of thumb.
For More Details: A Tutorial For Launching Your First Balloon