
Experimental introduction:
In many cases SD capacity is not enough. Luckily Raspberry Pi can easily be connected to external USB hard drives. Follow the steps in this section, and you will soon have a lot more storage connected to your Raspberry Pi.
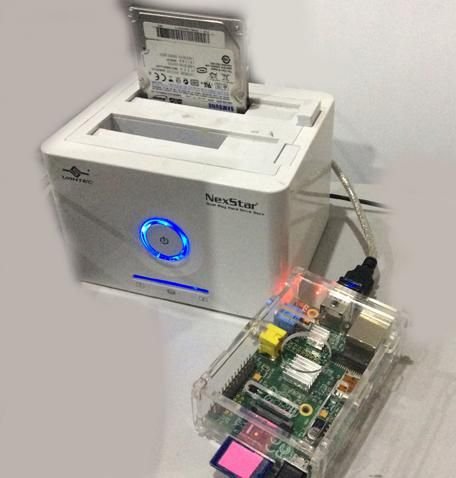
Step 1: Experimental hardware devices
Experimental hardware devices:
This experiment requires the following hardware:
- Raspberry Pi board.
- USB External hard drive.
This experiment requires the following software:
- tightvncserver
It is recommended that any USB external hard drive that you choose should be powered by an external power supply rather being powered by the USB port. In the past I have had bad experiences trying to power USB external hard drives from the Raspberry Pi USB port. Sometimes the Raspberry Pi was not even able to find the hard drive.
Experiments Wiring:
- Please plug the external hard drive into the Raspberry Pi USB connector.

Step 2: Make sure that your Raspberry Pi software is up to date
Execute the
following commands to make sure your Raspberry Pi has the latest software.
$sudo apt-get update

$sudo apt-get upgrade
This will update all the installed software on your Raspberry Pi.
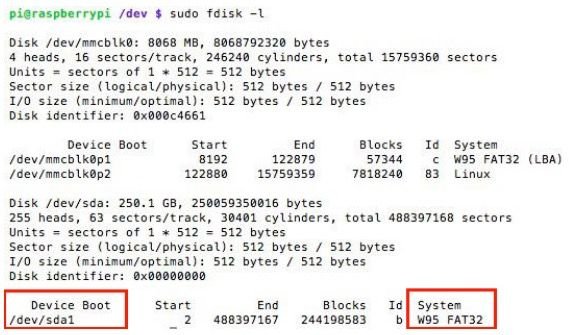
Step 3: Verify that your Raspberry Pi is able to recognize the hard drive.
Execute the following command to confirm your
Raspberry Pi recognizes the hard drive that you plugged in.
$sudo fdisk -l
If you do not see it, you can fix it by following these procedures:
1. Reboot the Raspberry Pi
2. Make sure you are using an external power supply for your USB hard drive as the Raspberry PI USB port will probably not have enough power for it.
3. Do not use a USB Hub plug the hard drive directly into the Raspberry Pi.
4. Verify that your Hard drive, USB interface is using USB 2.0. My experience is that Raspberry Pi is unable to use USB 3.0 interfaces.
Step 4: NTFS hard drive compatibility software driver installation
Execute
the following command to install this software.
$ sudo apt-get install ntfs-3g
Step 5: Specify the location path that you want to mount the USB hard drive
Execute the following command to create the path you
want to use to mount the hard drive. The name “usbhdd” is for example, it can be whatever you like following Linux naming standards.
$ sudo mkdir /media/usbhdd
Execute the following command to set up the user rights for your hard drive path.
$ sudo chown pi:pi /media/usbhdd
Execute the following command to mount the hard drive so that you can use it. Specify // media / usbhdd path, using the name that you set up previously.
$ sudo mount -t vfat -o uid=pi,gid=pi /dev/sda1
/media/usbhdd
If an error message appears as in figure 5-3 this means there is a problem is the file format, make sure your hard drive is using the FAT32 format. If you want to format the hard drive in the Raspberry Pi, you can see the next chapter “Format HDD” for instructions. You can also plug the external hard drive into your favorite Windows PC and format it with the FAT32 format as well.
For more detail: Using a USB external hard drive with your Raspberry Pi