
Contents
- 1 Freeing up UART pins on Raspberry Pi GPIO
- 2 Using Python
- 2.1 Installing pySerial
- 2.2 Example Program
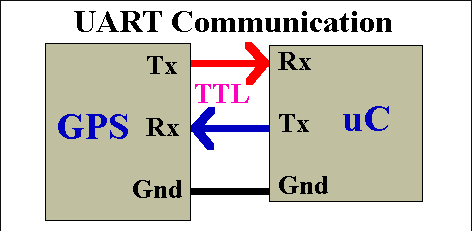
UART stands for Universal Asynchronous Transmitter / Receiver, a popular serial communication interface which provides full duplex communication between two devices. The term universal means that transmission speed and data format are configurable. As it is asynchronous it doesn’t need to send clock signal along with the data signals. UART uses two data lines for sending (Tx) and receiving (Rx) data. The ground of both devices should be made common.
Freeing up UART pins on Raspberry Pi GPIO
By default Raspberry Pi’s UART pins (GPIO 14 and 15) are configured as a serial console. It outputs all the kernel data during boot. We need to free up these pins for our use. For this launch terminal,
- First make a backup of the file containing kernel parameters cmdline.txt as cmdline_bp.txt
sudo cp /boot/cmdline.txt /boot/cmdline_bp.txt
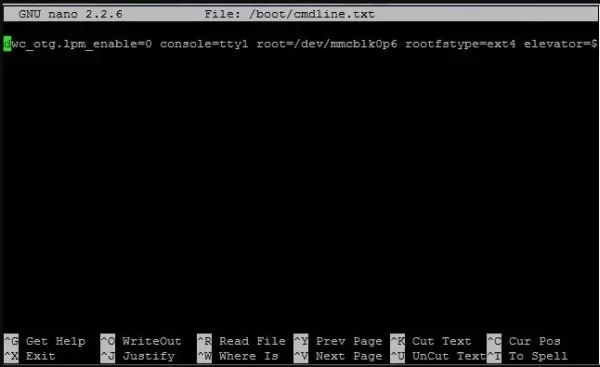
- Edit the file cmdline.txt by removing the parameters containing ‘ttyAMA0‘. ie. ‘console=ttyAMA0,115200’ and ‘kgdboc=ttyAMA0,115200’.
sudo nano /boot/cmdline.txt
- The remaining file looks like,
dwc_otg.lpm_enable=0 console=tty1 root=/dev/mmcblk0p6 rootfstype=ext4
elevator=deadline rootwait
- Save the file, Ctrl + O
- Close the editor, Ctrl + X
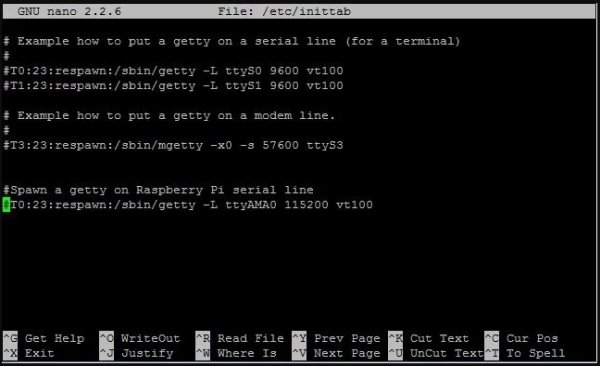
- Now edit inittab, file containing serial console data
sudo nano /etc/inittab
- Comment out the line ‘2:23:respawn:/sbin/getty -L ttyAMA0 115200 vt100’
#2:23:respawn:/sbin/getty -L ttyAMA0 115200 vt100
- Save the file, Ctrl + O
- Close the editor, Ctrl + X
- Reboot Raspberry Pi by using the command, sudo reboot.
Now you have freed the UART pins.
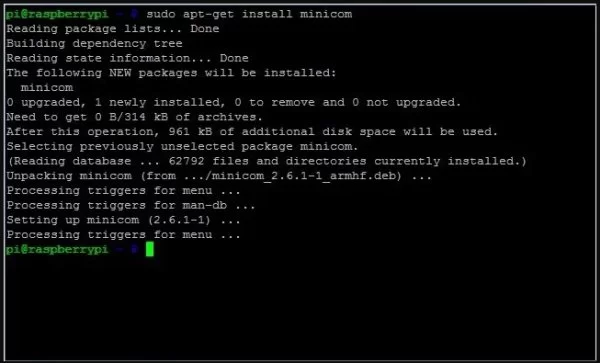
You can verify whether the Pi is sending and receiving UART data by installing the tool Minicom.
- Short the Rx and Tx pins on Pi (GPIO 14 and 15), such that it will receive the same data as it transmits.
- Install minicom,
sudo apt-get install minicom
- And launching it,
minicom -b 115200 -o -D /dev/ttyAMA0
Where,
- 115200 is the baud rate
- ttyAMA0 is the port
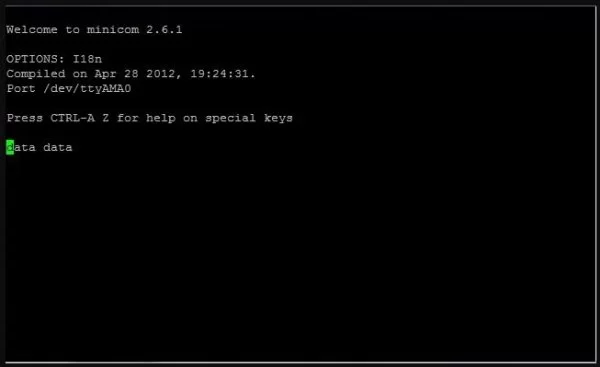
- Verify whether the pi is receiving the same data as it transmits.
Using Python
In this section we will see, How to access UART using Python.
Installing pySerial
Pyserial provides backend for serial communication using python. The module named ‘serial’ selects appropriate backend automatically. To install pySerial, by using following command.
sudo apt-get install python-serial
Now the module serial can be imported to python by using ‘import serial‘.
Example Program
The following python program reads 10 characters from the serial port and sends back it.
import serial
ser = serial.Serial (“/dev/ttyAMA0”) #Open named port
ser.baudrate = 9600 #Set baud rate to 9600
data = ser.read(10) #Read ten characters from serial port to data
ser.write(data) #Send back the received data
ser.close()