Raspberry Pi is an ARM cortex based popular development board designed for Electronic Engineers and Hobbyists. With the processing speed and memory, Raspberry Pi can be used for performing different functions at a time, like a normal PC, and hence it is called Mini Computer in your palm. We have created a series of Raspberry Pi tutorials, to start with Raspberry Pi from scratch and then create high level IoT projects using Raspberry Pi.

This time we are here with our next interesting project which is Visitors Monitoring System with Image capture functionality. Here we are interfacing Pi camera with Raspberry Pi to capture the image of every visitor which has entered through the Gate or door. In this project, whenever any person is arrived at the Gate, he has to press a button to open the Gate, and as soon as he/she press the button, his/her picture will be captured and saved in the system with the Date and time of the entry. This can be very useful for security and surveillance purpose.
This system is very useful in offices or factories where visitor entry record is maintained for visitors and attendance record is maintained for employees. This Monitoring system will digitize and automate the whole visitor entries and attendances, and there will be no need to maintain them manually. This system can be either operated by the person himself or there can be operator for pressing the button for very visitor. This is a good project for getting started with Pi camera and interface it with Raspberry Pi.
Components Required:
- Raspberry Pi
- Pi camera
- 16×2 LCD
- DC Motor
- IC L293D
- Buzzer
- LED
- Bread Board
- Resistor (1k,10k)
- Capacitor (100nF)
- Push Button
- Connecting wires
- 10k Pot
- Power supply
Working Explanation:
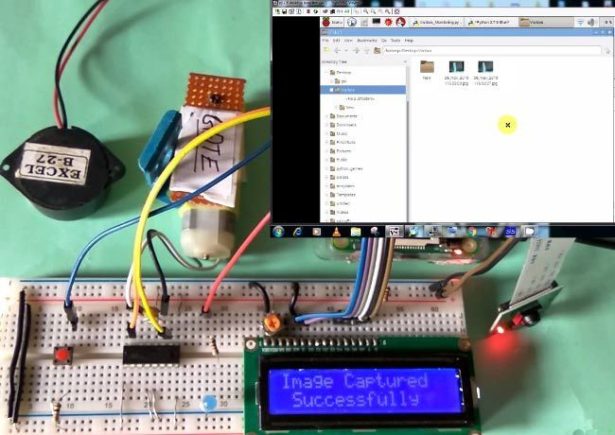
Working of this Raspberry Pi Monitoring System is simple. In this, a Pi camera is used to capture the images of visitors, when a push button is pressed or triggered. A DC motor is used as a gate. Whenever anyone wants to enter in the place then he/she needs to push the button. After pushing the button, Raspberry Pi sends command to Pi Camera to click the picture and save it. After it, the gate is opened for a while and then gets closed again. The buzzer is used to generate sound when button pressed and LED is used for indicating that Raspberry Pi is ready to accept Push Button press, means when LED is ON, system is ready for operation.
Here the pictures of visitors are saved in Raspberry Pi with the name which itself contains the time and date of entry. Means there is no need to save date and time separately at some other place as we have assigned the time and date as the name of the captured picture, see the image below. We have here taken the image of a box as visitor, check its full demonstration in the Video at the end.
Circuit Explanation:
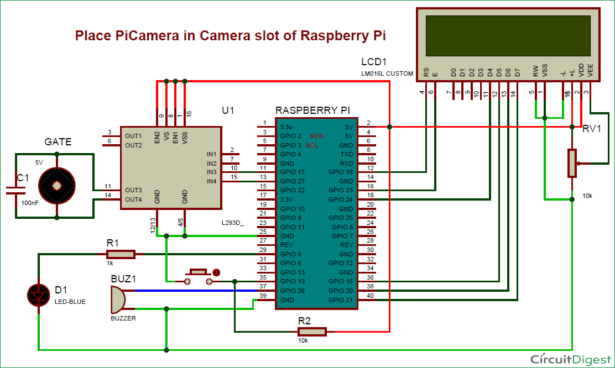
Circuit of this Raspberry Pi Visitor Surveillance System is very simple. Here a Liquid Crystal Display (LCD) is used for displaying Time/Date of visitor entry and some other messages. LCD is connected to Raspberry Pi in 4-bit mode. Pins of LCD namely RS, EN, D4, D5, D6, and D7 are connected to Raspberry Pi GPIO pin number 18, 23, 24, 16, 20 and 21. Pi camera module is connected at camera slot of the Raspberry Pi. A buzzer is connected to GPIO pin 26 of Raspberry Pi for indication purpose. LED is connected to GPIO pin 5 through a 1k resistor and a push button is connected to GPIO pin 19 with respect to ground, to trigger the camera and open the Gate. DC motor (as Gate) is connected with Raspberry Pi GPIO pin 17 and 27 through Motor Driver IC (L293D). Rest of connections are shown in circuit diagram.
For more detail: Visitor Monitoring System with Raspberry Pi and Pi Camera


