
Use mobile phone to config Walabot and define actions by sending trigger to IFTTT or turn on relays.Walabot can apply to many applications.

But to adjust Walabot parameters ( Arena, angle and threshold value to detect ) is quite a tricky part.Walabot Trigger can help you adjust Walabot parameters easily using Android phone. Users can define actions when checking condition is met. For example, detect new object, detect missing object, detect increase or decrease in total energy. Walabot Trigger can program to activate IFTTT or control two solid state relays which connected to Raspberry Pi.
Walabot Trigger Specifications
- Setting the radius, theta, phi variable and resolution for each values.
- Setting threshold value.
- Setting threshold for energy value.
- Detect object missing, new object detect.
- Checking total energy increasing/decreasing.
- Send event to IFTTT via webhooks.
- Turn ON/OFF two solid state relays.
- Setting Walabot for one time, repeat or disable checking (For direct control relay).
How It Works
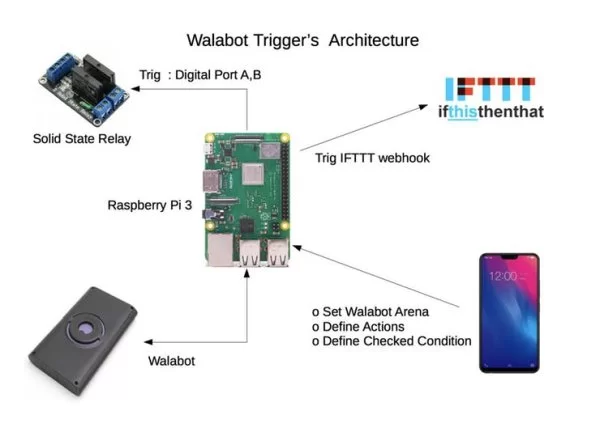
From above diagram, mobile device (iOS or Android ) can be used to set parameters (arena, theta, phi, MTI, threshold and energy threshold) for Walabot. Users can set checking condition (detail later in SW part) and config for Raspberry Pi's address and port. Define actions when condition is met. After all parameters are set, mobile phone will send all configuration data to Raspberry Pi via Socket communication. Raspberry Pi will start Walabot and check for any objects detection or find summation of energy. If condition is met, Raspberry Pi will trigger actions by sending event to IFTTT server or turn on /off relays.
Software
There are two parts for software in this project:
1) Software on mobile devices using Ionic framework.
Ionic framework is cross platform development which means we can run software on both Android and IiOS (you need to have registered key for create package on IOS). Source code can be download from https://github.com/wtos03/Walabot. After download source code, install ionic framework by running command:
$ sudo npm install -g cordova
Install web-socket ng
$ sudo npm install ng-socket-io –save
Add development platform for Android
$ ionic cordova platform add android
To run on web browser
ionic serve
To run on Android device, connect Android device and run
$ ionic cordova run android –device
For more information on Ionic framework, go to https://ionicframework.com
Walabot for Android has divided into three tabs
- Config tab (first tab when program start)
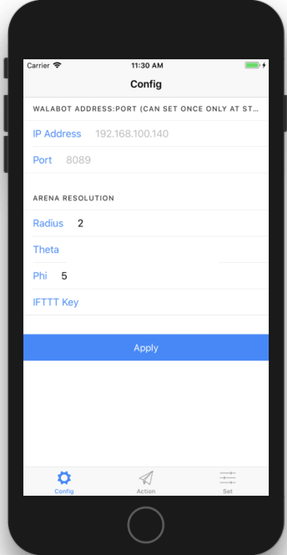
To config IP address and port of Raspberry Pi. These values can set only once. When you switch to other pages, these fields will disable and cannot modified until restart program again. To avoid open many socket communication in program.
Config for radius, theta and phi resolution use in Walabot.
Config for IFTTT key. You will get this key when you apply for IFTTT account. Refer to IFTTT website for how to set up.
- Action tab
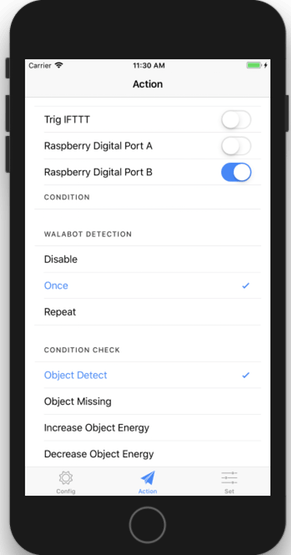
Action tab define the actions and conditions for Walabot.
- Enable/disable send event to IFTTT.
- Turn on/off relay 1.
- Turn on/off relay 2.
- Disable the Walabot. This option is used when you want to control relay directly without Walabot checking.
- Once. Ask Walabot to check until the condition is met. Walabot will terminate. But program still waiting for next config from mobile phone.
- Repeat. Ask Walabot to continuous checking whether condition is met or not.
- Object detect. Trig actions when new object detect.
- Object Missing. Trig actions when object missing.
- Increase object energy. Use object energy instead of object. Trig whenever object's energy above the energy threshold. Profile will be changed from PROF_TRACKER to PROF_SENSOR.
- Decrease object energy. Trig whenever object's energy below the energy threshold.
Notes
For object missing and decrease object energy, these functions are not working properly at this moments because Walabot always show targets and energy = 0 at the first scan. We are under investigate how to solve these problems.
- Set tab
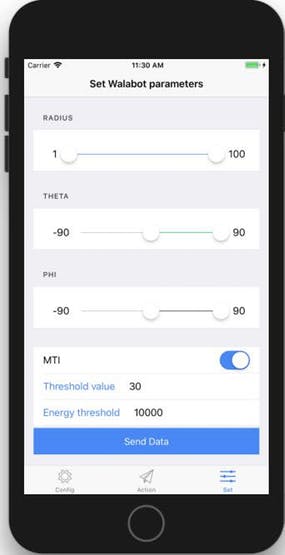
This tab set the arena, angle, MTI mode, threshold value, and energy threshold value for checking with conditions in action tab. After all settings done, press “Send Data” to send config data (JSON format) to Raspberry Pi via network socket.
2) Software on Raspberry Pi using Python
There are 3 main modules and one config file for this project
- walabotTrigger.py This module control the socket communication and decode JSON data and save data in config file config.ini
- walabotIF.py This module control the Walbot scanning and actions relate to Action tab in Android program.
- relay.py This module control GPIO for Turn On/Off Relays.
- config.ini Config files to save all Walabot Trigger configuration
Prior running the program we need to install these Python modules
$ sudo pip install Rpi
sudp pip install flask
sudo pip install flask_socketio
sudo pip install requests
Hardware
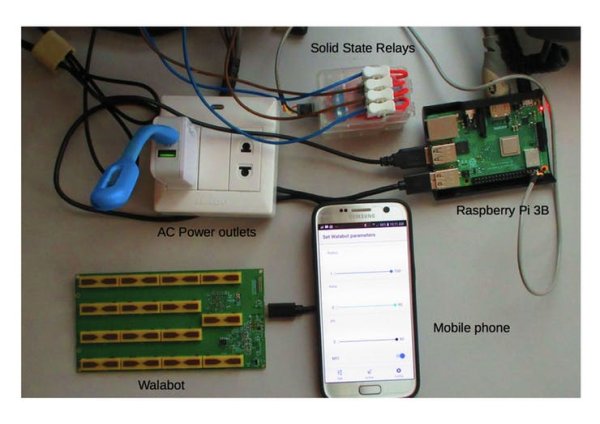
Hardware for this project very simple and easy to build. We just need to connect Raspberry Pi GPIO pins directly to solid state relays using +5V supply as shown in hardware diagram. Walabot just connects directly to USB port and install driver on Raspberry Pi using command
$ sudo dpkg –i walabot-maker.deb
Applications
We can apply Walabot Trigger to many applications. One example in this demo is to turn on the desk lamp whenever you put Notebook or other stuffs on the table. Walabot is installed under the table, when it detect objects above. It will trig the event and do whatever actions we pre-programmed in Walabot Trigger application.
Read More Detail :