
Walabot Touchpad A low profile solution that can turn any surface into a touchpad for your laptop.Imagine using a book, a table, or a wall as a touchpad. Combined with projector technology, you can replicate touch screens on any surface.

This project aims to bring this utility and ease of use by through simple socket protocols and Walabot, a consumer-level 3D imaging device.
As I wanted this solution to be both practical in everyday use and universally accessible, so I opted for the least hardware-intensive setup. To balance ease of setup with imaging accuracy, I implemented a basic configuration loop that runs each time the Walabot starts.
This tutorial covers the setup procedure for the Raspberry Pi and the cursor control on a host computer.
How Does It Work?
The project relies on a Raspberry Pi 3 client that takes readings from a Walabot Creator sensor (thanks Walabot!), and a host machine which in this case is my laptop.
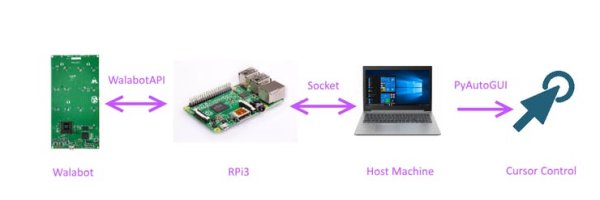
The general user flow is as follows:
- Raspberry Pi sends trigger signal to the Walabot
- Walabot detects a target and locates target
- Raspberry Pi retrieves this data, determines the user action, and sends it to the socket host through the local WiFi connection
- Host machine receives the command and conducts cursor control through PyAutoGUI
Demonstration
In Progress
Setting Up the Pi
First, we need to set up the pi so that it's usable and has all the necessary libraries installed.
- If your Pi isn't preloaded with an OS, you can follow this tutorial to install Raspbian with NOOBS. Raspbian is the official OS of the Raspberry Pi and is by far the most popular.
- If you don't have a monitor and want to access your pi headless, I'd recommend you setting up VNC or SSH and adding a shutdown button to the Pi.
- We won't be needing IO so you can leave the header pins unsoldered.
- Insert the SD card into the Pi, and connect it to display and power. The Pi should boot up.
- Connect to the internet, and open Chromium.
- Navigate to the Walabot download page
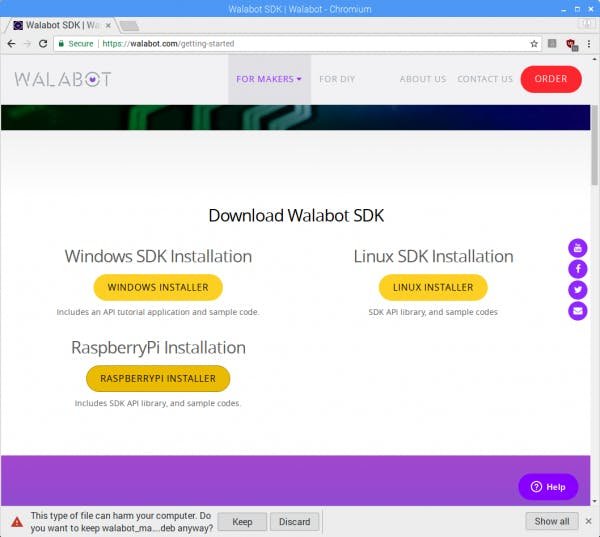
- Download the Raspberrypi Installer and click keep to confirm the download
- Go back to the desktop, open the terminal and type
sudo apt-get update
cd Downloads
sudo dpkg –i walabot_maker_1.0.34_raspberry_arm32.deb
In summary, the commands updates the system's package lists, and installs the WalabotSDK
- After going through a few agreement prompts, you should have the Walabot SDK installed. Then type
sudo apt-get dist-upgrade
sudo reboot
This updates the installed packages and reboots the RPi.
For greater speed, I'd recommend disabling the desktop GUI as shown here.
Walabot Interfacing
Now this is where the Walabot comes in. It's a 3D microwave imaging sensor that can do a whack load of things, from breathing sensing, seeing through walls, and detecting multiple targets. You can check em out on their youtube channel!
The functionality that's really useful for this project is the RF tridimensional sensing, which can detect the x, y, and x coordinates of a target. Also, its dynamic filtering capability which removes static signals can be combined with it's filtering of fixed reflectors, enabling you to track an object accurately even through other materials.
However one caveat of using such a powerful device is it's high power consumption. The Walabot uses 400-900 mA, which is too high for the raspberry's default USB output. This can be solved by navigating to /boot/config.txt and adding this line: max_usb_current=1.That'll increase the max current to 1200 mA.
Target Detection
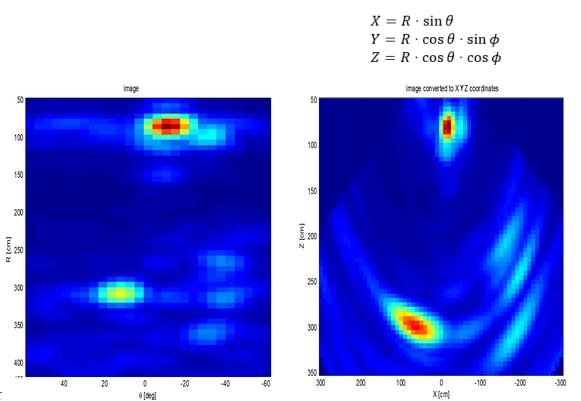
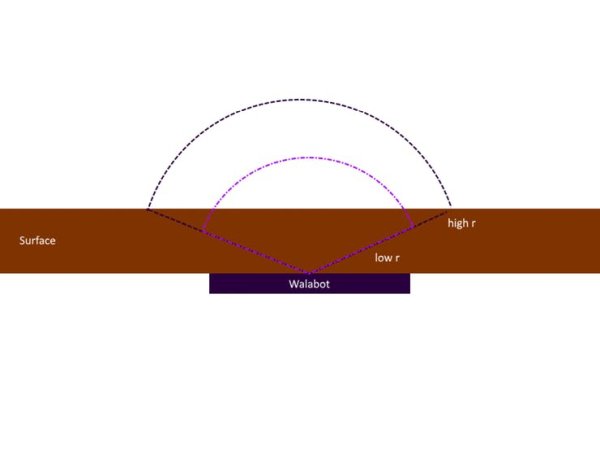
Making sure the Walabot detects only my finger when I want it to is key, or else my computer may randomly move the cursor, possibly even out of bounds. For my project, I interfaced with the Walabot API using the GetSensorTargets() function and turned MTI(Moving Target Identification) mode off to prevent the filtering of the finger signal over longer periods of time. I set the radius of detection (r) in my project to a maximum of 10 cm to set the arena to the area immediately above the Walabot. This changes based on the thickness of the material.
I tried setting the arena dimensions in x, y, and z values, but that only worked best on the short range profile which was only available on the Walabot developer edition. When I tried this on the default scanner mode, I got nearly zero target detection, probably as the scanner mode reads radially instead of through Cartesian coordinates. Thus I have set a standard scanner profile, set the arena radially, and convert the radial dimensions to Cartesian coordinates.
The target objects have x, y, z, and amplitude parameters, of which I only used the x and y values. As the y axis is along the length of the Walabot, I translated this to the x axis on the screen when the Walabot is placed horizontally like a touchpad. When I compare the coordinates to the arena bounds, I can find the relative location of the target to the arena and translate that to the relative location of the cursor on the host screen.
However, since my arena was initialized based on r, theta and phi values, I had to manually find the usable arena bounds through measurement of the lowest and highest values of the x and y coordinates. I then automated this at setup so that the program can find the bounds when the user slides their finger along the x axis and y axis. Even though there is formulae to convert polar coordinates to Cartesian, the set bounds differed from the actual measurable arena as it can't take into account the interference of another surface on the registered area.
To determine if a user wants to move the cursor, right click or left click, I made use of the multiple target detection features of the Walabot. Movement would be 1 point of contact, a right click would be 2 points of contact and a left click would be 3. It seems solid, time to test it out.
Argh! This turned out to be much more difficult to set up. I initially planned for the code to click the respective buttons on the mouse when the Walabot detectes two or more targets, but at the very moment in which the fingers enter the field of view, the Walabot detects one target, thus moving the mouse before clicking.
Read More Detail : Walabot Touchpad