
| Hardware components: | ||||||
 |
|
× | 1 | |||
 |
|
× | 1 | |||
|
× | 1 | ||||
|
× | 1 | ||||
| Software apps and online services: | ||||||
 |
|
|||||
STORY
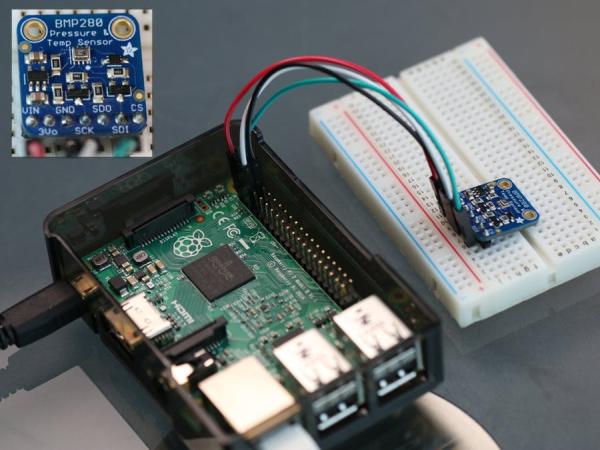
In this project we will use the Adafruit Starter Pack for Windows 10 IoT Core on Raspberry Pi 2 kit components to create a project that uses a barometric sensor to read the temperature, pressure and altitude.
NOTE: there are two versions of the kit, one includes the BMP280 sensor the other the BME280. If you have the BME280 you will want to go to the Weather Station v2 project https://www.hackster.io/windows-iot/weather-station-v-2-0
Hardware
Connect the Raspberry Pi2 to the breadboard and the other components as per the Fritzing diagram in the “Schematics” section below.
Software
You can download the code starting project from https://github.com/ms-iot/adafruitsample and we will lead you through the addition of the code needed to talk to the web service and get your pin on the map. What map?
Open up “Lesson_203\StartSolution\lesson_203.sln“ and open the mainpage.xaml.cs file.
We have filled in a few methods as a starting point for you in this solution. If you want to jump ahead you can find a solution with all the code completed at: “Lesson_203\FullSolution\lesson_203.sln”
MainPage.xaml.cs
Open the MainPage.xaml.cs file.
Add a reference to the barometric sensor (BMP280) class.
 public sealed partial class MainPage : Page
    {
        //A class which wraps the barometric sensor
        BMP280 BMP280;
Now we add code in the OnNavigatedTo method which will create a new BMP280 object for the barometric sensor and initialize the object.
If you do not want to add a pin onto the map, remove MakePinWebAPICall();
 //This method will be called by the application framework when the page is first loaded
        protected override async void OnNavigatedTo(NavigationEventArgs navArgs)
        {
Debug.WriteLine("MainPage::OnNavigatedTo");
            MakePinWebAPICall();
            try
            {
                //Create a new object for our barometric sensor class                BMP280 = new BMP280();
                //Initialize the sensor
                await BMP280.Initialize();
Next we add code to do the following:
- Create variables to store the temperature, pressure and altitude. Set them to 0.
- Create a variable for the pressure at sea level. The default value is 1013.25 hPa.
- Read the temperature, pressure and altitude 10 times and output the values to the debug console.
 //Create variables to store the sensor data: temperature, pressure and altitude.
                //Initialize them to 0.
                float temp = 0;
                float pressure = 0;
                float altitude = 0;
                //Create a constant for pressure at sea level.
                //This is based on your local sea level pressure (Unit: Hectopascal)
                const float seaLevelPressure = 1013.25f;
                //Read 10 samples of the data
                for(int i = 0; i < 10; i++)
                {
                    temp = await BMP280.ReadTemperature();
                    pressure = await BMP280.ReadPreasure();
                    altitude = await BMP280.ReadAltitude(seaLevelPressure);
                    //Write the values to your debug console
                    Debug.WriteLine("Temperature: " + temp.ToString() + " deg C");
                    Debug.WriteLine("Pressure: " + pressure.ToString() + " Pa");
                    Debug.WriteLine("Altitude: " + altitude.ToString() + " m");
                }
                          }
            catch (Exception ex)
            {
                Debug.WriteLine(ex.Message);
            }
BMP280.cs
Open the BMP280.cs file.
The first part of the code is making a list of the addresses of the different registers in the BMP280. These values can be found in the BMP280 datasheet.
In the BMP280 class, add the following after the enum for register addresses.
 //String for the friendly name of the I2C bus
         const string I2CControllerName = "I2C1";
        //Create an I2C device
        private I2cDevice bmp280 = null;
        //Create new calibration data for the sensor
        BMP280_CalibrationData CalibrationData;
        //Variable to check if device is initialized
        bool init = false;
Next add the following code in the Initialize function to:
 //Method to initialize the BMP280 sensor
        public async Task Initialize()
        {
            Debug.WriteLine("BMP280::Initialize");
            try
            {
                //Instantiate the I2CConnectionSettings using the device address of the BMP280
                I2cConnectionSettings settings = new I2cConnectionSettings(BMP280_Address);
                //Set the I2C bus speed of connection to fast mode                settings.BusSpeed = I2cBusSpeed.FastMode;
                //Use the I2CBus device selector to create an advanced query syntax string
                string aqs = I2cDevice.GetDeviceSelector(I2CControllerName);                //Use the Windows.Devices.Enumeration.DeviceInformation class to create a collection using the advanced query syntax string
                DeviceInformationCollection dis = await DeviceInformation.FindAllAsync(aqs);
                //Instantiate the the BMP280 I2C device using the device id of the I2CBus and the I2CConnectionSettings
                bmp280 = await I2cDevice.FromIdAsync(dis[0].Id, settings);
                //Check if device was found
                if (bmp280 == null)
                {
                    Debug.WriteLine("Device not found");
                }
            }
            catch (Exception e)
            {
                Debug.WriteLine("Exception: " + e.Message + "\n" + e.StackTrace);
                throw;
            }
        }
Add the following code in the Begin function to:
 private async Task Begin()
        {
            Debug.WriteLine("BMP280::Begin");
            byte[] WriteBuffer = new byte[] { (byte)eRegisters.BMP280_REGISTER_CHIPID };
            byte[] ReadBuffer = new byte[] { 0xFF };
            //Read the device signature
            bmp280.WriteRead(WriteBuffer, ReadBuffer);
            Debug.WriteLine("BMP280 Signature: " + ReadBuffer[0].ToString());            //Verify the device signature
            if (ReadBuffer[0] != BMP280_Signature)
            {
                Debug.WriteLine("BMP280::Begin Signature Mismatch.");
                return;
            }
            //Set the initalize variable to true
            init = true;
            //Read the coefficients table
            CalibrationData = await ReadCoefficeints();
            //Write control register
            await WriteControlRegister();
            //Write humidity control register
            await WriteControlRegisterHumidity();
        }
Add the following code to the next 2 functions to write to the control registers.
 //Method to write 0x03 to the humidity control register
        private async Task WriteControlRegisterHumidity()
        {
            byte[] WriteBuffer = new byte[] { (byte)eRegisters.BMP280_REGISTER_CONTROLHUMID, 0x03 };
            bmp280.Write(WriteBuffer);
            await Task.Delay(1);
            return;
        }
        //Method to write 0x3F to the control register
        private async Task WriteControlRegister()
        {
            byte[] WriteBuffer = new byte[] { (byte)eRegisters.BMP280_REGISTER_CONTROL, 0x3F };
            bmp280.Write(WriteBuffer);
            await Task.Delay(1);
            return;
        }
Add the following code to the ReadUInt16_LittleEndian function to:
 //Method to read a 16-bit value from a register and return it in little endian format
        private UInt16 ReadUInt16_LittleEndian(byte register)
        {
            UInt16 value = 0;
            byte[] writeBuffer = new byte[] { 0x00 };
            byte[] readBuffer = new byte[] { 0x00, 0x00 };
            writeBuffer[0] = register;
            bmp280.WriteRead(writeBuffer, readBuffer);
            int h = readBuffer[1] << 8;
            int l = readBuffer[0];
            value = (UInt16)(h + l);
            return value;
        }
Add the following code to the ReadByte function to read 8-bit data from a register.
 //Method to read an 8-bit value from a register
        private byte ReadByte(byte register)
        {
            byte value = 0;
            byte[] writeBuffer = new byte[] { 0x00 };
            byte[] readBuffer = new byte[] { 0x00 };
            writeBuffer[0] = register;
            bmp280.WriteRead(writeBuffer, readBuffer);
            value = readBuffer[0];
            return value;
        }
The next 3 functions are done for you. The information required to write these functions can be found in the datasheet.
ReadCoefficeints: This is the function where all the calibration data is read from the register addresses.
BMP280_compensate_T_double: In this function, the temperature in ºC is calculated using the compensation formula in the BMP280 datasheet.
BMP280_compensate_P_Int64: In this function, the pressure in Pa is calculated using the compensation formula in the BMP280 datasheet.
Add the following code to complete the ReadTemperature function.
 public async Task<float> ReadTemperature()
        {
            //Make sure the I2C device is initialized
            if (!init) await Begin();
            //Read the MSB, LSB and bits 7:4 (XLSB) of the temperature from the BMP280 registers
            byte tmsb = ReadByte((byte)eRegisters.BMP280_REGISTER_TEMPDATA_MSB);
            byte tlsb = ReadByte((byte)eRegisters.BMP280_REGISTER_TEMPDATA_LSB);
            byte txlsb = ReadByte((byte)eRegisters.BMP280_REGISTER_TEMPDATA_XLSB); // bits 7:4
            //Combine the values into a 32-bit integer
            Int32 t = (tmsb << 12) + (tlsb << 4) + (txlsb >> 4);
            //Convert the raw value to the temperature in degC
            double temp = BMP280_compensate_T_double(t);
            //Return the temperature as a float value
            return (float)temp;
        }
Repeat the same steps to complete the ReadPressure function.
Schematics of Weather Station Measure temperature, altitude and pressure in the room

public async Task<float> ReadPreasure()
        {
            //Make sure the I2C device is initialized
            if (!init) await Begin();
            //Read the temperature first to load the t_fine value for compensation
            if (t_fine == Int32.MinValue)
            {
                               await ReadTemperature();
            }
            //Read the MSB, LSB and bits 7:4 (XLSB) of the pressure from the BMP280 registers
            byte tmsb = ReadByte((byte)eRegisters.BMP280_REGISTER_PRESSUREDATA_MSB);
            byte tlsb = ReadByte((byte)eRegisters.BMP280_REGISTER_PRESSUREDATA_LSB);
            byte txlsb = ReadByte((byte)eRegisters.BMP280_REGISTER_PRESSUREDATA_XLSB); // bits 7:4
            //Combine the values into a 32-bit integer
            Int32 t = (tmsb << 12) + (tlsb << 4) + (txlsb >> 4);
            //Convert the raw value to the pressure in Pa
            Int64 pres = BMP280_compensate_P_Int64(t);
            //Return the temperature as a float value
            return ((float)pres) / 256;
        }
Finally complete the ReadAltitude function.
Read More: Weather Station Measure temperature, altitude and pressure in the room