Story
Calin Crisan's excellent motionEyeOS is a complete Linux distribution that turns the Raspberry Pi Zero into a highly functional wireless webcam. He provides detailed instructions for installation and configuration; some are referenced here. These instructions show how to use a gadget I designed called the Solar Pi Platter with a Pi Zero W to extend the capability of motionEyeOS with battery backup, pan/tilt servos and a status information display.
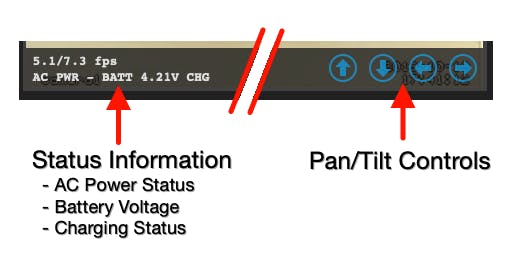
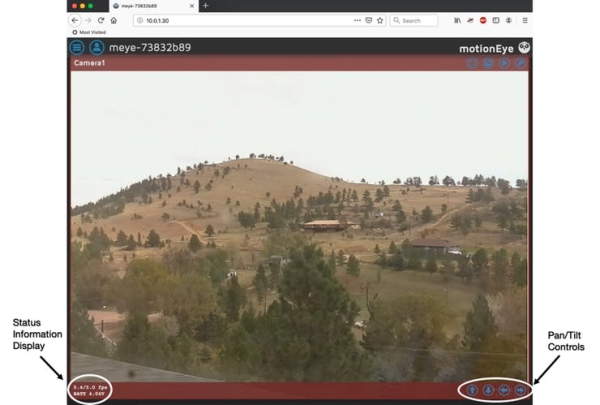
Installation is simple using the extension capabilities built-in to the motionEyeOS distribution. The pan/tilt controls as well as a status display showing battery and charging conditions show up in the web interface.
Building this web cam consists of the following steps described in this readme.
- Acquire necessary hardware
- Assemble camera
- Load the motionEyeOS distribution onto the micro SD card
- Configure motionEyeOS for your wifi and start it running
- Add files from my github repository to enable the new functions
- Enjoy your new webcam
I encourage you to read the Pi Platter Manual found in the documentation directory as well as the thorough documentation in the motionEyeOS wiki.
Hardware Components
I built my unit using components that I had on hand. You can certainly substitute some components like the backup battery and pan/tilt assembly.

Enclosure
I laser-cut a two piece assembly for this example but you may want a different type of enclosure depending on your application. The files for my cut-outs may be found at the end of this story. Both pieces may be cut out of a small (200mm x 200mm) piece of 2mm thick acrylic.
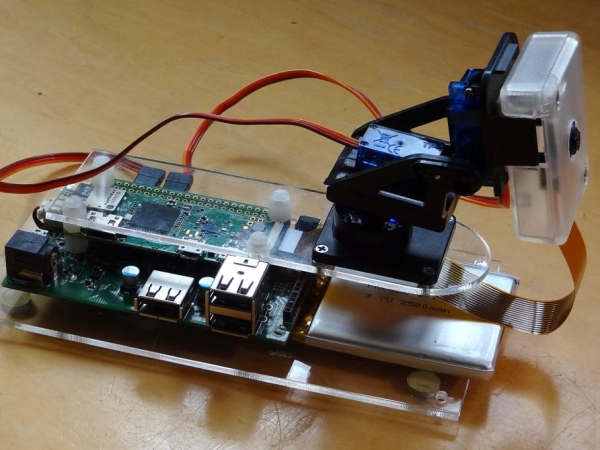
Hardware assembly
Assembly is straight-forward. The Pi Zero mounts on top of the Pi Platter using the included mounting hardware. This assembly mounts in the enclosure in a stacked arrangement using the additional stand-offs.
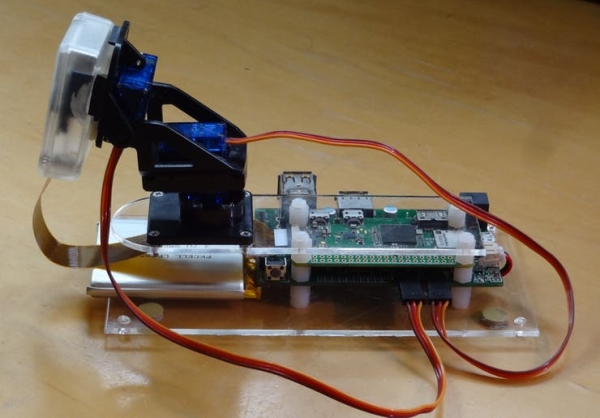
I held the battery down with a piece of double-sided sticky tape.
Connections to the Pi Platter are made as shown in the following image. Check the servo connections to make sure they match. Most servos I've seen use a Brown-Red-Orange cable for GND-5V-PWM. Incorrectly connecting them could damage them or the Pi Platter.
motionEyeOS Installation
It may be helpful to attach a monitor and USB keyboard during installation.
Install motionEyeOS
- Download motionEyeOS for Raspberry PI (A, B, A+, B+, Compute Module, Zero and Zero W models) from the github repository. I used version 20190427 and have kept a copy. Contact me in case you run into a problem with the current version and I can arrange to transfer that to you.
- Extract the image from the archive and write the OS Image to your micro SD Card as described in the wiki.
- Configure the system to access your wifi as described in the wiki before attempting to boot. You can also do this from the keyboard/monitor after booting if necessary.
- Configure the system with a static IP address if you like. Otherwise you'll have to use the keyboard/monitor or an external utility like Fing to determine the DHCP served IP address your Pi receives.
Boot motionEyeOS
Unmount the micro SD card and put in the Raspberry Pi. Connect the Pi Platter to the battery and USB power supply. Then power up the system by pressing the power button on the Pi Platter for two seconds until you see the green power LED light. The initial boot may take a couple of minutes as motionEyeOS configures itself. You can see the progress if you have a monitor attached to the Pi. After the system boots and motion starts you should be able to view your webcam by pointing your browser at the Pi's IP address.
Pi Platter Software Installation
The motionEyeOS distribution creates a partition, /data, that is used to store persistent changes. It is created during the first boot. We manually put the additional files in this partition (/data/etc).
The five scripts found in the github scripts directory use the motionEyeOS Action Button capability to allow control of the servos and for displaying information from the Pi Platter in the web interface.
The pre-built talkpp binary also found in my github repository is used by the scripts to communicate with the Pi Platter.
Install files
The talkpp binary and five script files are easily copied to the /data/etc directory using scp or via a USB Memory Stick.
Using scp
Download the files to your local computer and execute the following commands from a shell in the directory containing the files. You would use a program like WinSCP on a Windows computer. Put your Pi's IP address in the [IP Address] field.
scp talkpp admin@[IP ADDRESS]:/data/etcscp *_1 admin@[IP ADDRESS]:/data/etcNote that by default motionEyeOS has no password. You can and should add a password using the web interface.
Using a USB Memory Stick
Copy the files to a FAT-formatted USB memory stick on your computer.
Eject the memory stick and then plug it into one of the Pi Platter USB ports. motionEyeOS will automatically mount it in the /data/media directory.
Log in to the Pi via ssh or using the keyboard/monitor and copy the files from the memory stick to the system from the bash shell prompt.
cp /data/media/sda1/talkpp /data/etccp /data/media/sda1/*_1 /data/etcEnsure File Permissions
Make sure that the files have the correct linux file permissions so that motionEyeOS can execute them. From a motionEyeOS shell prompt, type the following.
chmod 700 /data/etc/talkppchmod 700 /data/etc/*_1Edit /data/etc/userinit.sh
The /data/etc/userinit.sh file allows motionEyeOS to execute custom commands when it boots. We use this facility to configure the Pi Platter to automatically restart the system in the case that AC power has failed and the system runs from battery until it is discharged and the Pi Platter shuts down power.
From a motionEyeOS shell prompt, edit the /data/etc/userinit.sh file using an editor such as vi or nano. Add the following to the end of the file and save it.
# Configure the Pi Platter to auto-restart on battery re-charge after shutdown/data/etc/talkpp -c C7=1Restart and Verify Operation
Type reboot from a shell prompt or use the web interface to restart the system. After it reboots you should be able to control the servos and view Pi Platter status via the motionEyeOS web interface. Clicking on the video image streaming from the camera should cause motionEyeOS to add an overlay to the image with status information from the Pi Platter on the lower left and four pan/tilt buttons on the lower right.