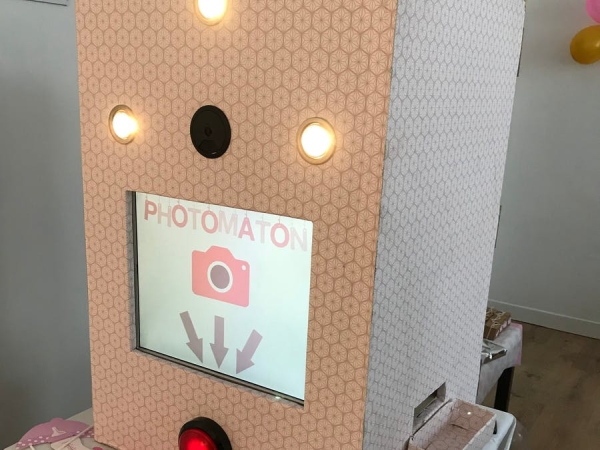
For a wedding or other event, you need a photo booth! You will find here how to do this awesome project which make all guests happy.
Hi everybody,
I got married last year. When we were looking for preparation of the D-day, we went to a lot of wedding conventions.
At almost every convention there was a photo booth renter. This made me think that a photo booth was a great idea for a wedding, where each guest could be have fun and could leave the wedding with a memory of the party.
I told my future wife: “I have almost everything I need to make a photo booth at home, I will do that!”
So here you will find how to make a photo booth for your wedding or another event.
Since the wedding, we've lent the photo booth to friends for various events (birthday parties, baptisms…). So fun!
Step 1: What You Need

This is the list of all what I need to do my photo booth:
- 1 Raspberry pi (for me Raspberry 1 model B because I've got it before but you can take a newer version)
- 1 SD Card for the raspberry
- 1 micro USB cable + power adapter 5V and 2A (to power raspberry)
- 1 Camera module for raspberry
- 1 USB Hub powered
- 1 photo printer compatible with raspbian (for me HP Photosmart 475)
- 1 massive arcade button 100mm with led
- 1 12v transformer for button led
- 1 computer screen (if it's not an HDMI screen you will need an HDMI adapter to plug to Raspberry)
- 3 spotlights with transformer
- 1 desk grommet of 80mm to fix the camera module
- Pieces of wood to make the box
- All decoration you want to embellish your photo booth (for me pink wallpaper).
Step 2: Prepare Your Raspberry Pi
First of all you have to prepare your Raspberry pi and test all your installation with the program (I will give you my program don't worry ;)).
1. Load the OS of Raspberry pi into the SD card=> Raspbian (Linux OS for Raspberry)
From your computer (windows / mac / linux):
- Download Raspbian with desktop from this page: https://www.raspberrypi.org/downloads/raspbian/
- Download Etcher and install it from this page: https://etcher.io/
- Connect an SD card reader with the SD card inside.
- Open Etcher and select from your hard drive the Raspberry Pi.img or.zip file you wish to write to the SD card.
- Select the SD card you wish to write your image to.
- Review your selections and click ‘Flash!' to begin writing data to the SD card.
You can find more information on this page: https://www.raspberrypi.org/documentation/installation/installing-images/
2. Enable Camera module
To enable the camera module there is a little configuration to do: https://www.raspberrypi.org/documentation/usage/camera/
3. Prepare Raspbian with All the Necessary Libraries
- Install Python (because program is made with Python), you will find how to do here: https://www.raspberrypi.org/documentation/linux/software/python.md
- Install Pygame (library for python graphical interface), more information here: https://www.packtpub.com/mapt/book/hardware_and_creative/9781785285066/3/ch03lvl1sec19/installing-pygame
- Install Picamera (library for the camera module of Raspberry pi): https://www.raspberrypi.org/documentation/linux/software/python.md
- Install Python module RPI.GPIO (library for control Raspberry GPIO for the arcade button): https://learn.adafruit.com/playing-sounds-and-using-buttons-with-raspberry-pi/install-python-module-rpi-dot-gpio
- Install CUPS to add a printer on Raspbian, you will find how to do here: https://www.howtogeek.com/169679/how-to-add-a-printer-to-your-raspberry-pi-or-other-linux-computer/
- Install PIL (library for images on Python):https://www.pkimber.net/howto/python/modules/pillow.html
Step 3: Wire Arcade Button on Raspberry Pi
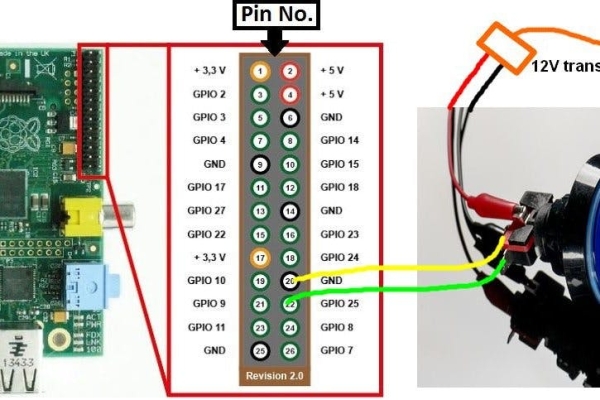
On my program, I set the button on the GPIO Pin 25 of the raspberry pi 1 model B
Step 4: Import Program from GitHub

You will find program on GitHub: https://github.com/sabat54i/photoboothdiy
The code is in camera.py file, you will need the images folder for the main wallpaper of the photo booth.
On the code you can change the path of the folder where pictures will be saved.
To run it you just have to launch a terminal, navagate to the program folder and type “sudo python camera.py“
If you want to test it without a button wire on GPIO Pin 25 of the raspberry, you can push down arrow of your keyboard.
Finally, I wanted to run the program at startup of the raspberry pi so I followed this tuto https://www.simplified.guide/linux/automatically-run-program-on-startup
The script which launch at startup is on the GitHub: photobooth-script.sh
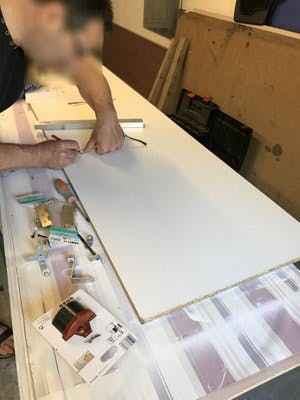
Step 5: Make the Box
You will find here all step of construction of the box