
Using Win10 IOT, RPi2, and XBee, measure lawn soil moisture, and automatically run irrigation as necessary.
Background
Large portions of the US have suffered from low water or drought conditions within the last few years. There are a large number of things a homeowner can do to reduce household water consumption, and lawn irrigation is one of them. Working with the most common residential irrigation controllers is inconvenient, and frustrating. Hidden away in garages, then complex dials and obscure instructions on these controllers make it difficult to tune how long the system runs on a daily basis. And they still don't know how much water the plants actually need.
My project aims to solve at least a portion of the problem, by allowing the irrigation controller to know just how wet the soil is, so it knows whether to run, and when to stop. Additionally, I have added web-based control, so I can control the sprinklers using my smart phone from the back yard, or from across the country.
Step 1: Sensing
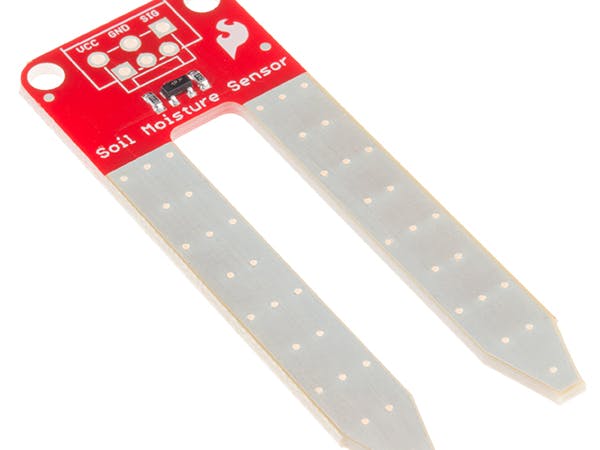
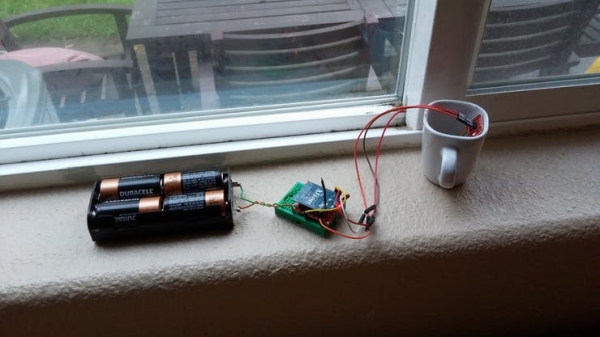
First, we need to get the soil moisture sensors to send data to the RPi2. We want the sensors to be in, or immediately next to, the lawn, but the RPi2 will have to be located someplace safe, and close to power and Ethernet. The sensors will be enclosed from the elements, battery-powered, and need to be able to read data from a soil-moisture sensor. Fortunately, Digi International's XBee line of chips are a well-tailored to solving all three of these conditions.
For simplicity sake, I choose to use the XBee Pro – Series 1 modules. While Digi has proprietary communication layer DigiMesh and a ZigBee implementation (here is a great summary sheet), the simplest and most direct solution was to use the basic “802.15.4” implementation. In this configuration, every wireless sensor talks directly to the XBee chip attached to the RPi2. Each individual XBee sensor manages its own sleep-wake cycle, which dramatically extends battery life. And the XBee sensor has 6 built-in 10-bit analog-to-digital inputs, perfect for hooking up our soil moisture sensor. There's even enough extra inputs to collect temperature or light readings at a later date.
For power to the sensor, I wanted enough capacity that I wouldn't have to constantly replace the batteries. By calculating the power used by the XBee chip in a sleep-wake cycle, and using standard battery capacities, I was able to fine tune how frequently the sensor reports home so that I should only have to change the batteries about once a year. Ideally a future revision will incorporate solar cells.
Finally, I needed to program the XBee chip. On the right-hand side of the energy budget spreadsheet, in columns “G” and “H”, are the values that I altered using the Digi X-CTU software. I was able to use the XBee Explorer USB component from SparkFun connected to my PC, instead of having to purchase a separate developer's kit from Digi.

Step 2: Programming the Raspberry Pi
The biggest challenge to programming the Raspberry Pi is interfacing the XBee module. The XBee only talks over serial, and the RPi2 has no accessible built-in serial capabilities. I decided to use the Sparkfun XBee Explorer USB module. The onboard chip used, made by FTDI, does not have native drivers for Win10 IOT Core. However, following the instructions provided by Jark on his GitHub repository, I was able to communicate with the XBee module.
The sensors will periodically send sensor data to the RPi, which is received as an API frame, according to the XBee documentation. There are many, many different libraries for processing XBee API frame data, but I decided to roll my own, to avoid any licensing issues.
After parsing the readings, the data is sent to a cloud service, hosted in Azure. The cloud service can then determine whether or not to open the value, and run the sprinklers in a given zone.

Step 3: Cloud Service for sensor logs, irrigation control
For the cloud service, I decided to use ServiceStack running in a Windows Azure web app. ServiceStack is a web-oriented framework that is an alternative to ASP.Net with Entity Framework. It has additional components to support Redis, C# clients, and It has dual commercial / AGPL license, and generous free-quotas for hobby projects. By using Azure, there is a wealth of additional resources we can tap, such as a Redis backend, SQL databse, Service Bus, and plenty of opportunities to scale up if necessary.
As an experiment / hobby project, my web site is very minimal, but illustrates the approach. It is designed to provide a functional example that can be expanded to suit the needs of the future hackers.
- A Server-Sent Events link is opened, using ServiceStack's ServerEvents, effectively allowing two-way communication between the RPi2 and server. This is similar to, but simpler and less robust, than using SignalR.
- The RPi sends sensor data to the cloud as it is received
- The server tells the irrigation controller to turn the sprinkler valves on or off.
The power of this approach is that the server can perform complex scheduling or logic, such as looking at weather forecasts, or adhering to local ordinances (such as even/odd day watering). It also allows for remote management, or management of many different locations from a single web-based interface. The downside is that the sprinklers won't run unless the Internet connection is functioning properly.
Step 4: The Future
This project has been mainly a proof-of-concept, so future hackers can build on it and tailor it for their own needs. There are lots of things that can be done to make it into a more polished project:
- Add a more robust web front-end
- Add support for temperature sensors
- Implement security
- Add irrigation scheduling
- Download irrigation scheduling, in case of Internet down time
- Add physical controls, such as with an LCD and push buttons
Source: Win10 IOT Irrigation Controller with Moisture Sensors