
About the Project
Now that the Windows 10 Insider Preview is available for those that have already signed up, the .NET framework is now available on another platform that some of us are probably already familiar with – the Raspberry Pi 2. This new addition to the .NET-capable platforms gives those of us already familiar with the Visual Studio development environment a new outlet for our creativity.
Dexter Industries has created an aptly named add-on for the Raspberry Pi called the GoPiGo. The GoPiGo is a robotics kit that allows the Raspberry Pi to go! It adds two motorized wheels, a protective chassis, and a battery pack, giving the Pi the mobility of an RC car.
The project is still a work in progress, and this guide will help get you started. Follow along with our tutorial to get the GoPiGo, the Raspberry Pi 2, and Windows 10 to go, go, go…
Some Assembly Required
There are a few things you'll need to set up before you can get started:
Set up your Windows 10 development Environment on both a PC and the Raspberry Pi 2. This can be easily done by following this guide.
- Remember – Windows 10 is not yet a finished product, which means that there will frequently be updates, the possibility of crashes exist, and there could even be catastrophic failures leading to data loss. This means that you shouldn’t upgrade your main PC to Windows 10 if you have another option.
Fully assemble the GoPiGo. It's very simple, straight-forward, and only takes about 15-20 minutes.
Setting Up The Solution
Now that you're running on Windows 10, and you have your Raspberry Pi 2 set up with the Windows 10 IoT image, its time to get started with the GoPiGo! Let's navigate to the directory where you've downloaded the GitHub project. You'll see a file named “GoPiGo.sln” – open it with Visual Studio 2015. Once the project loads,
If you happen to see an error that says the solution file is incompatible with your version of Visual Studio, ensure that you've installed Visual Studio 2015. If so, ensure you've installed the Universal Windows App Development Tools by doing the following:
- Navigate to the folder where your Visual Studio Installer was placed and open it
- Click on the Modify button
- Ensure that “Universal Windows App Development Tools” is checked, as well as both of the nested check boxes. Note that as of the writing of this tutorial, the version number is 10.0.10069.
- Click Next and finally, click Update. You will have to close Visual Studio to install these tools. It may take a few minutes to install.
A few important notes:
- In order to run a UWA on the Raspberry Pi 2, you'll need to set the target platform to ARM, and not x86 or x64 architectures. When we start using networked remote controllers, we'll be targeting other architectures, but for now, ARM is the one we want.
- The name of the Remote Machine can either be the name you gave your Raspberry Pi during set up, or the IP Address that the Raspberry Pi shows on screen when plugged into an HDMI port.
- Make sure that “Use Authentication” is NOT checked under the Remote Machine name. Visual Studio will not connect successfully to the Pi if this is checked.
The final thing to make sure is that you've made the GoPiGoApp the startup project. The GoPiGo project is a library that cannot be compiled as the startup project.
Quick Run
And now, finally, it's time to run the solution. Make sure that the GoPiGo is turned on, and that both the devices are receiving power. The Raspberry Pi should show the device name and IP address on the screen your HDMI cable is plugged into. Note that if you turned your Raspberry Pi on before plugging in the HDMI cable, you may have to reboot the Pi to have the cable recognized.
It may take several minutes to deploy the solution, particularly for the first time. It has taken up to 5 minutes for me. If you happen to encounter an error relating to the device not being found, or the debugger not attaching, you may have to restart the device, or try deploying. I've encountered this issue randomly, and I'll assume that it will be corrected by the time Windows 10 and Windows 10 IoT are officially released to the public.
Once the solution finishes deploying, you'll see the below user interface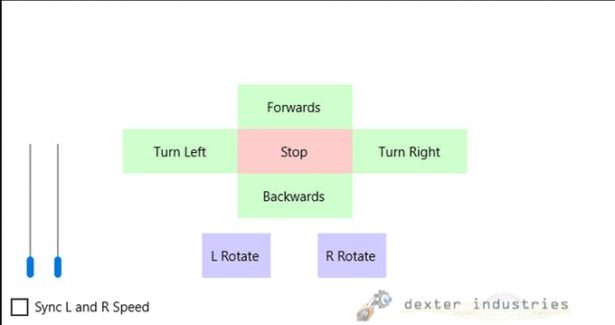
The controls are mostly self explanatory, but here are some important notes:
- Turn Left and Turn Right will turn only the motor on the left and right, respectively.
- Left Rotate and Right Rotate will turn both wheels in opposite direction. For Left Rotate, the left wheel will rotate counter-clockwise, and the right wheel will rotate clockwise. The reverse is true for the Right Rotate command.
- When you're finished playing around, make sure you click the Stop button. Otherwise, the GoPiGo will keep going!
- The sliders control the speed of the motors. Setting the speeds too low may simply cause the motors to hum and not move.
For more detail: Windows 10 on the GoPiGo