Story
Playing with a radio controlled toy is much fun. When is comes to water vehicle, we love them maneuvering whole day. If you are passionate for Windows and are a good hacker, this article is for you.
This article reveal the technique to modify RC Boat that will be controlled using Windows Phone. In addition, the source code contains libraries to develop application for Windows based OS, too.
Whats new in this article?
Arduino Wiring Project for Windows IoT Core
Microsoft has released awesome features to the Windows IoT build 10.0.10556 (Insider Preview). With this build, now you can write Arduino sketch for Windows IoT Core directly from Visual Studio 2015 (Refer this article for more information).
Overcome Existing Limitation of Windows IoT Core (Serial-UART, PWM)
RPi2 supports for PWM and UART on board but current release of Windows IoT Core (10.0.10556) doesn't. Regarding to this project, we need PWM to control motor speed and serial (UART) for ESP8266-01 and GPS.
As per Windows IoT Release notes, ADC and PWM is supported via external chips but I'm not sure about the availability of that chips in all regions. While Arduino is widely available worldwide. So why not to chose Arduino. In addtion, it is a full-fledged microcontroller having its own benefits.
Essential
Before going further, you must need following:
- Your Raspberry Pi 2 must have latest Windows IoT Core Insider Preview. (Download) (How to install Windows IoT Core on RPi2?)
- Raspberry Pi 2 must be setup for Lightning feature. (Lightning Setup)
- You must install latest Windows IoT Core Project Template. (Download)
Lightning is a set of providers to interface with GPIO, I2C and SPI through the lightning Direct Memory Access driver. In short, it is the new driver which provides high performance against default inbox drive by accessing direct memory mapped driver. By default Windows IoT Core is configured for default inbox driver.
Basic Concept
Raspberry Pi 2 (running Windows 10 IoT Core), will communicates with Windows device via Communication Link. Windows IoT Core will takes appropriate maneuver signal from remote Windows device and generates the appropriate signal to control engine and rudder (if available). In addition, Windows IoT running on RPi2 will send back sensor data to the remote Windows device to process it and show.
Each boat have different hardware configuration to maneuver it. Let's explore three basic configuration mode:
The source code for the project is only developed for Mode 2. With minor changes you can program for Mode 1 as well as 3 if you really understood the concept of Gateway.
Gateway (for ADC, PWM & Serial Communication)
With the release of Windows IoT build 10531, ADC and PWM are supported via external chips. That means there is no direct support for on-board pins. Even, on-board Serial Port is useless because it may be used by kernel debugger.
In this project, WiFi (ESP8266) and GPS module (uBlox Neo6mV2) uses Serial Communication (UART). PWM is going to be used for motor speed control as well as to control servo for configuration mode 3. Thus some extra components will be required to accomplish goal. Arduino Nano or Arduino Pro Mini (16MHz) will be used to provide Serial Port as well as PWM signals. It will work as gateway:
Now, Windows IoT can access to ADC, PWM and Serial devices via gateway. To access any peripheral connected to the gateway device, it just need to access gateway chip via I2C bus.
If major peripherals are connected to the gateway (Arduino), then what will be the responsibility of Raspberry Pi 2 and Windows IoT?>Raspberry Pi and Windows IoT can be called the brain. It gets data via ESP8266, process them and controls the peripheral via gateway. Arduino is limited to its memory and processing power, thus its not capable to deliver real-time application. For ex: The real power comes when you wanna use Windows IoT for video processing, sound processing, autonomous system, etc.
Let's explore gateway programming:
You don't need to modify ESP8266-01 and Gateway sketch. You just need to upload it. Once you have uploaded, it will work like charm. You just have to code for Windows IoT.
Sketches
This project is a bit complicated. Thus the code is divided into three parts:
- ESP8266 Sketch
- Gateway Sketch
- Windows IoT Sketch
Main objective of ESP8266 Sketch is to create Access Point and listen for incoming GET request. Request will be consists of arguments that must be placed into global argument buffer. Once arguments are copied, respond back with plain text which consists of data sent from Windows IoT via Gateway. Thus ESP8266 Sketch is responsible to communicate with remote device.
Gateway Sketch provides ADC, PWM and Serial service to Windows IoT on demand. It is also responsible to exchange data with ESP (using UART) as well as Windows IoT sketch via I2C.
Windows IoT Sketch is the brain. You can use it for complex processing such as autonomous guidance system. Windows IoT Sketch can get arguments that are passed by remote device to ESP8266 on demand. It can also send string to the remote device using ESP8266 via Gateway.
Deploy
ESP8266-01 Sketch
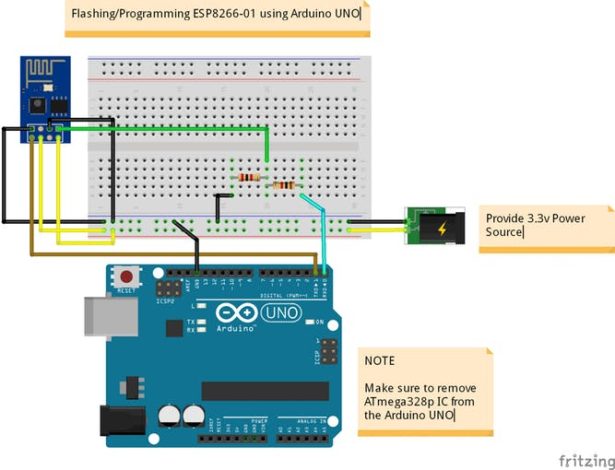
To flash or reprogram ESP8266-01, you need to wire-up ESP8266-01 as shwon below:
Gateway Sketch (Arduino Nano)
Upload the Gateway sketch to the Arduino Nano. Gateway sketch is provided at the end of the article.
For more detail: Windows 10 IoT Core : Hydroflyer


