Support for Software PWM is available for Windows IoT Core and the Raspberry Pi using a convenient NuGet Package.
Story
One of the gaping holes in my opinion is the availability of PWM when working with Windows IoT Core on the Raspberry Pi. There are two approaches to solving this problem, one is with additional hardware to provide PWM functionality, the other is to achieve PWM with software. This article will focus on Software PWM.
A Convenient Software PWM Library
In poking around the web, I stumbled across this convenient library for Windows IoT Core. One of the implemented functions in this library is support for Software PWM. This library is also available as a package through NuGet. To demonstrate software PWM in this article, we will be modifying the brightness of an LED.
Hardware Requirements
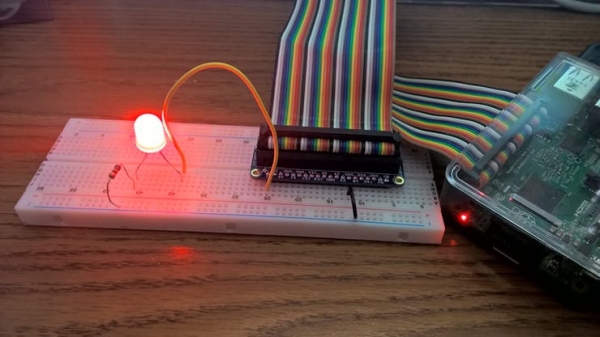
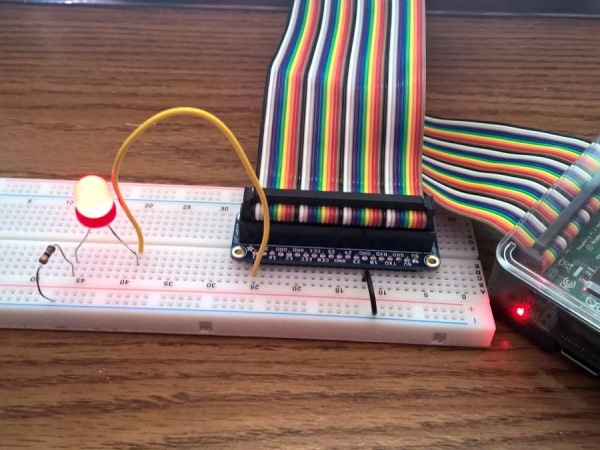
- Raspberry Pi (2 or 3) with Windows IoT Core
- Adafruit Pi Cobbler / Cable
- Breadboard
- Red LED
- 65 ohm resistor
- Jumper wire
Wiring Details
- Pi Cobbler GND to Breadboard Ground Rail
- Pi Cobbler Pin 21 to LED Positive Leg (Anode)
- Resistor from Ground Rail to LED Negative Leg (Cathode)
Hardware Diagram
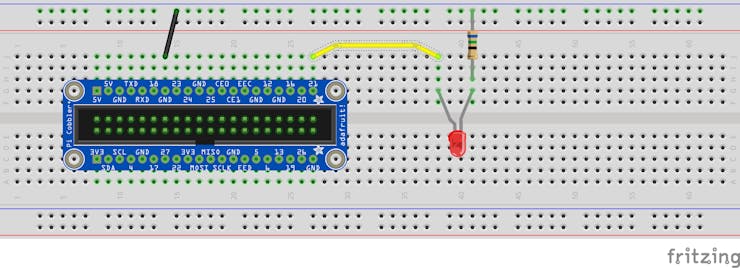
Software PWM Wiring Diagram
Software
Create a new blank Windows Universal application, I’ve named mine “PiSoftwarePWM”. Once the project is created, add a reference to the extension “Windows IoT Extensions for the UWP”. Finally, manage NuGet packages for the project, and install “Microsoft.IoT.Devices”.
Open MainPage.xaml and replace the listing with the following to define the user interface:
MainPage.xaml Code Listing:
<Page
    x:Name="pgMain"
    x:Class="PiSoftwarePWM.MainPage"
    xmlns="http://schemas.microsoft.com/winfx/2006/xaml/presentation"
    xmlns:x="http://schemas.microsoft.com/winfx/2006/xaml"
    xmlns:local="using:PiSoftwarePWM"
    xmlns:d="http://schemas.microsoft.com/expression/blend/2008"
    xmlns:mc="http://schemas.openxmlformats.org/markup-compatibility/2006"
    mc:Ignorable="d" Unloaded="pgMain_Unloaded">

    <Grid Background="{ThemeResource ApplicationPageBackgroundThemeBrush}">
        <Grid.RowDefinitions>
            <RowDefinition Height="125" />
            <RowDefinition Height="40"/>
            <RowDefinition />
        </Grid.RowDefinitions>
        <TextBlock x:Name="lblSoftwarePWM" Margin="10" HorizontalAlignment="Left"
                TextWrapping="Wrap" Text="Software PWM" VerticalAlignment="Center"
                Width="439" Height="49" FontSize="36"/>
        <TextBlock x:Name="lblDutyCycle" Margin="10" HorizontalAlignment="Left" Grid.Row="1"
                TextWrapping="Wrap" Text="Duty Cycle" VerticalAlignment="Top" Width="357"/>
        <Slider x:Name="slDutyCycle" Margin="10" HorizontalAlignment="Left" Grid.Row="2"
                Width="462" TickFrequency="25" ValueChanged="slDutyCycle_ValueChanged"/>
    </Grid>
</Page>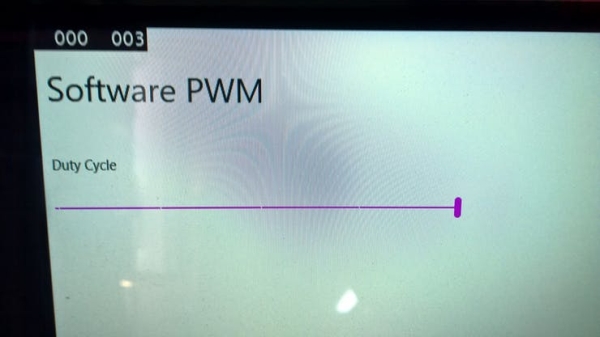
Then implement the functionality of the UI by opening MainPage.xaml.cs and replacing the code with the following (documented inline):
UI implementation – MainPage.xaml.cs:
using Microsoft.IoT.DeviceCore.Pwm;
using Microsoft.IoT.Devices.Pwm;
using System;
using Windows.Devices.Gpio;
using Windows.Devices.Pwm;
using Windows.UI.Xaml;
using Windows.UI.Xaml.Controls;
using Windows.UI.Xaml.Controls.Primitives;

namespace PiSoftwarePWM
{
    public sealed partial class MainPage : Page
    {
        private int _ledPin = 21;
        private PwmPin _redLed;
        private PwmController _pwmController;

        public MainPage()
        {
            this.InitializeComponent();
            SetupGPIO();
        }

        private async void SetupGPIO()
        {
            var gpioController = GpioController.GetDefault();
            var pwmManager = new PwmProviderManager();
            pwmManager.Providers.Add(new SoftPwm());

            var pwmControllers = await pwmManager.GetControllersAsync();

            //use the first available PWM controller an set refresh rate (Hz)
            _pwmController = pwmControllers[0];
            _pwmController.SetDesiredFrequency(240);

            _redLed = _pwmController.OpenPin(_ledPin);
            _redLed.Start();
            slDutyCycle.Value = 100;
        }

        private void slDutyCycle_ValueChanged(object sender, RangeBaseValueChangedEventArgs e)
        {
            //base the duty cycle on the value from the slider value (0-100 mapping to 0-1.0 duty cycle)
            _redLed.SetActiveDutyCyclePercentage(e.NewValue/100);
        }

        private void pgMain_Unloaded(object sender, RoutedEventArgs e)
        {
            _redLed.Stop();
        }
    }
}
Running the Application
Build and deploy the application to the Raspberry Pi. You will now see that the LED brightness will change as you change the slider value. The higher the duty cycle, the brighter the LED.