
Diy a wireless monitor tank is not difficult based on the raspberry pi, shown in the following picture.
Step 1: Materials for the rc tank raspberry pi based monitor
1.
Raspberry pi board:
http://www.smartarduino.com/original-rpi-raspberry-pi-pie-512m-2-generation_p93783.html
2.
Full-functional raspberry pi shield
http://www.smartarduino.com/raspberry-pi-pie-rpi-shield-enhanced-v2-release-fully_p94186.html
description:
All the features include:
l The full size perfectly compatible with raspberry pie,
l Convert 3.3 V SPI interface to gm's 5 V SPI interface (and can pass P13 jumper switch back to the 3.3 V)
l Convert 3.3 V the I2C interface to gm's 5 V I2C interface (and can pass P13 jumper switch back to the 3.3 V)
l The GPIO abandon optical coupling isolation method, driven by the chip, support 8-way 50 v, 600 ma high voltage large current drivers, means that you can connect directly to the steering gear, drive LED and so on (to do car, robot, intelligent household, remote control, a necessary yo)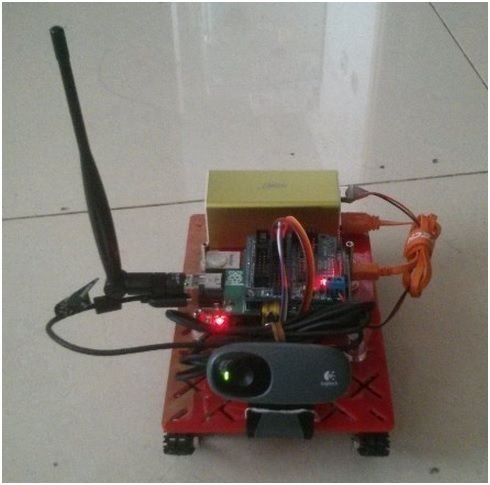
l Chip using socket, convenient change after accidentally burn out
l Increase the LED power light
l The power converter using fuse, better protect your expansion board and raspberry pie
3.
Tank/car chassis:
http://www.smartarduino.com/tanks-chassis_d005002.html
if you use this full-functional rpi shield, you can use GPIO to connect the motors. Thus, you don’t use driven board.
4.
USB camera
preferably driver-free and can be directly plug into raspberry pi board, and does not require an external power supply (some cameras current is too large, raspberry pie USB dragged up). Here, use a Logitech C110 with microphone. The current is small, better appearance compact and fixed easily.
http://www.smartarduino.com/view.php?id=94428
5.
Wireless wifi antenna and board
Here, use EDUP 1538 wireless antenna:
http://www.smartarduino.com/edup-1538-usb-wireless-network-card-300m-desktop-notebook_p94429.html
Step 2: Connection diagram
according to the idea to design the connection diagram.
Step 3: Usb camera installation and usage
Before, some papers on motion-based monitor software are written. Here, mjpg-streamer is used. Compared to the motion-based, the mjpg-streamer is simple, but has high speed, lower cpu usage. The following steps are listed.
1. Insert USB camera to check whether the device can be found by inputing:
root@raspberrypi:/# lsusb
where Logitech is the camera, which shows the device is found, then check whether the device is normal.
1. root@raspberrypi:/# ls /dev/vid*
2. /dev/video0
When display video0, then you find the device. Or, check whether the driver is right, or power supply is enough.
2. Install the necessary softwares.
1. sudo apt-get install subversion
2. sudo apt-get install libv4l-dev
3. sudo apt-get install libjpeg8-dev
3. download mjpg-steamer software, compile and install.
1. svn co https://mjpg-streamer.svn.sourceforge.net/svnroot/mjpg-streamer mjpg-streamer
2. cd mjpg-streamer/mjpg-streamer
3. make USE_LIBV4L2=true clean all
4. make DESTDIR=/usr install
note: many friends say this svn is failure, then you can try the following:
1. wget http://sourceforge.net/code-snapshots/svn/m/mj/mjpg-streamer/code/mjpg-streamer-code-182.zip
2. unzip mjpg-streamer-code-182.zip
3. cd mjpg-streamer-code-182/mjpg-streamer
4. run the file “stream.sh” in the copied raspberry pi directory.
1. pi@raspberrypi:/home/camtank# sudo chmod 777 stream.sh
2. pi@raspberrypi:/home/camtank# sudo ./stream.sh
If there exists any error, when running the program, it may the process is working because it had run in the past, which may result in it cannot work. So you can firstly run ps to check the process and its ID number, and then you can use “kill -9” to kill the process.
For more detail: Wireless monitor tank robot based on raspberry pi