
* This entire process should take about 20 minutes
Pianobar is a free/open-source, console-based client for the personalized online radio Pandora.
Feature:
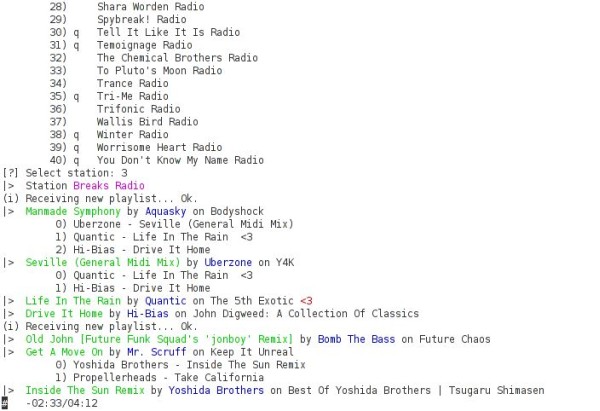
play and manage (create, add more music, delete, rename, …) stations
rate songs and explain why they have been selected
upcoming songs/song history
customize keybindings and text output
remote control and eventcmd interface (send tracks to last.fm, for example)
proxy support for listeners outside the USA
Use your Raspberry Pi as a wireless Pandora Radio jukebox! You can choose to add a display and controls to your Pi to set and navigate stations, however, this tutorial will use an SSH client and mobile devices (tablet or phone) to utilize pianobar's features.
Step 1: Required Materials
– SD memory card (4GB or larger)
– Power adapter compatible with the MicroB connector on the Raspberry pi
– Speakers or headphones
– Free or paid Pandora Radio account
Temporary Items for Initial Setup:
– HDMI compatible monitor and cable
– USB Keyboard (no mouse required, all steps done in a terminal environment)
Step 2: Preparation
The Raspberry Pi always needs to boot off of an SD card loaded with an operating system (OS) disk image.
You may buy an SD card that has already been made bootable complete with the Raspberry Pi OS or you may buy a blank card and
There are many OS versions offered for the Raspberry Pi, however, in this example, I have chosen to use Raspbian “Wheezy”.
Download the OS disk image and write it to your memory card. To write the image I used Win32 Disk Imager. Once the image is written to the card, plug the card into the Raspberry Pi's SD card reader and power on the device. (Be sure you have all the proper I/O devices plugged in, i.e., keyboard, USB wifi adapter, HDMI monitor.)
Step 3: Initial Configuration
Keep in mind, if you mess up anything along the way, just reformat your card, reload the disk image and start again. No harm no foul.
Upon powering the Raspberry Pi with the SD card plugged in, you will see the system automatically listing information about the operating system and peripherals. You do not need to know what it all means for this project, but I absolutely wouldn't discourage you from reading it and learning a little bit about your Raspberry Pi for your own benefit!
After the boot information is complete, you will be prompted with the raspi-config window. Here you should make the following changes:
– Expand root partition so all space on the SD card is usable.
– Set timezone.
– Enable SSH server (so you can control pianobar with your mobile device as well as continuing this installation on your desktop or laptop via SSH).
– Disable boot to desktop, we want to configure this program using only the terminal environment.
– Do not update your Raspberry Pi at this point (we need to configure the wireless USB module first)
– Do not restart your Raspberry Pi at this time.
* I also do not recommend overclocking your Pi for this project, the default setting works perfectly and overclocking will reduce the overall lifetime of the hardware.
Step 4: Configure Wireless USB Module
Navigate to your network interfaces with the following command:
sudo nano /etc/network/interfaces
Erase all the text and copy and past the code you see below:
auto lo
iface lo inet loopback
iface eth0 inet dhcp
allow-hotplug wlan0
auto wlan0
iface wlan0 inet dhcp
wpa-ssid “ssid”
wpa-psk “password”
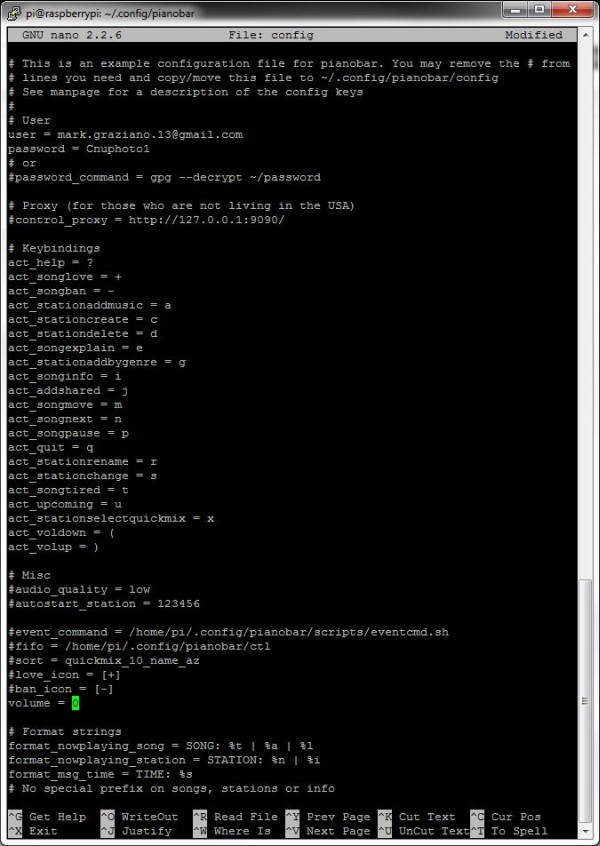
*it should appear as the image below. Change the wpa-ssid value in the quotes to your network's ssid (your wireless network name) and be sure it is still surrounded by quotes. Do the same with the wpa-psk, change it to the password for your personal wireless network, again, make sure the text is surrounded by quotes.
To save this edit, hit ctrl+x, you will be prompted if you would like top keep the change, type Y and hit enter for yes and hit enter again to confirm the path of the file.
For more detail: Wireless Raspberry Pi Radio: Pianobar