
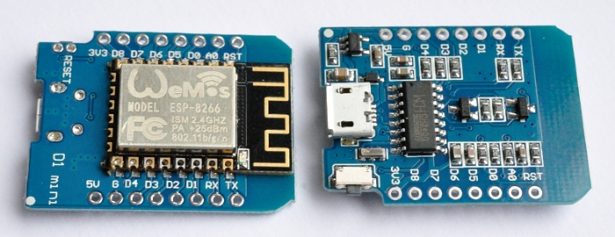
For a long time now I’ve wanted wireless temperature sensors scattered around the house and garden reporting their temperatures regularly to a central server. It’s not something I really need, but something nice to have. I’d originally planned to do it with a RasPiO Duino or Arduino nano and inexpensive NRF24L01 radio boards. Albert @winkleink Hickey, a friend of mine, who also runs the Egham Jam put me onto these when he did his buttonflash game. Albert has a useful hobby of trawling ebay for bargain-basement electronics. A few weeks ago he showed me the Wemos D1 mini.
On inspection, it ticked all my boxes for this project.
- Small
- Cheap
- Built-in wifi (via an ESP8266)
- Has an ADC input (I love my TMP-36 sensors)
- Supports Arduino IDE
So I ordered some to try out. They arrived recently and I took a little time to have a play. (I’ve been heavily into a development cycle on a top-secret new project that I hope to be able to announce within the next few weeks. So a little ‘playtime’ was very welcome.)
Installation
Installation was fairly straightforward. A driver for the CH340 USB interface is provided (I already had this installed from previous Arduino nano clone usage). There’s also a link you can copy into the Arduino IDE to install all the relevant libraries and examples specific to these boards. It all “just worked”. This is what we like. WIN!
Looking through the examples is quite an eye-opening experience. There are quite a lot of them (each of the items in the screenshot is a menu), but it gives you a flavour of what these boards can do.
You can have them working as web client, web server, or access point (to name but three modes).
Port Numbering Can Be Tricky!
The only caveat is that the port numbering is a bit confusing. For digital pins you need to use D1, D2, D3 instead of just the 1, 2, 3 for your digitalRead() and digitalWrite() commands. If you use just the integers, it defaults to the ESP8266’s GPIO numbers.
|
1
2
3
4
5
6
7
8
9
10
11
12
|
pinMode(D4, OUTPUT); //These two linesdigitalWrite(D4, 1);pinMode(2, OUTPUT); //do the same thing asdigitalWrite(2, 1); //these twopinMode(D4, INPUT); //These two linesdigitalRead(D4);pinMode(2, INPUT); //do the same thing asdigitalRead(2); //these two |
The pinouts are here in the table. That’s really the only “gotcha” though.
If you are familiar with the Arduino IDE, these boards are a breeze to use. You can even update them wirelessly, although I haven’t tried that yet (it screams “security hazard” to me, but would be OK if done well).
WiFiWebServer
The first sketch I tried was the WiFiWebserver sketch. The only modification you have to make is to add your WiFi login credentials. This sketch is very simple. It enables you to type a URL into your browser to switch the onboard LED on and off. You use the Arduino IDE’s serial monitor to get the Wemos’s ip address, then http://192.168.x.y/gpio/1 and http://192.168.x.y/gpio/0 toggle the LED on and off. Having done that, I modified the sketch to read the TMP-36 and report the results when accessed. That was pretty easy, but the connection was not persistent and kept dropping out. This is why I decided to use the Pi as a server and have the Wemos ‘nodes’ report in to it.
Temperature Logging
So once I’d proved the concept and that WiFi was working, I did a quick google to see if anyone else had already done the temperature sensor network before. It’s always good to do this so you can crib ideas and sometimes even borrow some bits of code. In this case I found exactly what I was looking for here. Someone had done a similar thing with the Wemos, but using different temperature sensors (DS18B20). The temperature sensor part was easy for me to change, but I used the rest of the method, which was in turn based on parts of the Wemos examples.
How Does It Work?
Before I go any further with the details and procedures, here’s an overview of how the whole system works.
I have multiple Wemos D1 minis. Each one has a TMP-36 sensor being read by the analog port. Every minute, each Wemos reads its sensor and reports the value, via WiFi to a Raspberry Pi on the local network.
The Raspberry Pi is running a lighttpd web server and php5. A short php script is used (a first for me) to log the data from the incoming http “GET” commands from each of the Wemos boards.
That takes care of the data logging. I wanted to be able to view the current data on a web page, so I wrote a short Python script to generate an html page from the most recent data. This script is run every minute using a cron job on the Pi. If I knew php, it could probably be done dynamically using php. But I don’t, so meh!
So the outcome is that, every minute, each sensor sends in its new data, which is logged, a new html file is created and I can always view data in my browser which is never more than a couple of minutes old. All I have to do is visit http://ip.of.my.pi/temps.html
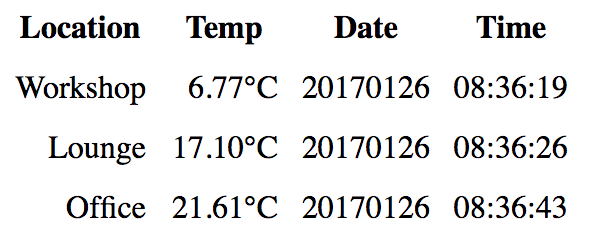
Temperature Output at RasPi.TV HQ
It wouldn’t be hard to open up a port on the router and make this viewable from the outside world, but I haven’t done that at this point.
How Reliable Is It?
It seems pretty solid to me. It’s not internet dependent, so even if your external connection goes down, your data should still be logged as long as your router(s) are behaving. I’ve only been running it a couple of days but it’s looking good at this point.
I Want To Have a GO!
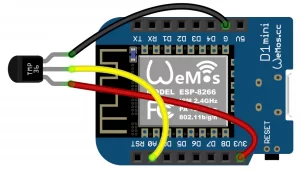
Hardware
OK. The hardware is simple. For each temperature reporting node, you need a Wemos D1 mini, a TMP-36 and wires to connect them. I’ve found that it’s best not to have the sensor too close to the board because it generates some heat. I’m using 10cm wires. Attach the TMP-36 power pin to 3V3 (it will also work fine on 5V), ground pin to G and signal pin to A0.
For more detail: Wireless Remote Sensing with Wemos D1 mini, Arduino IDE, Raspberry Pi and lighttpd web server