
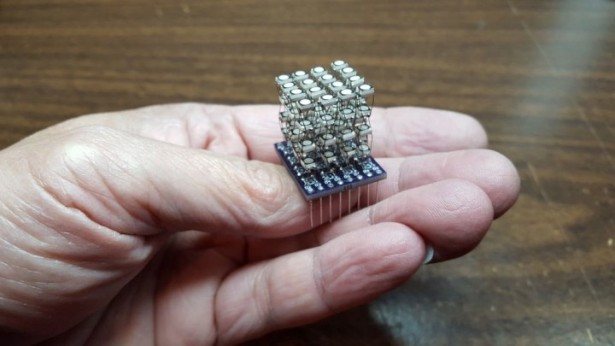
I believe this is “currently” the world's Tiniest 4x4x4 COLOR LED Cube. There are smaller ones but are usually single color and made up of fewer LEDs (3x3x3).
The actual LED cube is less than 1 inch square. It uses sixty four 3.2mmx2.7mm SMD RGB LED (Surface Mounted Device, Red+Green+Blue, Light Emitting Diode).
In this Instructable, I will share with you how I built it.
Credit where credit is due:
Original design and code is by Asher Glick and Kevin Baker.
I “simply” made a super tiny version of it. 🙂
Step 1: Parts
Picture of Parts
64 x RGB SMD LEDs
These are the exact LEDs that I used, but you might want to shop around for square profile LEDs. It would make soldering easier. You'll see why in later steps.
1 x Arduino
I used an Arduino Nano clone. However, most Arduino with 16 or more I/O pins should work.
Unless you're comfortable modifying code with PORT commands, I'd recommend staying with a true ATMega based Arduino (do NOT use ESP8266, Arduino M0, Arduino Due, etc)
Custom PCB
Due to the insanely tiny dimensions that we're dealing with, soldering wires for the point to point connections is too complex to do by hand, so I designed a PCB for it. It would be cool to see more tiny cubes in the world so I've shared my custom PCB.
Step 2: Soldering LEDs into pillars
Picture of Soldering LEDs into pillars
The cube consists of sixteen pillars.
Each pillar consists of four rotated LEDs such that powering any two of the four leads would turn on only one color of one of the LEDs. The Arduino switches the LEDs so quickly that our eyes are fooled into thinking that multiple LEDs are on at once.
After trying many different jig ideas to hold the LEDs while I solder them, my final jig is made of three layers of cardboard. This is where it would have been simpler had I used LEDs with symmetrical square profile. To keep the symmetry as I rotate the LED at each layer, I had to create a jig that hold the LEDs at different depths!
First two layers are identical.
Third layer have holes missing to create the different depths.
Please see the photos and video for more detail.
This project, as with any LED cube is very labor intensive, so I took every precaution possible to ensure success. I test all the LEDs at every step to catch mistakes as early as possible.
Step 3: Designing the Custom PCB
Picture of Designing the Custom PCB
First photo above is the bottom wiring of my normal sized CharlieCube. There was a lot jumper wires that cannot short each other. Difficult, but doable at that scale.
I had naively thought I would be able to do the same thing for this cube. However, due to the tiny size of the cube, running wires in around all the 64 pins at the bottom of the PCB (and not create a short) is pretty much impossible. So, I learned Eagle CAD (mostly from YouTube :-)) and designed my very first custom PCB. It is one giant sorry mess, but it works! lol
Step 4: More Soldering 🙂
Picture of More Soldering 🙂
ScarySoldering.jpg
The distance between pillars is only about 1 milimeter! To be safe, I painted the solder joints with clear nail polish so the pillars would not short out even if they accidentally touch each other.
For More Details: The World’s Smallest 4x4x4 RGB LED Cube