The Raspberry Pi was originally designed to be a tool for hands-on learning about how computers work. It is also a tool that can be used to make all sorts of creative programming projects. The point of the Pi is to be accessible, and I have made this short illustrated introduction for people who are new to the Raspberry Pi, and are interested in learning a few basics, before diving into other projects.
Step 1: A Raspberry Pi is….?
A Raspberry Pi is….? A computer.
That’s right, it is a compact and inexepensive computer that, once you’ve set it up, can do nearly anything your regular old standard laptop or desktop computer can do.
Step 2: What do you mean “it’s a computer”?
Suppose you happened to have a screw driver and you opened up your laptop, and then you looked at all the stuff that is inside, you would find a few printed circuit boards (PCBs) and some other components. The PCB at the heart of your laptop or desktop is called the motherboard. It includes the central processing unit (CPU) and memory. It may also have an assortment of other components – for example, input devices, slots for connecting more boards (known as PCI), USB ports, network adapters, audio ports, graphics cards, and cooling fans – depending on how fancy the computer is.
The Raspberry Pi is just like the main PCB that is inside your laptop. It is the heart of a computer on a tiny board. It is very powerful, especially the latest version (Raspberry Pi 2), because you can run it just like you would a computer. But the beauty of it is that you can also program it for your own creative projects (like taking selfies at certain time intervals, for example).
Out of the box, your Pi is not quite ready to go. First you’ll need to set up the Operating System (OS) and plug in all the devices (i.e. a mouse, keyboard and a monitor).
Step 3: What devices do I need?
You’ll need a few things to get started. Just like a regular computer, you’ll need some devices to use with with the Pi. These are: a mouse, monitor with HDMI connector, keyboard, power, and an SD card with the OS installed. You can also add optional devices such as a speaker or headphones through the mini audio jack input, USB wifi adapter, cameras, program your own input and outputs, and more!
What is an Operating System?
Just like your MAC uses OSX and your PC uses Windows, your Raspberry Pi requires an operating system. You’ll need an operating system for your Pi so that you can talk to the processing units in the board and accomplish tasks without having to worry about all the low level processes that a functioning computer requires. Older operating systems have a text based interface, but most now have a Graphical User Interface (GUI, pronounced “gooey”, as in custard).
If you are new to the Raspberry Pi it is recommended to start with NOOBs (as easy operating system installer) which contains Raspbian OS. You can buy this pre-installed in an SD card or download it here.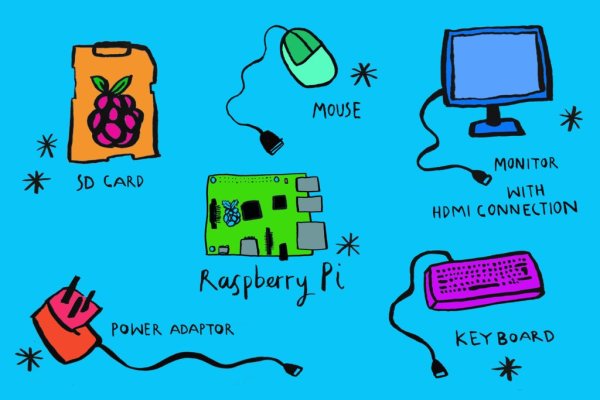
Step 4: How do I get started?
Start by plugging all of the external devices into the USB and HDMI sockets on the front of the board (i.e. the keyboard, mouse, monitor), then turn the board over and slot the micro SD card in. And then power up.
If you are using NOOBs (which is recommended if this is your first Pi project), then the set-up is a walk though process: power up the board and when prompted choose the OS you would like to use (go for the recommended option of installing Raspbian), and then wait for the Pi to set-up, this can take a while.
A configuration window will pop-up, and if you are not using the default GB keyboard, you’ll want to change the configuration settings. Select option (4) Internationalization, and then select to configure. Scroll down to en_US_UTF-8 UTF-8 (you can find a US keyboard, or find your local keyboard from the menu).
note: you’ll need to plug in everything else, including the SD card, BEFORE you plug in the power cable or it won’t boot up. It is good practice to always plug in the power cable last.
For more detail: An Illustrated Introduction to the Raspberry Pi