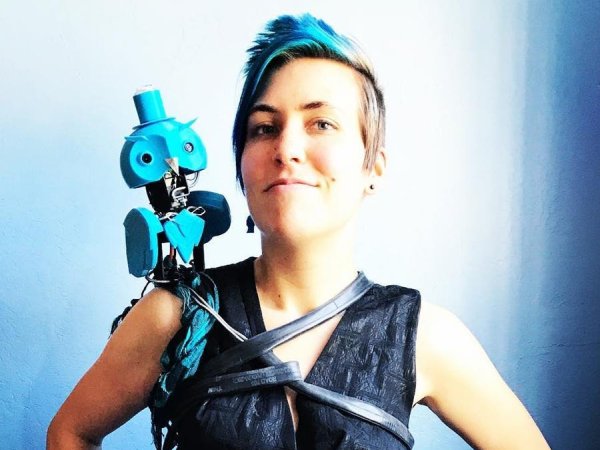
A wearable robotic owl familiar. Archimedes judges your emotions, via Google AIY.
Story
As featured in Make: Magazine!
This is a robotic owl that looks around for cool people, and can tell whether you’re happy or upset. If you’re excited enough, he will eventually let you take a sticker (or other small giveaway). He’s named Archimedes, after Merlin’s familiar in The Once and Future King. Of course, it’s also reminiscent of the cyborg owl in Blade Runner… and, apparently, one in Clash of the Titans(which I’ll have to check out).

First up, if you don’t know the Google AIY Vision Kit, check out the details here! This is the basis for the robot’s smarts. The code for this project is coming soon.
It started when we were invited to contribute something to the Google booth at Bay Area Maker Faire. I took a really, really long time to figure out what to build—what it would look like, how it would animate, how it would dispense the stickers… in the end, I went with this cute and fairly challenging design.
This robot is versatile enough that I can bring it along to different events, such as the CODAME Artobots Festival and the Arm/Hackster Asia Tour (since the Raspberry Pi runs on an Arm chip, the Broadcom BCM2835). In other words, I can justify spending this much time on one project because I can re-use and iterate upon it. I’m also excited to have a sidekick in the office 🙂
1. Assembling the AIY Vision Kit

(You might also want to see the other demos that come pre-loaded with the kit.)
2. Servos
I used the pan/tilt servo gimbal from HackerBox #0024, “Vision Quest”. The servos are super beefy – heavy and stable. Perfect for a robot that will do lots of traveling.
Then, I grabbed a servo out of a Seeed Grove kit and cut off the connector, to lift the box lid. Nothing too fancy.
I couldn’t get the servo control to play nice with the Joy Detection AIY demo, so I offloaded that to an Arduino, tucked into the tea box that Archimedes perches on.
The servos get plugged into pins 9 (owl top/pan), 10 (owl bottom/tilt), and 11 (box lid). Their ground wires are connected to the GND pin. Then, both their power and ground lines are connected to a separate 5V USB power supply, to make sure they have plenty of juice.
3. Programming
Archimedes keeps looking around until he finds a happy face, then stops and opens the treat box for you. (He’s a bit of a diva, though, so you need to look REALLY happy!)
I combined the AIY kit’s LED and Joy Detection demos (found in /gpiozero and /joy, respectively). I wanted to make the LED pin turn on when it finds a happy face, but weirdly, this code does the opposite. Someday, I will be enough of a software wizard to figure out why…
The Arduino code is modded from the Servo demo. I use a “while” loop to keep the owl looking around until he finds a REALLY happy face… then he stops and opens the box for you. 🙂
4. 3D-printed carapace
I spent several nights in the office, CAD-ing and printing up the various bits. First off, it involved a lot of measuring the dimensions of my AIY Vision kit and servo assembly, then deciding where the different electronic pieces would go. I wanted plenty of space in the head, but it also needed to be close to the base, so that I could mount the Raspberry Pi underneath and still have the camera and button assemblies up in the head.
I decided to print the wings and chest piece with mounting loops, so I could put it together later with aluminum wire. (The chest piece is called owl-tail because it was originally a tail, but looks much better in the front. You could probably make several, if you wanted to give him a bit more dignity.)
Here’s a bit of insight into the design process:

I designed everything in OnShape and printed it on Hackster’s Lulzbot Taz 6, using light blue Taulman N-Vent filament (discontinued).
Assembly notes
Managing the cables is important here. I could have done a better job, but I didn’t have time to re-solder everything and make it perfect. “Perfectionism is nihilism!”, as my friend says – or more commonly, perfect is the enemy of good. I do need to get some little cable controllers, though…
Head: To mount the 3D-printed parts, I used thick aluminum armature wire (sold in art stores). For the head, I bent a couple of pieces of wire to fit into the servo bracket holes, curved them over to support the head, and slid heat-shrink tubing over them so they wouldn’t short anything out. This is quite stable! For the Pi, I stuck it down with double-sided insulating foam tape. I also covered the servo bracket with electrical tape, just in case.
When I was printing the head, it came out kind of… Cthulhu-like. I haven’t yet solved how to adjust the Z-axis on our Lulzbot printer, and it’s off, which means that things don’t always adhere the way they should. So, with some regret, I cut off its little face-tendrils. I’ve been experimenting with cutting up CDs for mosaics, so I hot-glued on a couple of pieces to form a little beak. It looks great now, and is quite sturdy!
Body: The body perches on a tea tin… English Breakfast, of course. I have a little bendy tripod in there, which is attached to the bottom of the servo mounting bracket using the nut from the AIY kit. A couple more bolts hold him perching in place on the edge of the tin. Then, the tin is filled with brown paper, which creates a “nest” and also insulates the Arduino from its metal box and tripod. I did drill a couple of holes in the tin, to pass cables through.
Treatsbox: The box is pretty straightforward; it’s made of LEGO, with a hinged lid. The “open sesame” servo is mounted in the back, under the lid. Did you know you can just buy different sizes of blue LEGO baseplates? You can! ✨
Power: I’m using a powered USB hub so everything gets plenty of juice. The Pi, servos, and Arduino draw their power directly from here. I soldered a USB power cable directly to the Pi’s 5V and GND pins, because the plug stuck out too much to fit in the head.
Process shots
I have a ton of progress shots up on my Instagram. I won’t bore you with them here (also, some are in the Story and can’t be embedded).
Source: Archimedes: The AI Robot Owl