Wireless technology has revolutionized home printing, offering benefits like reduced cable clutter and the flexibility to place your printer anywhere in your home. However, if you have an older printer, it may not have built-in wireless capabilities. Replacing it with a new printer might not be cost-effective, especially if your old printer has unique features or replacing it is expensive.
The solution to this problem is to make your old printer wireless. There are various options available, but one popular choice is to utilize your Raspberry Pi as a wireless print server.
Benefits of Wireless Printing
If you haven’t yet experienced the convenience of wireless printing, this project is a great opportunity to explore its benefits. But what exactly makes wireless printing worth considering?
- Freedom from computer dependency: With wireless printing, your printer is no longer limited to being connected to a single computer. You can print from any device, including laptops, smartphones, or tablets.
- Device compatibility: Wireless printing allows any compatible device to connect and print, regardless of its operating system. Whether you’re using Windows, macOS, or other Linux-based systems, wireless functionality enables seamless printing.
- Elimination of cable clutter: Say goodbye to the hassle of dealing with tangled cables. Wireless printing liberates your printer from the constraints of physical connections, providing a cleaner and more organized setup.
- Overcoming wireless issues: If your existing wireless printer is experiencing connectivity problems, using the Raspberry Pi as a wireless print server can help resolve these issues.
By implementing wireless printing with the Raspberry Pi, you can enjoy the flexibility and convenience it brings, while ensuring compatibility across different operating systems.
Preparing for Wireless Printing With the Raspberry Pi
To transform an old wired printer into a wireless device, you’ll require a Raspberry Pi model that has built-in Wi-Fi. Here are the Raspberry Pi models that come with wireless capabilities:
- Raspberry Pi 3 B/B+
- Raspberry Pi 4 B
- Raspberry Pi Zero W
If you are using an older Raspberry Pi model without built-in Wi-Fi, you’ll need to connect a wireless USB dongle to the Pi and ensure it is connected to your network. Additionally, make sure that your Raspberry Pi is running the latest version of Raspbian, which should be installed on the SD card.
In addition to the Raspberry Pi, you will need the following components:
- A USB printer (if you have a parallel printer, you can use a parallel-to-USB adapter)
- The printer’s power supply and USB cable
- Credentials for your wireless network
By gathering these components and ensuring that your Raspberry Pi is properly set up, you’ll be ready to proceed with making your old printer wireless.
Boot and Update Your Raspberry Pi for Printing
To begin the process, make sure that your printer is connected to the Raspberry Pi and powered on. You can access your Raspberry Pi through various methods, either by using a keyboard and display directly connected to the Pi, or by establishing a remote connection via SSH, VNC, or RDP.
Once you have access to your Raspberry Pi, you need to update it. Open a terminal and enter the following command to initiate the update process:
sudo apt update && sudo apt upgrade -yRunning this command will check for any available software updates and perform the necessary upgrades. You should follow the prompts that appear on the screen and continue until the update process is completed.
Configuring Your Raspberry Pi as a Print Server With Cups
After connecting and setting up the necessary equipment, your first step is to confirm whether your USB printer is recognized by the system.
To do this, open a command line interface on your Raspberry Pi directly or establish an SSH connection. Once you have access to the command line, input the following command:
lsusbA list of connected USB devices will be displayed, and you should be able to identify your printer from the list.
After that, you will need to install Samba, which is an open-source file sharing software. You can install it by executing the following command:
sudo apt install sambaFollow any instructions that appear on the screen during the installation process. Once Samba is installed, it’s time to proceed with installing CUPS, which stands for Common Unix Printing System. It is important to note that you need to have Samba installed before installing CUPS.
sudo apt install cupsCUPS serves as a driver provider for your printer. While many manufacturers offer Linux drivers, in case you don’t have one available, CUPS can be used as an alternative.
At this stage, you can proceed to add the default user to the printer admin group.
sudo usermod -a -G lpadmin piBy default, CUPS does not allow access from external devices. To address this, you need to configure CUPS to accept connections from specific devices, such as your PC browser. Once configured, you will need to restart the CUPS service.
sudo cupsctl –remote-any
sudo /etc/init.d/cups restart
Adding Your Printer
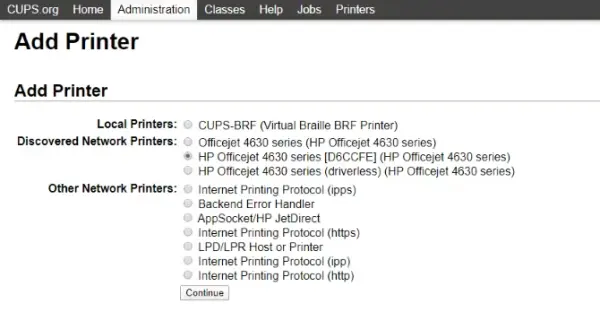
To set up your printer with your Raspberry Pi, navigate to the Raspberry Pi desktop and open your browser. Enter either “127.0.0.1:631” or “127.0.0.1:631/admin/” in the address bar to access the CUPS administration page. Once there, switch to the Administration tab. From the available options, select “Add new printer” and provide your Raspbian credentials when prompted. Choose your printer from the list and proceed to the next screen, where you will need to select the correct device from the available options.
After selecting the correct device, proceed to confirm the details and assign a name to your printer. Make sure to check the “Share This Printer” option and click on the “Continue” button to proceed.
After selecting your printer from the list, the next page may take some time to load as the device driver names are being loaded. The correct printer driver should be selected by default, so you can proceed by clicking on the “Continue” button.
Alternatively, if you prefer to let the device you’re printing from handle the driver, you can click on “Select Another Make/Manufacturer” and choose “Raw”.
Once you have selected the appropriate driver, click on “Add Printer” and then “Set Default Options”. After a few moments, your printer will be ready to accept print jobs. To ensure that it is working correctly, you can click on “Maintenance” and select “Print Test Page”.
Connecting to Your Raspberry Pi Print Server
Once you have completed the previous steps, you need to ensure that access to your Raspberry Pi is enabled. By default, macOS allows access, but for Windows, some additional configuration is required. Once this configuration is done, you will be able to start printing.
To make the necessary changes, you can edit the Samba config file located at /etc/samba/smb.conf. There are two ways to do this:
- Open the file on the desktop and make the changes using a text editor.
- Use the command “sudo nano /etc/samba/smb.conf” in the terminal to edit the file.
You should add the following lines to the file:
Make sure to save the changes after adding these lines.
# cupsys-client package.
printing = cups
printcap name = cups
[printers]
comment = All Printers
browseable = no
path = /var/spool/samba
printable = yes
guest ok = yes
read only = yes
create mask = 0700
# Windows clients look for this share name as a source of downloadable
# printer drivers
[print$]
comment = Printer Drivers
path = /usr/share/cups/drivers
browseable = yes
read only = yes
guest ok = no
workgroup = your_workgroup_name
wins support = yes
To complete the configuration, you will need to replace “your_workgroup_name” with the actual Windows workgroup name. The default workgroup name is usually “Workgroup.”
To save and exit the file, you can press Ctrl + X, and then restart the Samba service by executing the following command:
sudo systemctl restart smbdThis will ensure that the changes take effect and Samba is restarted with the updated configuration.
Start Printing From Windows & macOS
After restarting Samba, give it a few seconds to complete the process. Now you can switch to your PC and proceed to add the new printer. To ensure that the Raspberry Pi is visible, open Windows Explorer and navigate to Network.
To add the printer on your Windows PC, go to Control Panel, then select Hardware and Sound, followed by Devices and Printers. Click on Advanced printer setup and wait for the system to scan for available printers.
Alternatively, you can expand the entry for your Raspberry Pi in Windows Explorer’s Network view. Right-click on the printer you want to add, select Connect, choose your Windows printer driver, and start printing.
Mac users can add a new printer using the standard method available on macOS.
For any administrative tasks related to the print server, you can access the CUPS printer admin web interface by opening http://[RPI.IP.ADDRESS.HERE]:631 in a web browser on any device connected to your network. This interface allows you to manage and configure the print server settings.
You Made a DIY Print Server With Raspberry Pi
Congratulations on successfully setting up your Raspberry Pi-powered print server! At this stage, your non-wireless printer has been transformed into a wireless-enabled printer, allowing you to print to it from any device on your network. This opens up a world of flexibility and convenience in your printing experience. Well done on completing the project!