Aim:
Set up the Raspberry Pi as a wireless router using the Raspbian OS. The internet connection will be provided by a Huawei E303 USB 3g dongle on the safaricom network in Kenya, though the setup should be similar on most Huawei dongles and 3g networks. The wireless access point will be provided by an Edimax Nano USB Wifi adapter.
Power Source ——–>RPI —-> Powered USB HUB —–> 3g Dongle
|
|
Edimax
Wifi
The USB ports of the Pi seem to struggle to provide the power for a 3g dongle, so a powered USB hub is necessary.
After a lot of reading and messing around, I’ve come up with a step by step guide for setting up my Pi as a wireless internet router. I use this every time I make a fresh setup of Raspbian, which is a fairly regular event. Stumbling round my latest install like a drunken elephant, it never takes me long to screw something up so badly that it’s easier just to start from scratch.
As such, this guide assumes that the Raspbian operating system is ‘fresh’. It has been tested with the 2012-12-16 release – as soon as I have the time free, I’ll update the guide for the newest release. So, the steps I use to set up the ‘Pifi’ Router are as follows:
This guide and more like it can be found on my blog.
Step 1: Make sure the Pi can see the 3g Dongle
Gather Information
To get more information about the USB devices connected to the Pi, we use the command ‘lsusb‘. Open a terminal window and type:
lsusb
should give an output similar to this:
Bus 001 Device 002: ID 0424:9512 Standard Microsystems Corp.
Bus 001 Device 001: ID 1d6b:0002 Linux Foundation 2.0 root hub
Bus 001 Device 003: ID 0424:ec00 Standard Microsystems Corp.
Bus 001 Device 008: ID 050d:0234 Belkin Components F5U234 USB 2.0 4-Port Hub
Bus 001 Device 005: ID 7392:7811 Edimax Technology Co., Ltd EW-7811Un 802.11n Wireless Adapter [Realtek RTL8188CUS]
Bus 001 Device 010: ID 12d1:1506 Huawei Technologies Co., Ltd. E398 LTE/UMTS/GSM Modem/Networkcard
lsusb lists the usb devices connected to the Pi, either directly or through the hub. I’ve highlighted the parts of the output that indicates the 3g dongle can be seen by the Pi. Yours should look similar to this, although it will vary from model to model – most 3g dongles on the market seem to be a Huawei of one flavour of another at the moment. So long as there is a mention of ‘modem’ or ‘UMTS’, you should be laughing. What you don’t want to see is this:
Bus 001 Device 010: ID 12d1:14d1 Huawei Technologies Co., Ltd.
This is an issue that arises because your 3g dongle has a small partition on it containing the ‘dashboard’ software for windows. Your Pi has detected this partition, and labeled the dongle as a storage device before it had chance to notice the 3g modem waving its arms frantically in the background.
This happened occasionally with my 3g dongle – I would suggest following the next step even if you are feeling smug about your lsusb output at the moment. The next time you reboot your Pi it could detect your dongle as a storage device, throwing you into a fit of depression. Dangerous times
This can all be overcome with the use of usb_modeswitch. To install, in the terminal window type:
sudo apt-get install usb-modeswitch
The clue is in the name – its going to switch the mode of the usb device from ‘storage’ to ‘modem. Yaaaaay. You need to give it some direction though, which will require some googling. The hexidecimal values highlighted here:
Good: Bus 001 Device 010: ID 12d1:1506 Huawei Technologies Co., Ltd. E398 LTE/UMTS/GSM Modem/Networkcard
Bad: Bus 001 Device 010: ID 12d1:14d1 Huawei Technologies Co., Ltd.
tell the operating system the vendor ID and device ID. More information on USB identification can be found on the debian wiki. Notice that the first 4 characters of the device ID (vendor ID) are the same in both examples, but the last 4 (device ID) have changed. Usb-modeswitch forces the operating system to use the combination that corresponds to the 3g modem.
usb-modeswitch usage
After usb-modeswitch has installed, an entry for your 3g dongle has to be made in /etc/usb_modeswitch.conf. If your device has already been detected, you can find the Device ID in the output from ‘lsusb’ – the portion highlighted in the examples above. If, however, you have the ‘bad’ example in your output, you need to find the correct Device ID (second part) for your 3g dongle – a good bet is a google search for ‘3g dongle model number usb_modeswitch’. Failing that, the search function of the usb-modeswitch forums. Your model number can normally be found somewhere on the device – try popping the cover off and looking for a sticker near where you insert the sim if you cant find it on the outside. We can assume the first part (vendor ID) is correct in both situations.
After a bit of research, the information I had to amend to the config file amounted to this:
DefaultVendor = 0x12d1
DefaultProduct = 0x1506
MessageEndPoint = “0x01”
MessageContent = “55534243000000000000000000000011060000000000000000 000000000000”
Once you have found the correct device ID, copy and paste the information above into a text editor. Amend the information to suit your own setup, deleting the bottom two lines if they are not needed – I’m not going to claim to understand the MessageEndPoint or MessageContent fields: They were part of the solution I found here – credit goes to krishnamohan of the fedoraforum.org site. Your device may or may not require them. Make sure to include the ‘0x’ before the vendor and device IDs – this lets the Pi know that they are hexidecimal values.
To add this information to the usb-modeswitch config file, open the file for editing by issuing the following command in the terminal window:
sudo nano /etc/usb_modeswitch.conf
Paste the Device ID information from the text editor to the bottom of the config file you just opened in the terminal window. Hit Ctrl+X, y, Enter to exit and save changes.
Reboot your Pi and run ‘lsusb’, observing the output – if you found the right Device ID, you should see something to the ‘good’ output example shown above.
Step 2: Download and setup ppp, UMTSKeeper and Sakis3g
pppd
The ppp package will install the point to point protocol daemon, which will manage the connection between you and your 3g provider. The package can be installed via the terminal with the command:
sudo apt-get install ppp
Nothing further needs to happen with pppd, it should just sit there in the background, as a daemon is supposed to, waiting for Sakis3g to poke it in the ribs. Want to learn more? Here is a link to the Wikipedia page on daemons in linux.
UMTSKeeper
UMTSkeeper is used to automatically reconnect the 3g dongle using the Sakis3g script should the connection drop, which actually happens with monotonous regularity in Kenya.
Download and unpack UMTSkeeper by issuing the following commands from the terminal window:
sudo mkdir umtskeeper
cd umtskeeper
sudo wget “http://zool33.uni-graz.at/petz/umtskeeper/src/umtskeeper.tar.gz”
sudo tar -xzvf umtskeeper.gz
sudo chmod +x umtskeeper
The first command created a folder called ‘umtskeeper’ in the current directory you are in. To confirm what this directory is, type ‘pwd’. Make note of the output, as we will need the full path to automate UMTS keeper later. Now we will download Sakis3g into the same directory to keep things simple.
Sakis3g
Sakis3g is a script used to make a 3g connection. You need to be able to provide a few details: your APN, the PIN for your sim card and your username and password if your provider requires them. This information can (hopefully) be found on your providers website or in the documentation that came with your simcard/dongle. If not, a search on google for ‘your provider APN settings’ should unearth them.
The sakis-3g.org website has been down for some time. Fortunately somebody has uploaded a copy of the script to sourceforge. To download and unpack it, issue the following commands from the terminal window:
sudo wget “http://downloads.sourceforge.net/project/vim-n4n0/sakis3g.tar.gz?r=http%3A%2F%2Fsourceforge.net%2Fprojects%2Fvim-n4n0%2Ffiles%2F&ts=1363537696&use_mirror=tene~t” -O sakis3g.tar.gz
sudo tar -xzvf sakis36.tar.gz
sudo chmod +x sakis3g
Before going further, you should attempt to make a 3g connection using the sakis3g script alone, proving everything you’ve done up till now works. Sakis3g has an interactive mode, which will prompt you for information regarding your 3g connection. In the terminal window, type:
./sakis3g –interactive
and follow the prompts on screen. If you have no APN user or password, enter ‘0’. Once a connection has been made, make sure you can browse the internet, or issue a ping from the terminal window:
ping -c 4 google.com
Now test UMTSkeeper. The command at first may look a bit confusing (the details are for my connection):
./umtskeeper –sakisoperators “USBINTERFACE=’0′ OTHER=’USBMODEM’ USBMODEM=’12d1:1506′ APN=’CUSTOM_APN’ CUSTOM_APN=’safaricom’ SIM_PIN=’1234′ APN_USER=’saf’ APN_PASS=’data'” –sakisswitches “–sudo –console” –devicename ‘Huawei’ –log –silent –monthstart 8 –nat ‘no’
Breaking it down a little, these are the areas that you will need to change:
USBMODEM: The Device ID we found using the lsusb command earlier
CUSTOM_APN, APN_USER, APN_PASS, SIM_PIN: Information about your sim card and your providers data network.
A full breakdown of the paramaters can be found on the UMTSKeeper site..
Once you are satisfied UMTSKeeper is working in harmony with Sakis3g, we can edit /etc/rc.local so that it starts when the operating system boots. In the terminal window, type:
sudo nano /etc/rc.local
and add the following single line, edited to show your path to the umtsfolder you found with the ‘pwd’ command earlier:
PATH GOES HERE/umtskeeper –sakisoperators “USBINTERFACE=’0′ OTHER=’USBMODEM’ USBMODEM=’12d1:1506′ APN=’CUSTOM_APN’ CUSTOM_APN=’safaricom’ SIM_PIN=’1234′ APN_USER=’saf’ APN_PASS=’data'” –sakisswitches “–sudo –console” –devicename ‘Huawei’ –log –silent –monthstart 8 –nat ‘no’ &
Exit, saving changes.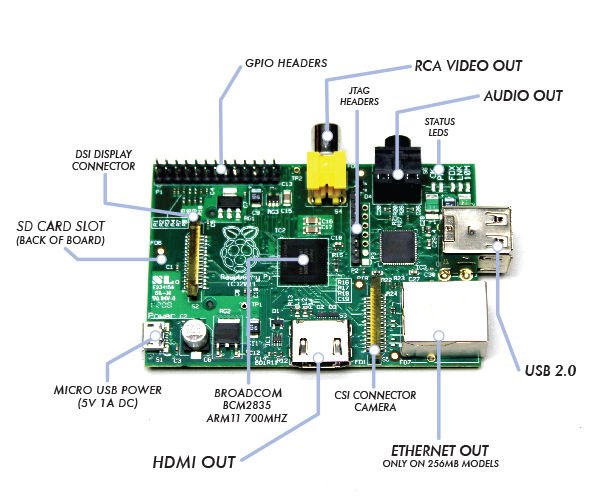
Step 3: Setup Wireless Access Point
The final hurdle involves setting up the wireless access point.
The chiipset in the Edimax Wifi adapter does not work ‘out of the box’ as an access point, so the process is a little disjointed. One step at a time:
Install ‘hostapd’ specifically built for Edimax adapter
hostapd manages the authentication on your wireless network. The version in the debian repositories in not compatible with the Edimax adapter – thankfully someone has put together a version which includes the correct drivers. Follow this guide to install the updated version of hostapd.
The guide mentions creating a configuration file. This should contain the following:
interface=wlan0
ssid=NAME OF YOUR WIRELESS NETWORK GOES HERE
channel=10
driver=rtl871xdrv
ieee80211n=1
hw_mode=g
device_name=RTL8188CUS
manufacturer=Realtek
wpa=2 # This sets the security settings to WPA2
wpa_passphrase=PASSWORD FOR NETWORK GOES HERE
wpa_key_mgmt=WPA-PSK
wpa_pairwise=CCMP
rsn_pairwise=CCMP
# Other settings
beacon_int=100
auth_algs=3
wmm_enabled=1
For more deatil: Raspberry Pi as a 3g (Huawei E303) wireless (Edimax EW-7811Un) router