How exciting would it be to design and operate your very own website using a Raspberry Pi? Imagine connecting sensors to the Raspberry Pi and having their data presented on a web page accessible from any internet-connected device.
In the initial section of this dual-part tutorial, we will illustrate the process of establishing a basic web server on the Raspberry Pi. This web server can be accessed remotely via the internet. To illustrate, we will demonstrate how to present temperature and humidity data obtained from a DHT22 sensor on a web page. This setup will allow users to view these readings from a different computer.
INSTALL THE BOTTLE PYTHON LIBRARY
The Bottle framework, a Python micro-framework, offers a straightforward yet robust solution ideal for small web applications, including the one we intend to create. It stands out for its minimal dependencies, relying solely on Python, and is compatible with a wide range of Python versions.
Setting up the Bottle server on your Raspberry Pi is a straightforward process. Start by refreshing the list of available packages on your Raspberry Pi with this command: “sudo apt update.” After that, proceed to install the Bottle framework within a virtual environment using the following command: “pip install bottle.”
BOTTLE WEBSERVER “HELLO WORLD”
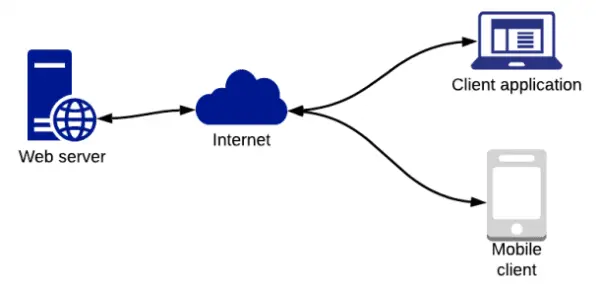
To establish a web server on your Raspberry Pi, you must ensure that your Raspberry Pi is connected to your network. Here are the essential components you’ll require:
1. Network router
2. Ethernet cable or a WiFi USB modem
3. Raspberry Pi
4. One or two computers to assess the connection
Follow these steps to connect these devices properly:
In order to establish a fundamental web server, begin by crafting a Python file with your preferred name. I’ve chosen to name mine “myServer.py.” Then, paste the provided code into your file. Afterward, press Ctrl-X, followed by Y, and then press Enter to save and exit. To execute the server, run the following command: “sudo python myServer.py.”
from bottle import route, run
@route(‘/hello’)
def hello():
return “Hello there…”
run(host=’192.168.8.39′, port=80, debug=True, reloader=True)
CODE DESCRIPTION
A web application relies on routes for its proper functionality. To establish a route, you can follow these steps:
1. Begin by importing the ‘route’ and ‘run’ functions from the Bottle library, like so: `from bottle import route, run`.
2. Utilize the ‘@route’ decorator and specify the desired route location. In this example, it’s set as ‘/hello,’ but you can customize it to your preferences.
3. Define a function that will be executed when the specified route is accessed, for instance: `def hello():`.
4. Inside the function, return the string “Hello there…”. This function essentially sends this text to be displayed in the user’s web browser.
5. Finally, instruct the Python interpreter to activate the built-in development server. You can specify the host and port for the server (it can be the local host or an IP address if known), like this: `run(host=’137.158.131.117′, port=8080, debug=True)`.
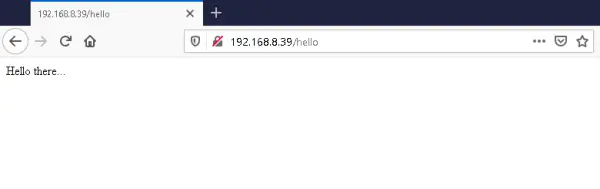
By following these steps, you can create a web server route. To access the result in your web browser, open your preferred browser and enter the IP address, port number, and the route name. You’ll then see “Hello there” displayed in the browser. Additionally, you can perform the same procedure on a different computer, provided it’s on the same network as the Raspberry Pi.
On the Raspberry Pi terminal, you will see status messages when users access your web page.
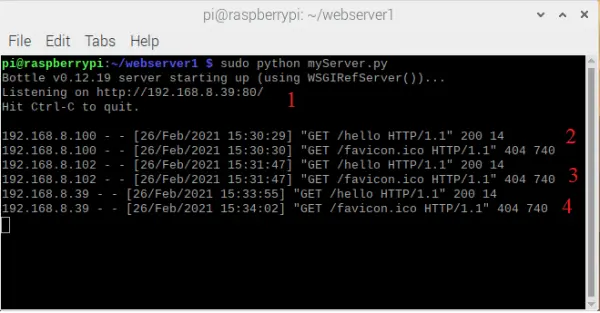
As a result, we can observe that our server is operational, and three devices on the same network have effectively accessed our website.
These devices are identified by the following IP addresses: 192.168.8.100, 192.168.8.102, and the localhost, which is 192.168.8.39.
The subsequent action is to initiate the server via your terminal. You can accomplish this by executing the following command from the Raspberry Pi terminal:
“`bash
sudo python myServer.py
“`
Now, proceed to open your web browser and enter the address 192.168.8.39/hello. Please take note that if the website is operating on a different port, you should include it in the URL like so: 192.168.8.39:80/hello.
PORT FORWARDING
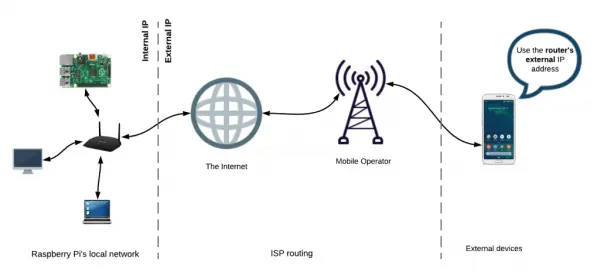
Currently, our web page is accessible exclusively to computers within the same network as the Raspberry Pi. To enable external users to access our web server via the internet, we must make some adjustments to our router settings. One such task involves implementing Port Forwarding.
Port Forwarding is a process that permits internet-connected computers to establish a connection with a designated service within our private network. Essentially, we are instructing our router to redirect incoming requests on port 80 and direct these requests to the Raspberry Pi.
To initiate this process, we must access the configuration page of the router, which involves entering the router’s internal IP address into our web browser. In my case, I’m using the Huawei 4G B315 Router, and its internal IP address is 192.168.8.1. This action will direct you to the configuration page.
I won’t delve into the specifics of creating an account on your router because different router brands feature various configuration page layouts. However, the ultimate objective remains the same: we must instruct the router on how to handle incoming requests. To access the port forwarding section on a router similar to mine, follow these steps:
HOW TO ENABLE PORT FORWARDING
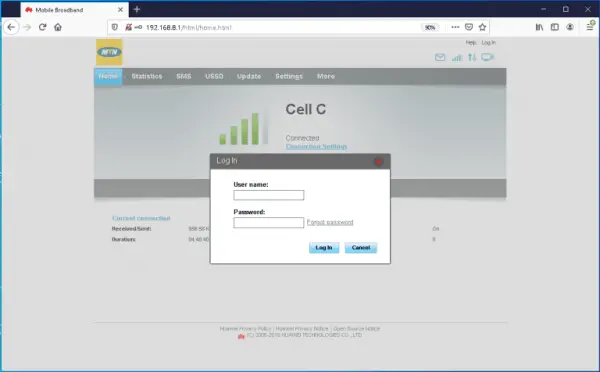
On the home page, click “Settings” then enter your username and password.
Here’s a rephrased version:
Within the settings page, follow these steps:
1. Select “Virtual Server.”
2. Click the “Add” button and complete the required entry fields with the following details:
– Name: Enter “Rpi” as the computer’s name.
– WAN Port: Set it to “80” for web connections.
– LAN IP Address: Specify the static IP address of the Raspberry Pi, which is “192.168.8.39.”
– Protocol (TCP/UDP).
– Ensure that the Status is set to “ON.”
3. Click “OK.”
4. Finally, click “Apply.”
Congratulations, the Port Forwarding for the Raspberry Pi has been successfully configured.

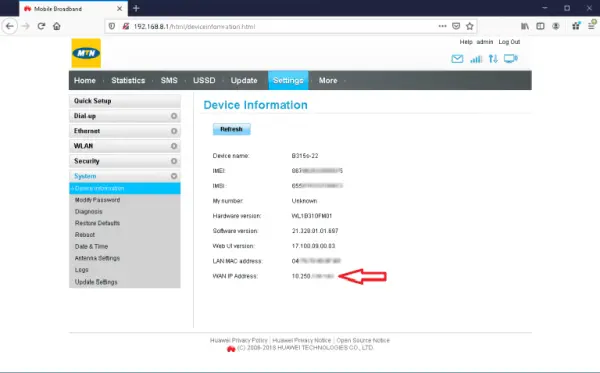
At this stage, there’s no need for the router’s internal IP address; we’ll be using its external IP address instead. If you’re unsure about the external IP address of your router, you can access the “Device Information” page to find and verify the WAN IP address. When an external computer sends a request to this IP address on port 80, the router will be able to determine the appropriate destination for forwarding that request.
EXAMPLE PROJECT
The final step in this exercise involves presenting the date, time, temperature, and humidity data from a DHT22 sensor on a web page that can be accessed over the internet.
We’ve previously covered how to retrieve a basic webpage from the web, so this task will solely focus on illustrating how to showcase DHT22 sensor data on a webpage. I won’t delve into the details of interfacing the DHT22 sensor with the Raspberry Pi here. If you’re unfamiliar with this step, I strongly recommend you review the associated tutorial first.
Here’s the list of components you’ll require:
1. Raspberry Pi
2. DHT22 humidity and temperature sensor
3. One 10K resistor
4. Breadboard
5. Jumper wires
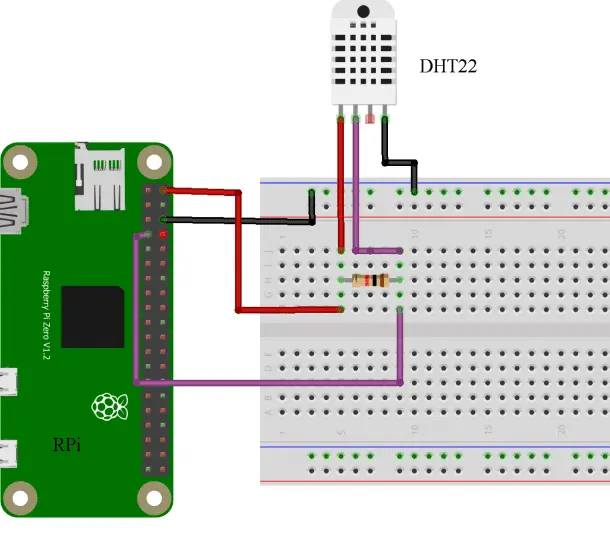
Once you’ve gathered these components, establish the connection between the Raspberry Pi and the DHT22 sensor by following the provided wiring diagram.
THE HTML CODE
To craft the webpage’s code, we’ll employ HTML. Begin by generating a fresh file and labeling it as “main.tpl.” Afterward, proceed to duplicate the HTML code provided below and insert it into the “main.tpl” file.
<!DOCTYPE html>
<html lang=”en”>
<head>
<title>Tempetature and Humidity</title>
<link rel=”stylesheet” type=”text/css” href=”http://twitter.github.com/bootstrap/assets/css/bootstrap.css”>
</head>
<body>
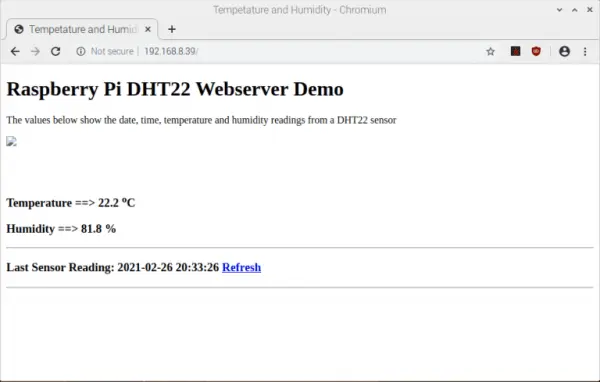
<h1>Raspberry Pi DHT22 Webserver Demo</h1>
<p>The values below show the date, time, temperature and humidity readings from a DHT22 sensor</p>
<p><img src=”/home/pi/webserver1/temp_humidity.jpg”></p>
<br /><br />
<h3> Temperature ==> {{tempVal}} <sup>o</sup>C</h3>
<h3> Humidity ==> {{humidVal}} %</h3>
<hr>
<h3> Last Sensor Reading: {{myTime}} <a
href=”/”class=”button”>Refresh</a></h3>
<hr>
</body>
</html>
THE PYTHON CODE
Following this step, generate a fresh Python file for the purpose of defining your web server. You can name it as you like; for instance, I’ve chosen “main.py.” Now, proceed to paste the provided code into this file, save your changes, and exit the text editor. Finally, in your terminal, execute the command “sudo python main.py.”
from bottle import route, run, static_file, template
import time
from datetime import datetime
import Adafruit_DHT
DHT_SENSOR = Adafruit_DHT.DHT22
DHT_PIN = 4
HOST = ‘192.168.8.39’
@route(‘/’)
def serve_homepage():
humidity,temperature = Adafruit_DHT.read_retry(DHT_SENSOR, DHT_PIN)
humidity = ‘{0:0.1f}’.format(humidity)
temperature = ‘{0:0.1f}’.format(temperature)
time = datetime.today().strftime(‘%Y-%m-%d %H:%M:%S’)
myData = {
‘tempVal’ : temperature,
‘humidVal’ : humidity,
‘myTime’ : time
}
return template(‘main.tpl’, **myData)
run(host=HOST, port=80, debug=True, reloader=True)
HOW THE PYTHON PROGRAM WORKS
The `route()` decorator associates a code block with a specific route. In this instance, we establish a connection between the “/” path and the `serve_homepage()` function. This linkage is known as a route, which aligns with the purpose of the decorator’s name. Whenever a web browser requests a URL, the corresponding function is invoked, and the result it produces is sent back to the browser.
The `run()` command at the bottom initializes an in-built development server. It operates on the host IP address 192.168.8.39 and port 80, continuously handling requests until the server is manually stopped via the terminal.
For loading the HTML content from a separate file and injecting variables into the HTML, we utilize the following line to include the `main.tpl` file: `return template(‘main.tpl’, **myData)`.
The `serve_homepage()` function is responsible for retrieving temperature, humidity, and time readings and subsequently passing these variables to the HTML file.
At this juncture, the process is straightforward, involving the addition of new functions annotated with the `@route` decorator to create new web pages.
ACCESSING THE WEBPAGE
The webpage is accessible via any web browser on a computer connected to your home network or even from the worldwide internet. Simply launch your preferred web browser and input the Raspberry Pi’s IP address. If you’re on a computer within the same network as the Raspberry Pi, employ its local IP address (in my instance, it’s 192.168.8.39). On the other hand, if you’re accessing it from a computer in a separate network, use your router’s external address (which could be something like 10.250.xxx.xx).
We appreciate your readership, and if you have any questions or need further clarification, please don’t hesitate to leave a comment below! To proceed with this project, you can access the next tutorial – Part 2 of “Creating a Raspberry Pi Web Server.”
Source: Raspberry Pi Web Server Configuration: A How-To Manual