A guest post by Les Pounder, a Freelance IT Consultant and Trainer from the UK who is a regular contributor to many Linux magazines and podcasts. You can find out more about him at about.me/lespounder.
Scratch, the well known first step into programming, has been used in the classroom for the last few years. Scratch is also pre-installed on the Raspberry Pi, making it easy to access the application. An interesting project is merging Scratch and the Raspberry Pi GPIO together, making it easier for children to use the GPIO, via a friendly GUI. Read Raspberry Pi: Creating a Camera to learn more about the Raspberry Pi GPIO.
This guide is based upon Simon Walter’s excellent tutorials.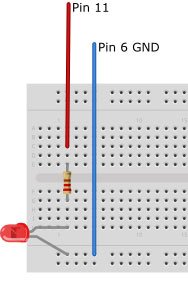
Here is the hardware you will need to follow along in this post:
- 2 x female to male jumper wire
- 1 x LED
- 1 x 220ohm Resisitor
- 1 x Breadboard
First, we will need to set up Scratch to work with the GPIO. For this, we need to download a shell script and run it in a terminal.
In a terminal type:
|
1
2
|
sudo wget https://dl.dropbox.com/s/oql4qzm8jlnsbeb/install_scratch_gpio2.sh -O
/boot/install_scratch_gpio2.sh
|
Then type the following:
|
1
|
sudo /boot/install_scratch_gpio2.sh
|
This will install a script that enables Scratch to talk to the GPIO. Now we need to wire up our Pi to some components. We will be using the standard pin mapping with pin 1 being the top left pin, marked “P1” on the Pi:
Connect a jumper cable to pin 6, which will be GND, and connect another cable to pin 11.
Now connect the components on the breadboard, as per the diagram:
Now, we need to start Scratch on our Raspberry Pi. To do this, double left-click on the “Scratch GPIO 2” icon, that is on the desktop.
We’ll start with a blank sketch. You will see a pop up that says “Remote Sensor Connections.” Just click OK to this.
Now, we need to click on the “Control” button, which provides us with a series of control constructs.
We will be using the control functions for this project.
In Scratch, you drag blocks, which represent the code that you wish to write, onto the center gray column.
So first drag the “When Green Flag Clicked” into the column, and look for a block called “forever.” Drag it from the left column to the center column, so that it connects with the first block.
The forever block will be an infinite loop, in which we will control the LED. Now, find the “broadcast” block, and drag it into the forever loop. On the broadcast block, click on the dropdown arrow. You should see a “new” popup appear. Click on it, and in the next box type:
|
1
|
pin11high
|
Then click OK.
Next, drag the “wait 1 sec” block into the forever loop, and drag the “broadcast” block into the forever loop. Click on the dropdown link again, and click on “new”, but this time type:
For more detail: Scratch & Raspberry Pi GPIO: A Great Combination