Adafruit launched it’s PiTFT not long ago and I bought one immediately from Pimoroni. Soon after that Adafruit published a tutorial entitled DIY WiFi Raspberry Pi Touchscreen Camera. I had a good read through it and on the final page the final paragraph was;
The package could be slimmed down considerably; there’s a huge amount of empty space between the PiTFT and Raspberry Pi (even more with a Model A board). Advanced makers could squeeze a slim LiPo battery and a 5V boost converter in there, connecting to the expansion header at the right edge of the TFT board instead of the side-protruding USB power connector. The result would be similar in size to some consumer point-and-shoot digital cameras.
Hmmm OK, Challenge Accepted!
But let’s see if we can fit in a charger too, and attach some lenses while we’re at it. Modern cameras feature both as standard, no reason why the SnapPiCam shouldn’t……
Thanks for voting for the SnapPiCam in the Raspberry Pi Contest, we made First Prize!
The SnapPiCam is on Kickstater!
http://www.kickstarter.com/projects/1008225922/the-snappicam-a-raspberry-pi-digitial-camera
Step 1: Parts
1 x Raspberry Pi Model A
1 x Raspberry Pi Camera
1 x Adadfruit PiTFT
1 x Adafruit LiPo Charger
1 x Adafruit 1200mAh LiPo
1 x Pololu Step-Up/Step-Down DC Converter
1 x Slide Switch
1 x Compact Micro SD Adaptor
1 x 8gb Micro SD Card
4 x M3 45mm Button Head Screws
4 x M2 8mm Screws
8 x M2 6mm Screws
2 x Nylon M2.5 6mm Screws
2 x M3 4mm Nylon Spacers
4 x M3 Microbabrs
2 x M2.5 Microbarbs
12 x M2 Microbarbs
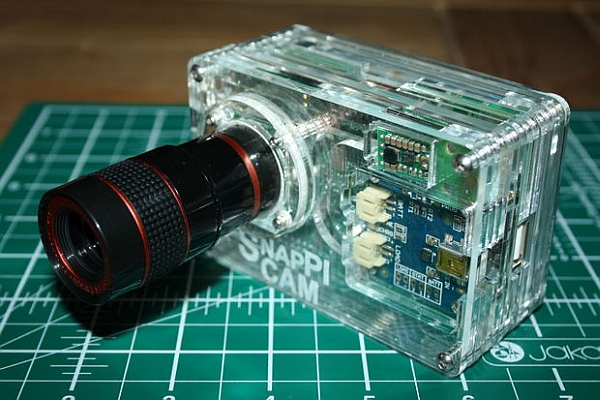
25 x Laser-Cut Acrylic Parts
1 x 8x Zoom Lens
1 x Fish-Eye Lens
1 x Telephoto Lens
Step 2: Power
The SnapPiCam uses a 1200mAh LiPo battery. I wanted to know what sort of run-time I could expect from the power pack.
Before I started with the build I hooked up the electricals to a DC Power Supply. By doing a few calculations using the data from the DC Supply we can work out an estimated run-time.
To calculate the power consumption of the electrical components in watts we multiply Volts by Amps.
V x A = W
5.2 x 0.51 = 2.652
The electricals consume power at 2.652 watts per hour. Next we calaulate the battery’s capacity.
V x A = W
3.7 x 1.2 = 4.44
The battery holds 4.44 watts based on 3.7v. The Lipo will supply ~4.2v when fully charged, and it’s lowest rating is 3.7v. I’ve gone with the lower value as not to over-estimate the run-time.
Now we know the battery’s power capacity and the electricals consumption rate we can approximate the run-time with a simple division.
4.44 / 2.652 = 1.674
We can expect a run-time of 1.6 hours, or 96 minutes. An hour and a half.
Step 3: Starting Point
I’m going to be making the parts with my laser cutter and the plans will be drawn in Illustrator.
I began by taking measurements of the Raspberry Pi. From that I could estimate the overall width and height of the camera frame. I wanted all the ports such as HDMI, USB and the SD Card all to be accessible even with the components fully enclosed. I also left space for a screw in each corner.
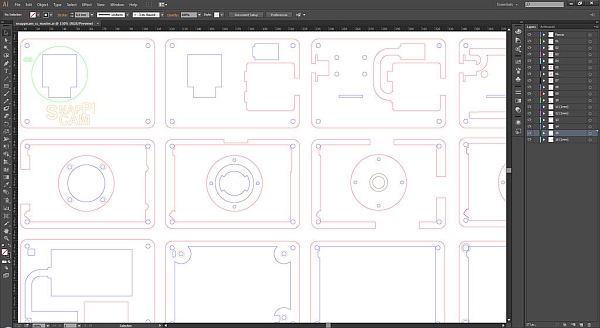
The overall width of the camera worked out at 101mm and with height was 67mm. The depth of the camera depends on how many layers of 3mm acrylic it would take to enclose everything in.
Next I needed to model the LiPo Charger and the DC DC Converter as both of those would be going at the front. The PiTFT needs to face backwards so the Raspberry Pi will be in a down-position with the camera and charger in front.
Cut-outs in the acrylic layers will hold the components. I’ll also use recessed Microbarb brass inserts as bolt anchor.
I want to attach some lenses to the front. I bough a few different ones off eBay. The small ones are magnetic and need a washer to attached themselves, but the 8x Zoom has a latching system. I’ll have to use interchangeable lenses to handle the two types.
The battery is ~5.5mm thick. It should fit nicely between two 3mm layers. I’ll make cut-outs for the battery in the layers and add thinner layer each side of those to box the battery in.
There will also need to be holes for the GPIO and channels for the wires and cables. I’ll also need an On / Off switch.
For more detail: The SnapPiCam | A Raspberry Pi Camera