Of course, Raspberry Pi is an amazing computer but it is not always very reachable. If you are not using a monitor constantly connected to it, you most likely utilize SSH, VNC, or RDP to get to it.
What You Need to Use a Tablet Display With Raspberry Pi
Would you like to turn your Android device into a display for Raspberry Pi? I assure you it is easier than how it sounds.
The following items are necessary:
– For Raspberry Pi versions older than 3, a wireless networking dongle is required.
– Both gadgets are linked to the same network.
– A keyboard and mouse connected to the Raspberry Pi using USB, Bluetooth, or wireless connection.
– A tablet holder or suitable cover for your Android gadget to serve as a display.
This arrangement proves to be efficient.
Unfortunately, creating a direct link between your tablet screen and a Raspberry Pi is not possible. The GPIO and DSI ports do not support tablet displays, so it is not possible to use an old tablet screen as a display for the Raspberry Pi. Even if the device successfully connects, reaching a satisfactory image output will not be possible.
Also, it may be essential to obtain a new Raspberry Pi in this situation.
Instead of connecting the Raspberry Pi directly to your Android tablet, think about using remote desktop software instead.
Two strategies are available to use the Android tablet/phone as the display for Raspberry Pi.
1. RDP: Remote Desktop Protocol This is a protocol developed by Microsoft for a network communications protocol.
2. VNC: Virtual Network Connection
Both options enable you to have absolute control of your Raspberry Pi’s desktop from your Android device. Fortunately, neither is difficult to organize in terms of setting up either medium. That said, it is expected that these methods will work with other Raspberry Pi versions including the lower versions, and Raspberry Pi Zero.
In this scenario, you’ll require two Android devices: one of them will be specialized in being the Wireless Access Point (WAP) while the other one will be designed to act as the display.
In both activities, the beginning action is to check that SSH is enabled on the Raspberry Pi. This will simplify the “headless” setup, and allow the configuration of the Remote Desktop Protocol / Real VNC from the PC in question, prior to the connection via an Android device.
Activating SSH can be accomplished in three different ways:
1. Using the command line: Access the raspi-config screen and navigate to Interfacing Options > SSH > OK. Reboot the system when prompted.
2. Via the Raspbian desktop: Proceed to Preferences > Raspberry Pi Configuration > Interfaces and select SSH. Confirm by clicking OK.
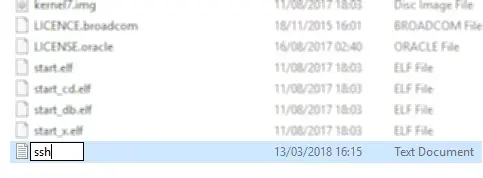
3. Power down your Pi, remove the SD card and insert it into your desktop PC’s file browser. In the boot directory, create a new file named “ssh” without any file extension. Safely remove the card and place it back into your Raspberry Pi. Upon powering up, SSH will be enabled.
Linux and Mac OS X users can use the terminal app to create a link with Raspberry Pi via SSH. At the same time, there are quite a number of safe and efficient programs presented for Windows users who need to create an SSH connection.
First of all, to begin SSH it is necessary to know the network address of Raspberry Pi. To reach the information below, you can key in
ifconfig wlan0Make a note of the IP address, as you’ll need it later.
Connect Android to a Raspberry Pi via RDP
First of all, let us perform certain trials in which RDP should be quite handy. This stands as the favorable option, due to the increase in functionality with the remote device. However, it should be noted that, for example, in the case of sessions that demand high graphics performance, RDP works much better than VNC. Linux additionally has its personal RDP package called xrdp.
Essential requirements include:
1. Downloading of RDP software on your Raspberry Pi.
2. An RDP application that must be necessarily pre-installed on your Android device.
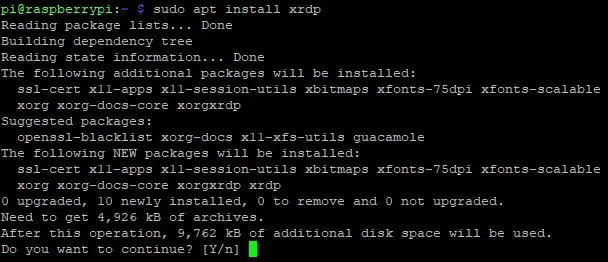
Firstly, connect with your Raspberry Pi to the networks through SSH(Secure Shell). After this enter the following commands to sync the packages and install the xrdp package.
sudo apt update

sudo apt install xrdp
Tap Y when prompted.
Sure, there’s a rephrased version: Sure, here’s a rephrased version:
After that, one should find an RDP application that is suitable to use on the Android operating system. Microsoft Remote Desktop should be your go-to app.
Download: Download a Microsoft Remote Desktop for Android – Free.
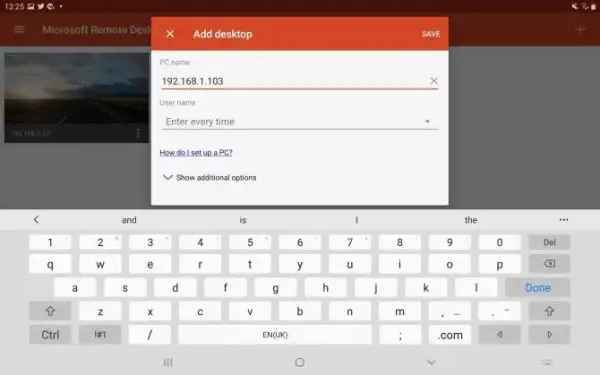
To establish a connection between your Android device and the Raspberry Pi via RDP, follow these steps:1. Launch the Microsoft Remote Desktop on your portable device.
2. Tap the “+” icon.
3. Choose “Desktop. ”
4. Please input the hostname I/O IP address of your Raspberry Pi.
5. Save the entered details.
6. If prepared, tap on the connection tile.
7. This is accompanied by a warning that cannot confirm the remote PC (this happens because of the tuned Linux operating system installed on your Pi).
8. Next, click on the option that is labeled “Connect.
Afterward, the xrdp login screen will appear. Enter your regular Raspberry Pi account details (the default credentials are pi: raspberry, but it’s recommended to modify these) and then click OK.
Connect a Raspberry Pi to an Android Tablet With VNC
Another way to utilize a tablet as a screen for a Raspberry Pi is by using VNC software. Setting this up on both your Raspberry Pi and Android device will allow you to access the desktop of the Pi. When you plug in a keyboard, the experience will be very similar to directly connecting to the Pi.
VNC is frequently utilized for remotely connecting to a Raspberry Pi from a computer. However, how does it operate on an Android smartphone?
To make this work, you’ll require: To make this work, you’ll require:
– Server VNC software that is utilized in Raspberry Pi
– Any VNC viewing software that can be installed on an Android device.
First of all, it is required to install a VNC server. It is needed to have RealVNC sold with the Raspberry Pi OS; however, it gets inaccessible once you start using the OS.
Enabling VNC can be done in two ways: Enabling VNC can be done in two ways:
1. Via the raspi-config screen: Select Interfacing Options then click on VNC then OK. Copy and paste the codes that appear; Reboot the system when asked for.
2. Through the Raspbian desktop: Go to Preference – Raspberry Pi Configuration – Interfaces and choose VNC. Click OK to confirm.
After that, allow yourself to download the proper VNC client for Android. Many choices are present, but the most popular and efficient is the VNC Viewer developed by RealVNC.
Download: The Android operating system, has a VNC Viewer.
Once the app is installed and your Pi is booted: Once the app is installed and your Pi is booted:
1. Launch VNC Viewer
2. The ‘+’ button is used to add on a new connection
3. Specify the input with the format IP and session (for example, 192. 168. 10. 21:1).
4. Tap Create
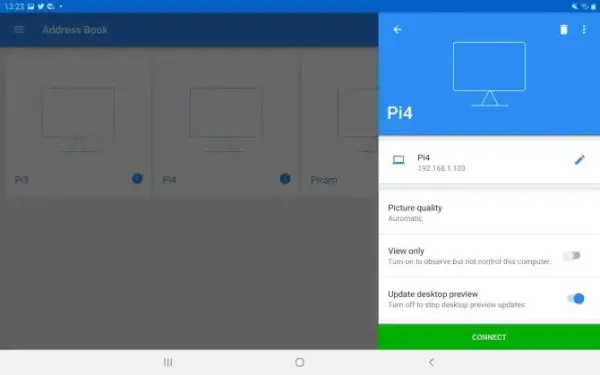
Upon reaching this point, you’ll receive a notification regarding the unencrypted nature of the connection. Accept the connection (assuming you’re within your secure home network), and proceed to input the password. Click “Continue” when prepared, initiating the connection.
Provide a password as prompted and relish access to your Raspberry Pi using the keyboard while utilizing your Android tablet as a display!
Add a Simple Raspberry Pi Display With an Android Tablet
Another good idea is to attach an Android tablet screen to Raspberry Pi; an old tablet will have a new life again. The installation procedure is simple, and as long as the tablet stays charged, it should provide dependability. It is also worth considering exploring these efficient techniques for powering a Raspberry Pi in portable projects.
Additionally, with the addition of a keyboard, mouse, and a handy battery recharger, you can turn your Raspberry Pi into a completely portable setup. Utilizing the 4G connection on your Android tablet for internet access can be extremely advantageous. Moreover, connecting a Raspberry Pi to a tablet touchscreen further increases its convenience for transport. To thoroughly examine the topic, immerse yourself in our manual on building your own personalized Android tablet with a Raspberry Pi.