So now that we bought the MCP3008 ADC lets get it up and running!
Note: This is my first instructables submision so if something is wrong just tell me so and if you like my style leave a comment, also I’m from the Netherlands so my English might not be perfect.
In this project we will be using a Fundruino moisture sensor, don’t mind if you don’t have the same sensor this process will work for any analog sensor. Also you might have the MCP3004 this project will work aswell only the wiring is slightly different so I suggest that you check the datasheet first, the datasheet is stated at the end of step 3.
So lets get started!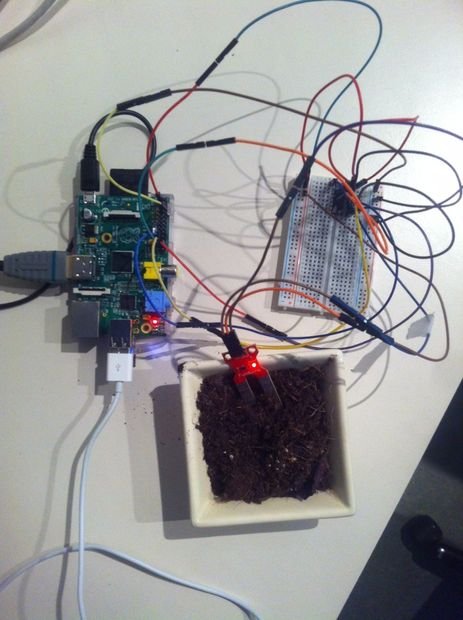
Step 1: Step 1: Wiring
It is important to know the orientation of your chip. It is marked by a small semi-circular indentation on top of the chip.
Wire up as shown in the wire scheme (Note: You should use 3.3V only!)
MCP3008 VDD -> 3.3V (red)
MCP3008 VREF -> 3.3V (red)
MCP3008 AGND -> GND (black)
MCP3008 CLK -> pin 23 (orange)
MCP3008 DOUT -> pin 21(yellow)
MCP3008 DIN -> pin 19 (blue)
MCP3008 CS -> pin 24 (violet)
MCP3008 DGND -> GND (black)
These instructions are in the same order as the right side of the MCP3008 with the semi-circular indentation pointed upwards.
The left side is the analog input were the right side is the digital output.
In this project a Fundruino moisture sensor is used to give the analog input, this sensor is the same as the Ardruino moisture sensor only cheaper.
To wire up the sensor:
S pin -> one of the channels on the left side of the MCP3008 (green)
+ pin -> 3.3V (red)
– pin -> GND (black)
Now that we wired up lets convert analog inputs to digital outputs!
Step 2: Step 2: Update your Raspberry Pi
For the MCP3008 chip we need the following software on our Pi,
Type in the command line:
ls /dev/
Now you should be presented with al lot of yellow text, check if spidev0.0 and spidev0.1 is in there. The position is shown by the red circle in the picture with the yellow text. if not no worries the following instructions will tell you how to get it there. If you do have the spidev0.0 and spidev0.1 you can skip to Unblacklisting.
First we want to enable the SPI functions on the Raspberry Pi:
Type in the command line:
sudo raspi-config
Now you will see the config window that you saw when your first booted your Rasbian.
scroll down to Advanced Options and enable SPI
Now reboot
Now type in the command line :
ls /dev/
If spidev0.0 and spidev0.1 is in there skip to Unblacklisting.
If not we need to update your Rasbian
Type in the command line:
sudo apt-get -y update && sudo apt-get -y upgrade
This will take a while.
When finished type in the command line:
sudo wget http://goo.gl/1BOfJ -O /usr/bin/rpi-update
When finished type in the command line:
sudo chmod +x /usr/bin/rpi-update
When finished type in the command line:
sudo reboot
Now you need to reboot to activate the update.
So type in the command line:
sudo reboot
When finished type in the command line:
ls /dev/
Now the spidev0.0 and spidev0.1 should be there, if not you might have made a mistake so retry updating your pi. If it’s there we need to unblacklist it.
Unblacklisting
Type in your command line:
sudo nano /etc/modprobe.d/raspi-blacklist.conf
Now there is two options, or you will see nothing in the blacklist file or you will see three lines of text.
If you see nothing just type:
blacklist i2c-bcm2708
If you do see three lines of text delete the hash before the blacklist i2c-bcm2708 sentence.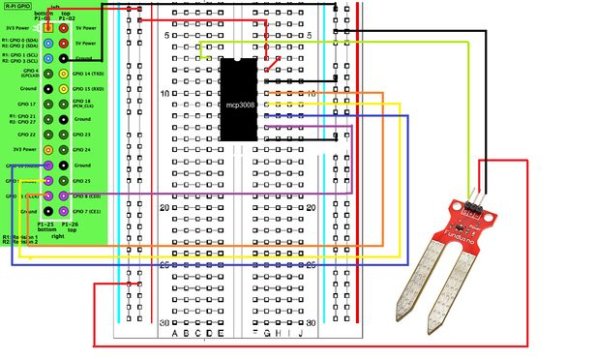
After your finished Unblacklisting reboot now.
Type in the command line:
sudo reboot
When finished type in the command line:
sudo apt-get install python-dev git
When finished type in the command line:
git clone git://github.com/doceme/py-spidev
When finished type in the command line:
cd py-spidev/
Now type in the command line:
sudo python setup.py install
When finished type in the command line:
cd ~
Now type in the command line:
nano mcp3008.py
we are now ready to write our software
For more detail: Analog sensor input raspberry pi using a MCP3008: wiring/installing/basic program