The Raspberry Pi platform offers several camera modules, each with its own features and capabilities. Currently, the Raspberry Pi Foundation provides three camera modules:
- Camera Module 2: Released in April 2016 as a replacement for the original camera module, the Camera Module 2 features an 8-megapixel Sony IMX219 sensor. It offers improved image quality, low-light performance, and color fidelity compared to the previous module. Compatible with Raspberry Pi 1, 2, 3, and 4, it easily connects to the CSI port of any Raspberry Pi. The Camera Module 2 supports video modes such as 1080p30, 720p60, and VGA90.
- Camera Module 2 NoIR: Similar to the regular Camera Module 2, the NoIR variant lacks an infrared filter. This makes it suitable for night photography and capturing videos in low-light conditions. It shares the same specifications as the regular Camera Module 2 but without the infrared filtration.
- Raspberry Pi High-Quality Camera: This camera module features a 12.3-megapixel Sony IMX477 sensor and supports C- and CS-mount lenses. The high-quality camera allows for even more detailed imaging and is compatible with all Raspberry Pi models.
With a Raspberry Pi and a camera module, you can embark on exciting projects involving image processing, video processing, and even machine learning. Whether you’re interested in photography or exploring advanced computer vision applications, the Raspberry Pi camera module opens up a world of possibilities.
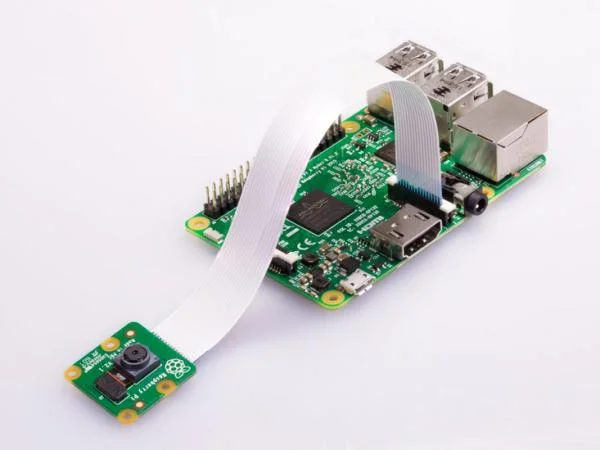
To get started, you’ll need a Raspberry Pi (any model from 1 to 4) and the corresponding camera module. The standard camera module is suitable for capturing images in well-lit environments. However, if you plan to capture images in low-light conditions, the NoIR camera module is recommended, along with an additional infrared light source. For this article, we will focus on working with the standard camera module. Remember that the camera module should come with a flexible ribbon cable for easy attachment to the CSI port. In the case of Raspberry Pi Zero, a smaller cable is required for camera module integration.
How to connect the camera module
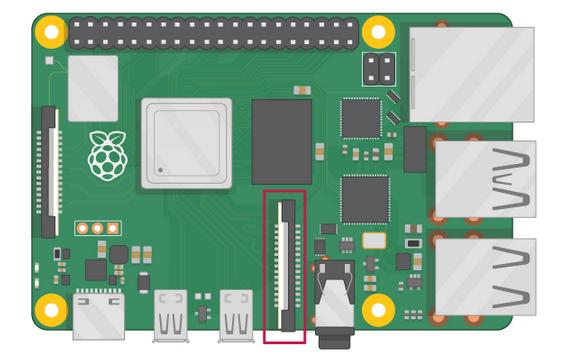
All Raspberry Pi models feature a Camera Serial Interface (CSI) port, which is where the camera module attaches. It’s important not to confuse the CSI port with the display port, as they serve different purposes. The CSI port on Raspberry Pi is located in the following position:
[Include an image or description indicating the location of the CSI port on Raspberry Pi]
To install the camera module, follow these steps:
- Locate the CSI port on your Raspberry Pi.
- Gently remove the plastic clip or cover of the CSI port.
- Take the ribbon cable of the camera module and insert it into the CSI port. Ensure that the connectors at the bottom of the cable are facing the contacts in the port.
- Carefully place the plastic clip or cover back onto the CSI port to secure the ribbon cable in place.
- The camera module attached to the Raspberry Pi should now be securely connected.
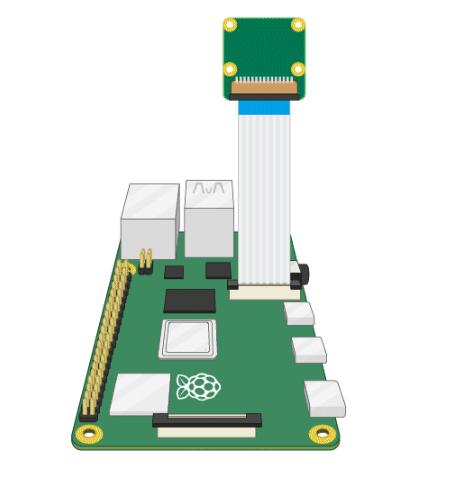
The setup should resemble the image below:
[Include a description or image illustrating the camera module attached to the Raspberry Pi]
Enable Raspberry Pi camera
After attaching the camera module, the camera functionality is not enabled by default. To enable it, follow these steps:
- Boot up your Raspberry Pi.
- From the main menu, navigate to the Raspberry Pi configuration tool. Alternatively, you can open the configuration tool from the terminal by typing
sudo raspi-config.
By following these steps, you can access the Raspberry Pi configuration tool to enable the camera module functionality.
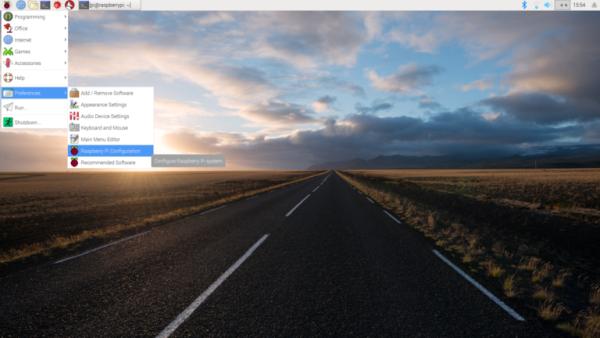
In the configuration tool, select the interfaces tab and make sure the camera is enabled.
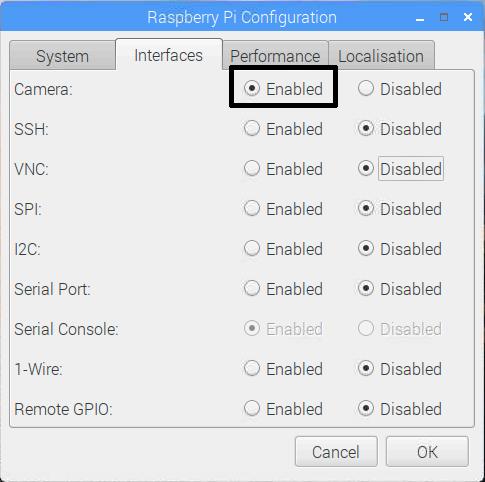
If not enabled, enable the camera and reboot Raspberry Pi.
Taking pictures from the command line
Once the camera module is installed and enabled, it’s time to test the module. The best place to test the camera module is the Raspberry Pi’s command line i.e., the Bash shell. Open the terminal window by clicking the terminal icon in the taskbar.

For taking a picture, type the following command and press Enter.
raspistill -o Desktop/image.jpg
The provided command captures a still picture using the camera module and saves it to the Desktop. When executed, the command opens the camera preview for a duration of five seconds before capturing the still picture. Once the picture is captured, the camera preview window closes. Please note that you can save the pictures to any desired location on the Raspberry Pi, as long as the specified folder exists within the Raspberry Pi’s directory structure.
Capturing a video from the command line
When this command is executed, it captures a video recording and saves it to the specified folder, in this case, the Desktop. If the recording process is interrupted, the video recorded until that point will be saved. It is worth noting that videos can be saved in any desired location on the Raspberry Pi, as long as the specified folder exists within the Raspberry Pi’s directory structure. To play the saved videos, you can use a VLC player or any other compatible video player of your choice.
Controlling the camera module with Python
The camera module can be controlled using Python by utilizing the picamera library. In most cases, the picamera library is already installed on Raspberry Pi 3/4 along with the IDLE or Thonny Python IDE. However, if the library is missing, you can install it using the following commands:
$ sudo apt-get install python-picamera
After installing the picamera library, it is recommended to upgrade the installation by executing the following commands:
$ sudo apt-get update $ sudo apt-get upgrade
Alternatively, you can also install the picamera library using PIP:
$ pip install picamera
To utilize the picamera library in a Python script, you need to import it with the following command:
from picamera import PiCamera
To use the camera module in your Python script, you need to create an instance of the PiCamera class as shown below:
camera = PiCamera()
To test the camera module with Python, you can run a code that displays the camera preview for a certain period. Make sure to connect a monitor to the Raspberry Pi for the camera preview to work. Here’s an example Python script that demonstrates the camera preview functionality:
from picamera import PiCamera from time import sleep camera = PiCamera() camera.start_preview() sleep(5) camera.stop_preview()
Please note that you should save the Python script with a .py extension. Avoid saving it as picamera.py to prevent conflicts. If you want to stop the camera preview while it is running, press Ctrl+F2 to safely exit from the script execution.
Taking still pictures with Raspberry Pi Camera using Python
To capture still images using the picamera library, you can use the capture() method of the PiCamera class. This method requires a file path to store the captured image with the appropriate image format. Here’s an example code that captures a still image using Python:
In the above code, the start_preview() method is called to display the camera preview for 5 seconds using the sleep() function. After the specified delay, the capture() method is used to capture a still image and save it to the specified file path. Finally, the stop_preview() method is called to stop the camera preview.
Please note that it is recommended to have a delay of at least 2 seconds using sleep() before capturing the image to allow the camera sensor to adjust to the light levels.
If you want to capture multiple pictures, you can use a for loop as shown in the following example:
from picamera import PiCamera

from time import sleep
camera = PiCamera()

camera.start_preview()

for i in range(5):

    sleep(5)

    camera.capture('/home/pi/Desktop/image%s.jpg' % i)

camera.stop_preview()
In this code, the for loop captures five pictures at an interval of 5 seconds using the capture() method. The image filenames are dynamically generated using the %s placeholder to include the index i in the filename.
Ensure that the specified folder for saving the images exists in the Raspberry Pi directory structure, and use recognized image formats like jpg, jpeg, or png for the filenames.
Recording video with Raspberry Pi Camera using Python
To record a video using the picamera library, you can utilize the start_recording() and stop_recording() methods of the PiCamera class. Here’s an example code that demonstrates video recording using Python:
from picamera import PiCamera
from time import sleep
camera = PiCamera()
camera.start_preview()
camera.start_recording(‘/home/pi/Desktop/video.h264’)
sleep(10)
camera.stop_recording()
camera.stop_preview()
The above code records a video using a Raspberry Pi camera for a duration of 10 seconds. The recorded video is saved to the specified location. The specified location must exist in the Raspberry Pi directory structure. The name of the video must be specified in proper file format. The picamera library supports h264 and mjpeg video formats.
Rotating the camera preview
If you encounter a disoriented camera preview on the monitor due to the camera module’s installation, you can rotate the camera preview by using the rotation property of the camera object. Here’s an example code to rotate the camera preview by 180 degrees:
camera.rotation = 180
In the above code, the rotation property of the camera object is set to 180, which will rotate the camera preview by 180 degrees. Adjust the value accordingly if you need to rotate the preview by a different angle, such as 90 or 270 degrees.
After setting the rotation property, you can proceed to start the camera preview using start_preview(), wait for the desired duration with sleep(), and finally stop the preview using stop_preview().
This way, you can correct the orientation of the camera preview to align it properly with your setup.
Making the camera preview see-through
To make the camera preview see-through and allow visibility of compilation errors or other content while the preview is active, you can adjust the alpha level of the preview. The alpha level determines the transparency of the preview overlay. The value of the alpha parameter can range from 0 to 255, with 0 being fully transparent and 255 being fully opaque.
Here’s an example code that sets the alpha level of the camera preview to 100:
In the above code, the start_preview() method is called with the alpha parameter set to 100, indicating a semi-transparent overlay. Adjust the value of the alpha parameter according to your preference. You can experiment with different values to achieve the desired level of transparency.
After setting the alpha level, you can proceed with starting the camera preview, performing any necessary tasks while the preview is active, and then stopping the preview using stop_preview().
This way, you can customize the transparency of the camera preview to accommodate your specific needs.
camera = PiCamera()
camera.start_preview(alpha=200)
Changing the brightness of the camera preview
To adjust the brightness of the camera preview, you can modify the brightness property of the camera object. The brightness property allows you to control the overall brightness level of the preview.
Here’s an example code that sets the brightness of the camera preview to 50:
camera = PiCamera()
camera.start_preview()
camera.brightness = 70
In the above code, the brightness property of the camera object is set to 50. You can adjust the value of brightness according to your preference, ranging from 0 (minimum brightness) to 100 (maximum brightness).
After setting the brightness level, you can start the camera preview, perform any necessary operations while the preview is active, and then stop the preview using stop_preview().
By modifying the brightness property, you can control the brightness of the camera preview to achieve the desired visual effect.
Changing the contrast of camera preview
To adjust the contrast of the camera preview, you can modify the contrast property of the camera object. The contrast property allows you to control the level of contrast in the preview.
Here’s an example code that sets the contrast of the camera preview to 70:
camera = PiCamera()
camera.start_preview()
camera.contrast = 70
In the above code, the contrast property of the camera object is set to 70. You can adjust the value of contrast according to your preference, ranging from 0 (minimum contrast) to 100 (maximum contrast).
After setting the contrast level, you can start the camera preview, perform any necessary operations while the preview is active, and then stop the preview using stop_preview().
By modifying the contrast property, you can control the contrast of the camera preview to achieve the desired visual effect.
Changing resolution and frame rate
By modifying the resolution property of the camera object, you can change the resolution of the captured images or recorded videos. The resolution is specified as a tuple representing the width and height of the desired resolution.
Here’s an example code that sets the resolution to 1280×720 and adjusts the frame rate accordingly:
camera = PiCamera()
camera.resolution = (2592, 1944)
camera.framerate = 15
In the above code, the resolution property of the camera object is set to (1280, 720), which corresponds to a resolution of 1280×720 pixels. Additionally, the framerate property is set to 30 frames per second.
You can modify the resolution according to your requirements, keeping in mind the maximum and minimum resolution limits mentioned in the previous statement. If you choose a higher resolution, it may be necessary to adjust the frame rate accordingly to ensure smooth operation.
After setting the resolution and frame rate, you can start the camera preview, perform any necessary operations, and then stop the preview using stop_preview().
By adjusting the resolution and framerate properties, you can customize the camera’s output to meet your specific needs.
Adding text to the images
It is possible to add text to the still images by specifying annotate_text property of the camera object.
camera = PiCamera()
camera.start_preview()
camera.annotate_text = “EEWORLDONLINE”
Changing the font and color of added text
To modify the font size, color, and background color of the added text in the camera preview, you can use the annotate_text_size, annotate_foreground, and annotate_background properties of the camera object, respectively. Additionally, you will need to import the Color class from the picamera module to specify the text color.
Here’s an example code that demonstrates how to change the text properties:
from picamera import PiCamera, Color
from time import sleep
camera = PiCamera()
camera.start_preview()
camera.annotate_text_size = 50
camera.annotate_background = Color(‘blue’)
camera.annotate_foreground = Color(‘yellow’)
camera.annotate_text = “EEWORLDONLINE”
sleep(5)
camera.capture(‘/home/pi/Desktop/image.jpg’)
camera.stop_preview()
In the above code, the annotate_text property is set to the desired text that will be displayed on the camera preview. The annotate_text_size property is set to 80, indicating a text size of 80 points. The annotate_foreground property is set to Color('yellow'), which specifies the text color as yellow. The annotate_background property is set to Color('blue'), indicating a blue background color for the text.
You can customize the text size, foreground color, and background color according to your preference by modifying the respective properties. Experiment with different values to achieve the desired visual effect.
After setting the text properties, you can start the camera preview, observe the text overlay, and then stop the preview using stop_preview().
By utilizing these properties, you can adjust the appearance of the added text in the camera preview to suit your specific requirements.
Changing the exposure of captured images
To adjust the exposure of the captured images, you can modify the exposure_mode property of the camera object in the picamera library. The exposure_mode property allows you to specify the desired exposure mode for the camera.
Here’s an example code that demonstrates how to set the exposure mode:
camera = PiCamera()
camera.start_preview()
camera.exposure_mode = ‘beach’
sleep(5)
camera.capture(‘/home/pi/Desktop/beach.jpg’)
camera.stop_preview()
Run the following code to loop through all the exposure modes in the camera preview.
camera = PiCamera()
camera.start_preview()
for exmode in camera.EXPOSURE_MODES:
camera.exposure_mode = exmode
camera.annotate_text = “Exposure Mode: %s” % exmode
sleep(5)
camera.stop_preview()
In the above code, the exposure_mode property is set to 'night', which instructs the camera to use the night exposure mode. This mode is suitable for capturing images in low-light conditions.
The picamera library supports various exposure modes, including off, auto, night, nightpreview, backlight, spotlight, sports, snow, beach, verylong, fixedfps, antishake, and fireworks. You can choose the appropriate mode that best fits your scenario.
After setting the exposure mode, you can start the camera preview, allow some time for the camera to adjust the exposure settings, and then stop the preview using stop_preview().
By adjusting the exposure mode, you can control how the camera captures images based on the lighting conditions, helping you achieve optimal image quality in different situations.
Changing white balance of the image
To adjust the white balance of the captured images, you can modify the awb_mode property of the camera object in the picamera library. The awb_mode property allows you to specify the desired white balance mode for the camera.
Here’s an example code that demonstrates how to set the white balance mode:
camera = PiCamera()
camera.start_preview()
camera.awb_mode = ‘sunlight’
sleep(5)
camera.capture(‘/home/pi/Desktop/beach.jpg’)
camera.stop_preview()
Run the following code to loop through all the white balance modes in the camera preview.
camera = PiCamera()
camera.start_preview()
for awbmode in camera.AWB_MODES:
camera. awb_mode = awbmode
camera.annotate_text = “White Balance Mode: %s” % awbmode
sleep(5)
camera.stop_preview()
In the above code, the awb_mode property is set to 'sunlight', which instructs the camera to use the sunlight white balance preset mode. This mode is suitable for capturing images under normal daylight conditions.
The picamera library supports various white balance preset modes, including off, auto, night, sunlight, cloudy, shade, tungsten, fluorescent, incandescent, flash, and horizon. You can choose the appropriate mode that best suits your lighting conditions.
After setting the white balance mode, you can start the camera preview, allow some time for the camera to adjust the white balance settings, and then stop the preview using stop_preview().
By adjusting the white balance mode, you can ensure that the colors in your captured images are accurately represented, especially in different lighting environments.
Adding image effects
The picamera library provides support for adding image effects to the captured images. You can achieve this by modifying the image_effect property of the camera object.
Here’s an example code that demonstrates how to apply an image effect:
camera = PiCamera()
camera.start_preview()
camera.image_effect = ‘oilpaint’
sleep(5)
camera.capture(‘/home/pi/Desktop/beach.jpg’)
camera.stop_preview()
Run the following code to loop through all the image effects in the camera preview.
camera = PiCamera()
camera.start_preview()
for effect in camera.IMAGE_EFFECTS:
camera.image_effect = effect
camera.annotate_text = “Effect: %s” % effect
sleep(5)
camera.stop_preview()
In the above code, the image_effect property is set to 'negative', which applies a negative effect to the captured images. This effect inverts the colors, resulting in a negative-like appearance.
The picamera library offers a range of image effects to choose from, including none, negative, solarize, sketch, denoise, emboss, oilpaint, hatch, gpen, pastel, watercolor, film, blur, saturation, colorswap, washedout, posterize, colorpoint, colorbalance, cartoon, deinterlace1, and deinterlace2. Each effect creates a unique visual transformation on the captured images.
After setting the image effect, you can start the camera preview, allow some time for the effect to be applied, and then stop the preview using stop_preview().
By utilizing different image effects, you can add creative enhancements or alter the visual appearance of the captured images to achieve desired artistic or stylistic results.
Conclusion
Raspberry Pi Camera Module is really fun. The picamera library is well-written and powerful. It allows taking pictures, recording videos, streaming videos, streaming videos to a network, and even image processing with openCV. The camera module is easy to install and get started with endless possibilities of making many exciting things.