An inexpensive open-source home automation solution for low income individuals.
Background
Today’s home automation systems are expensive and often require the ability to install or modify existing hardware in the home. These two barriers to entry prohibit low-income individuals from joining the world of home automation.
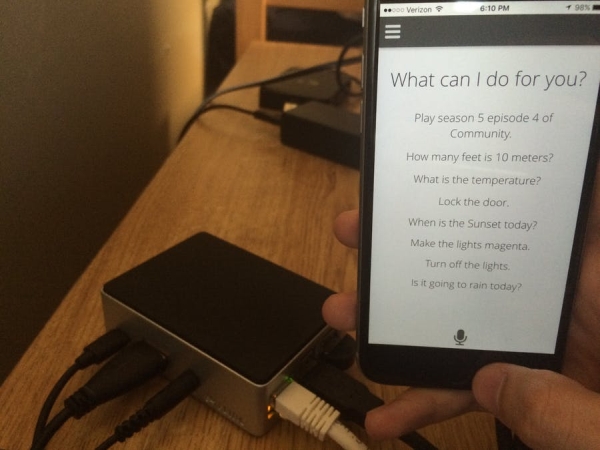
My solution was to create an open source node.js server on a Raspberry Pi 2 running Windows 10 IoT Core for controlling preexisting hardware in the home without needing to make any permanent modifications. As a proof of concept, I have set up a basic home automation system in my dorm room using this node.js server.
The Node.js Server
The node.js server runs on the Raspberry Pi 2 with Windows 10 IoT Core. A Photon is used to control the actual hardware in the room. There are two ways to interact with the system:
Voice Control
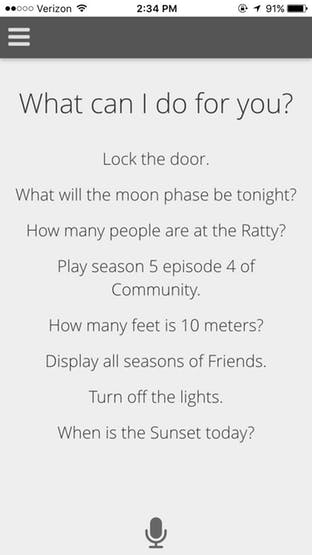
When the microphone is clicked in the web browser, the Raspberry Pi 2 starts recording audio. When the microphone is clicked again the audio is sent it to Wit.ai, a natural language API, to process speech and extract intents. The intent is then returned to the Raspberry Pi and the action to accomplish the intent is performed.
The voice control is not limited to just controlling hardware. You can ask for information as well. A few examples include:
"What is the temperature?""How many feet are in a mile?""What is the address of the closest Chipotle?"
"How many people are at the Ratty?"(a dinning hall at Brown University)"Display all comedy movies"(if you have a Kodi media server)
and many more. It is also exceedingly easy to add new functionality to the node.js server. More information about expanding functionality can be found on this project’s Github page.
Control Panel
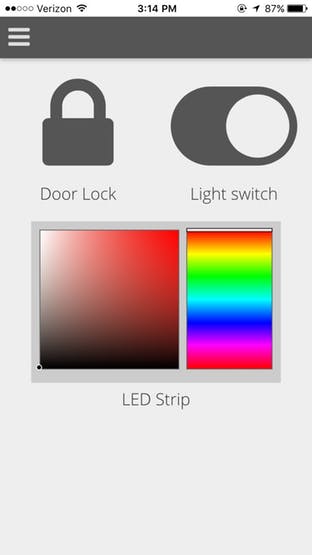
The control panel provides an interface for controlling the various hardware components in the room. It also provides a visualization of the current state of each device (in the image above the door is locked, the overhead lights are on, and the LED strip is off).
The control panel sends requests to the Raspberry Pi running Windows 10 IoT Core which then sends the Photon a message to alter a given hardware component. The control panel utilizes an API provided by the node.js server which can be used to create your own interfaces or mobile apps.
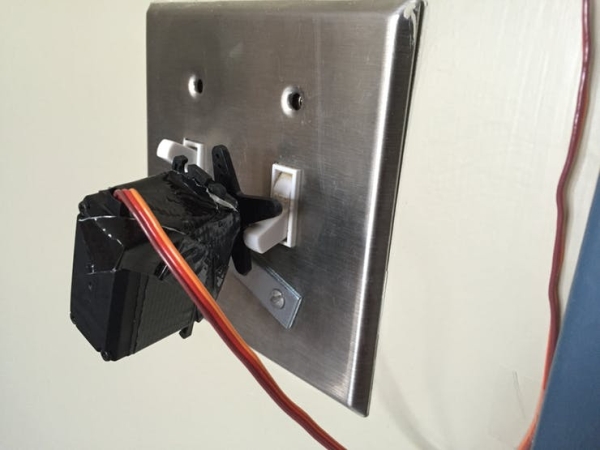
The Hardware
Setup on Windows IoT Core
- Install the latest version of Windows IoT Core onto your Raspberry Pi 2.
- Install the Node.js tools for Windows IoT bundle onto your Raspberry Pi 2.
- Download the zipped version of the node.js server code for this project.
- Connect to your Raspberry Pi 2 using power shell.
- Copy the unzipped folder to your Raspberry Pi and follow the software setup section in the repository’s README.
- Start the server using
& 'C:\Node.js (Chakra)\Node.exe' C:\path-to-backend-code\bin\www(Be sure to replace path-to-backend-code with the path to the node.js folder on the Raspberry pi you copied over in step 5) - Open your browser to
http://<IP address of your device>:3000and enjoy!
Schematics
RGB LED Strip Control
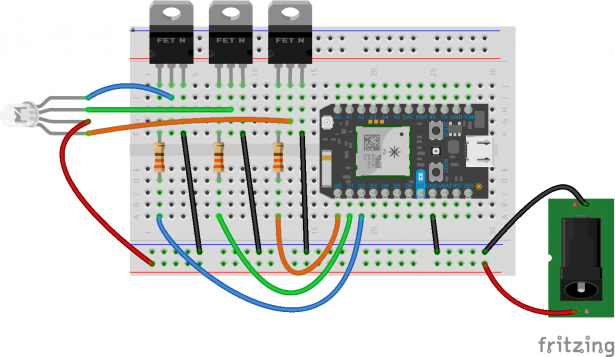
This circuit is used to control the RGB LED strip. The circuit uses N-channel MOSFETs to change the color pins of a 5050 Common anode LED strip (depicted by a single LED in the diagram). A 12v power supply is attached to the barrel connector. The resistors attached to the gate pins of the MOSFETs are 330Ω each.
Code
#include "rgb-controls/rgb-controls.h"
#include "SparkJson/SparkJson.h"
using namespace RGBControls;

Servo servo;
String method = "";
Color c1(0, 0, 0);
Color c2(0, 0, 0);
Led led(D0, D1, D2);
bool is_locked = true;
bool switch_on = true;

void setup() {
  RGB.brightness(16);
  Spark.function("method", color_method);
  Spark.function("lock", lock);
  Spark.function("switch", mainLight);
  Spark.variable("is_locked", &is_locked, BOOLEAN);
  Spark.variable("switch_on", &switch_on, BOOLEAN);

  pinMode(D5, INPUT);
  pinMode(D7, OUTPUT);
  pinMode(WKP, OUTPUT);
  pinMode(RX, OUTPUT);
}

void loop() {
    if (method.equals("fade")) {
        led.fade(c1, c2, 5000);
    }

    if (digitalRead(D5) == HIGH) {
        is_locked = false;
        delay(100);
        servo.detach();
    } else {
        is_locked = true;
    }
    digitalWrite(D7, digitalRead(D5));
}

int lock(String state) {
    if (state.equals("lock")) {
        if (!is_locked) {
            is_locked = true;
            servo.attach(RX);
            servo.write(150);
            delay(2000);
            servo.detach();
        }
        return 1;
    } else if (state.equals("unlock")) {
        servo.attach(RX);
        servo.write(30);
        return 0;
    } else {
        return -1;
    }
}

int mainLight(String state) {
    if(state.equals("on")) {
        servo.attach(WKP);
        servo.write(10);
        delay(1200);
        servo.detach();
        switch_on = true;
        return 1;
    } else if(state.equals("off")) {
        servo.attach(WKP);
        servo.write(70);
        delay(1200);
        servo.detach();
        switch_on = false;
        return 0;
    } else {
        return -1;
    }
}


int color_method(String command) {
    char json[100];
    command.toCharArray(json, 100);
    StaticJsonBuffer<512> jsonBuffer;
    JsonObject& root = jsonBuffer.parseObject(json);

    if (!root.success())
        return -1;

    method = root["method"];
    if (method.equals("fade")) {
        c1 = Color(root["c1"][0], root["c1"][1], root["c1"][2]);
        c2 = Color(root["c2"][0], root["c2"][1], root["c2"][2]);
    } else if (method.equals("set")) {
        c1 = Color(root["c1"][0], root["c1"][1], root["c1"][2]);
        led.setColor(c1);
    }

    return 0;
}
