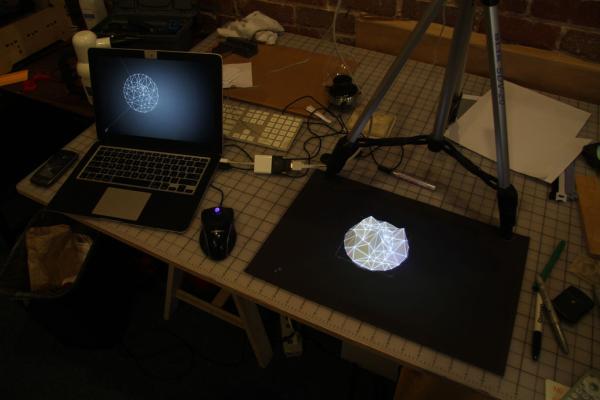
This Instructable about creating a simple sculpture that is augmented with projection mapping, designed to run on the Raspberry Pi, built with OpenFrameworks.
Projection Mapping is a process that relies on knowledge of the physical space, graphics software, and installation of the hardware necessary to complete the illusion of precisely mapped light. There are a myriad of tools and methods available to projection map objects, some relying on camera-vision, and other auto-calibrating methods. My goal for this instructable is to streamline the process of creating a sculpture and having it precisely projection mapped.
Material List:
Projector
Vivitek Qumi Q5 Super Bright HD Pocket Projector
Computer
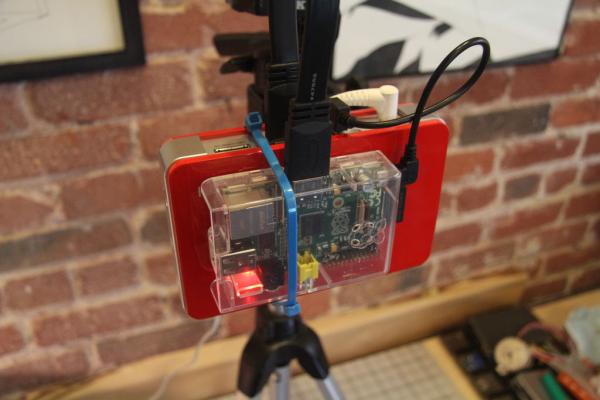
Raspberry PI Model B+
Projection Mapping Software
Custom app written with OpenFrameworks.
Modeling Software
Rhino + Grasshopper
Sculpture Fabrication
MakerBot Duo PLA
Step 1: Sculpture Design
I designed a landscape with Rhino3D/Grasshopper. You can use any software you’re comfortable with. The projection software is designed for polygonal shapes and not optimized for curves, so if you do have curves in your mesh, or a highly-tessellated mesh, this will create more work in the mapping phase.
This design process could translated to another modeling software. I’m using Rhino3D/Grasshopper. The design is based on a series of points placed in space, which will be converted into a Mesh with the Delunay node in Grasshopper.
Open Rhino and Grasshopper.
Place a few vertices in Rhino’s 3D space by repeating the following process:
Type “Point”. Move the cursor the place where you want to place the point Click the left mouse button. Click the right mouse button to repeat the point command.
Once you have a group of points, select then in the Rhinoceros window. Then, in the Grasshopper window, create a Point collection by typing ‘Point’, and right clicking on the node and select ‘Set Multiple Points’.
Then, in Grasshopper, connect your point collection to a Delunay Mesh node. The Rhinoceros window will show the result.
For each new point you add to your mesh in Rhino, you’ll need to right-click on the Point collection in Grasshopper.
Add, move, and modify your points in Rhinoceros to create a form that you like.
I’ve also included a series of various formats of my landscape model for you to use.
 landscape.3dm112 KBlandscape.gh4 KBlandscape.obj12 KBlandscape.ply3 KB
Step 2: 3D print the Sculpture
printed the sculpture with a Makerbot Duo with a white PLA. I’ve also made a few different colors. Gray seems to work well. They are a bit shiny, so I may scuff them up with sandpaper.
Attached to this step is the x3g file which can be dropped directly on your SD card and printed on a MakerBot.
landscape.x3g5 MBStep 3: Setup Software on the Raspberry Pi
We’re going to now set up our Raspberry Pi.
1. Setup Raspberry Pi
If you haven’t set up a Raspberry Pi before, check out Scott Kildalls awesome Ultimate Raspberry Pi Configuration Guide.
2. Install OpenFrameworks on the Raspberry Pi
OpenFrameworks has a great tutorial on setting up OpenFrameworks on the Raspberry Pi.
Install openframeworks into your home directory. I’m assuming your username is the default (pi).
The result should be a directory structure that looks like this:
/home/pi/openFrameworks/
4. Install Addons
You’ll need one ofxAddon called ofxCameraSaveLoad. You can install this by downloading it from
http://ofxaddons.com/, or directly from the author’s github, or the zip file I’ve attached to this step. Extract the files into /home/pi/openFrameworks/addons/

Step 4: Install of-meshMappingExample
This software is written in OpenFrameworks/C++ running on a Raspberry Pi. The code will work on your desktop or laptop, as well. The app has tools for distorting a polygonal mesh imported from another software. The app has controls for a virtual software camera, rotation, translation, and manual vertex mesh-tweaking.