Contents
hide
The following example demonstrates the simple control of a GPIO pin on the Raspberry Pi.
Source Code
The source code for this example is included in the github repository:
https://github.com/Pi4J/pi4j/tree/master/pi4j-example/src/main/java/ControlGpioExample.java
/*
 * #%L
 * **********************************************************************
 * ORGANIZATION  :  Pi4J
 * PROJECT       :  Pi4J :: Java Examples
 * FILENAME      :  ControlGpioExample.java
 *
 * This file is part of the Pi4J project. More information about
 * this project can be found here:  http://www.pi4j.com/
 * **********************************************************************
 * %%
 * Copyright (C) 2012 - 2015 Pi4J
 * %%
 * This program is free software: you can redistribute it and/or modify
 * it under the terms of the GNU Lesser General Public License as
 * published by the Free Software Foundation, either version 3 of the
 * License, or (at your option) any later version.
 *
 * This program is distributed in the hope that it will be useful,
 * but WITHOUT ANY WARRANTY; without even the implied warranty of
 * MERCHANTABILITY or FITNESS FOR A PARTICULAR PURPOSE.  See the
 * GNU General Lesser Public License for more details.
 *
 * You should have received a copy of the GNU General Lesser Public
 * License along with this program.  If not, see
 * <http://www.gnu.org/licenses/lgpl-3.0.html>.
 * #L%
 */

import com.pi4j.io.gpio.GpioController;
import com.pi4j.io.gpio.GpioFactory;
import com.pi4j.io.gpio.GpioPinDigitalOutput;
import com.pi4j.io.gpio.PinState;
import com.pi4j.io.gpio.RaspiPin;

/**
 * This example code demonstrates how to perform simple state
 * control of a GPIO pin on the Raspberry Pi.
 *
 * @author Robert Savage
 */
public class ControlGpioExample {

    public static void main(String[] args) throws InterruptedException {

        System.out.println("<--Pi4J--> GPIO Control Example ... started.");

        // create gpio controller
        final GpioController gpio = GpioFactory.getInstance();
        // provision gpio pin #01 as an output pin and turn on
        final GpioPinDigitalOutput pin = gpio.provisionDigitalOutputPin(RaspiPin.GPIO_01, "MyLED", PinState.HIGH);

        // set shutdown state for this pin
        pin.setShutdownOptions(true, PinState.LOW);

        System.out.println("--> GPIO state should be: ON");

        Thread.sleep(5000);

        // turn off gpio pin #01
        pin.low();
        System.out.println("--> GPIO state should be: OFF
");

        Thread.sleep(5000);

        // toggle the current state of gpio pin #01 (should turn on)
        pin.toggle();
        System.out.println("--> GPIO state should be: ON");

        Thread.sleep(5000);
        // toggle the current state of gpio pin #01  (should turn off)
        pin.toggle();
        System.out.println("--> GPIO state should be: OFF");

        Thread.sleep(5000);

        // turn on gpio pin #01 for 1 second and then off
        System.out.println("--> GPIO state should be: ON for only 1 second");
        pin.pulse(1000, true); // set second argument to 'true' use a blocking call

        // stop all GPIO activity/threads by shutting down the GPIO controller
        // (this method will forcefully shutdown all GPIO monitoring threads and scheduled tasks)
        gpio.shutdown();
    }
}
JavaDoc
The following JavaDoc links are the primary interfaces used to control the Pi’s GPIO state:
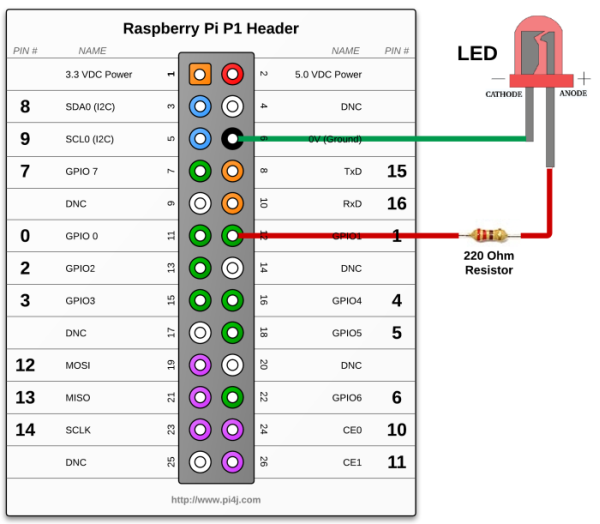
Wiring Diagram
The following circuit can be used in conjunction with this sample code.
Read more: Simple GPIO Control using Pi4J