The dragonfly was a collaboration between many many people. These wings are all that remain after it was burnt at Burning Man…

Story


The dragonfly was a Burning Man project created in my backyard by Richerd Chan, Elya Le, and a dozen other volunteers. The wooden part burned, but the extra set of LED wings survived and came back to my house (a decoy pair of wooden wings was burned instead).
This amazing project deserves to be shared, so I decided to set the wings back up and document their recreation.
1. Create the wings
The wings were made with eight strands of LEDs each. The small wings each have 381 LEDs and the big wings have 481 LEDs.


Elya Le designed the lasercut pattern from the wings. The diffusion material is a flexible acrylic from Tap plastics.
2. Build a stand
The original dragonfly wings and body were created around steel blocks to make them sturdy enough to climb on.


But how to display the just two wings? I originally wanted the wings to stand vertically, but I realized that the amount of weight I needed for the base of the wing’s stand had to be greater than the weight of the wing itself (each wing is 30-40lbs). In the interest of making them semi-portable, I settled for cutting the original metal base so that it would hold two wings horizontal to the ground.
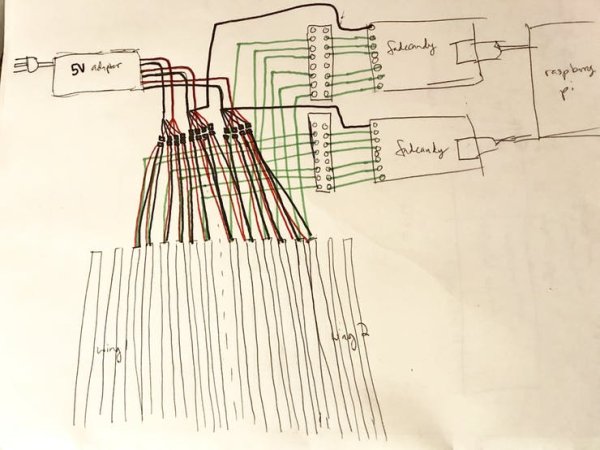
3. Make a wiring harness
The original project used eight 110 amp hour deep cycle marine batteries. I’ll be displaying this indoors, so I can just plug a power converter into the wall. This AC power supply runs off of 120 Volts AC at ~6amps, and converts it to 5volts DC at 60 amps.


How much power will my LEDs draw? When displaying pure white, each of these WS8211s draws 0.4 amps.
381 LEDs per wing times two is 762 times 0.4amps = 30.48amps at max brightness. In the code, I’ve dialed my brightness back to 70% so I only need 21.34 amps.
4. Test the LEDs with Processing
My next step was to test the wings to make sure they were still working.
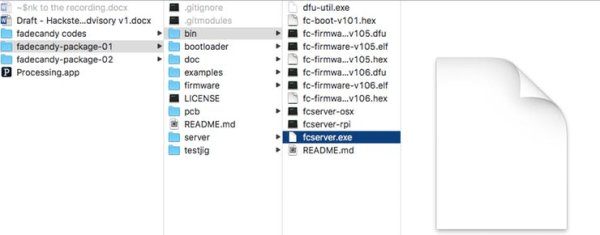
Download the Fadecandy Software. I’m using Fadecandy 02.
Plug your Fadecandy into your laptop using micro usbs (if using Fadecandy Rev A) or mini usbs (if using Rev B).
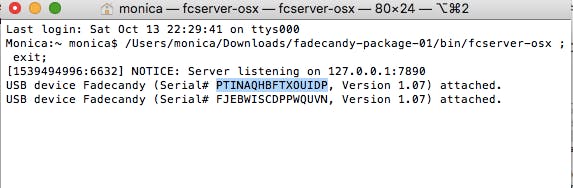
I started fcserver on my laptop by clicking on fcserver.osx on Mac or fcserver.exe on windows.
When Fadecandy starts up, it automatically detects my Fadecandies. They show up with their serial numbers in the terminal window.
Configure the server for Fadecandy
You can find full instructions for the Fadecandy server configuration here.
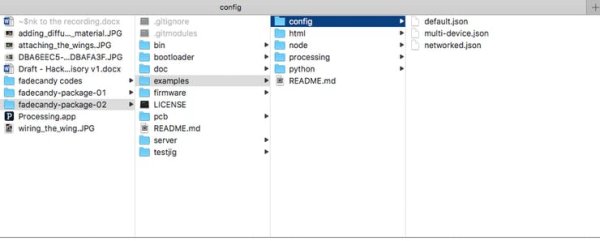
Open fadecandy-package-02>examples>config an open multi-device.pde in a text editor.
Past the following code. Edit the serial numbers to match the serials of your devices.
{
“listen”: [null, 7890],
“verbose”: true,
“color”: {
“gamma”: 2.5,
“whitepoint”: [0.7, 0.7, 0.7]
},
“devices”: [
{
“type”: “fadecandy”,
“serial”: “LXJNACKAPTQLQVMF”,
“map”: [
[ 0, 0, 0, 511 ]
]
},
{
“type”: “fadecandy”,
“serial”: “ELWQLXUWZPYTKTIB”,
“map”: [
[ 0, 0, 0, 511]
]
}
]
}
The “map” maps the wing’s LED strips to the output of the fadecandy. Each fadecandy can run 512 LEDs (8 rows of 64). Here I’m just mapping the LEDs as if they were a long strip, from 0 to 511.
Close your terminal window that has fcserver if it’s still running.
Re-open terminal, change directory to the directory where fcserver is, and run:
./fcserver-osx multi-device.json
This will restart fcserver using your new config files.
Open Processing. I’m using Processing 2.
Open the test sketch from github in processing and press “run.”
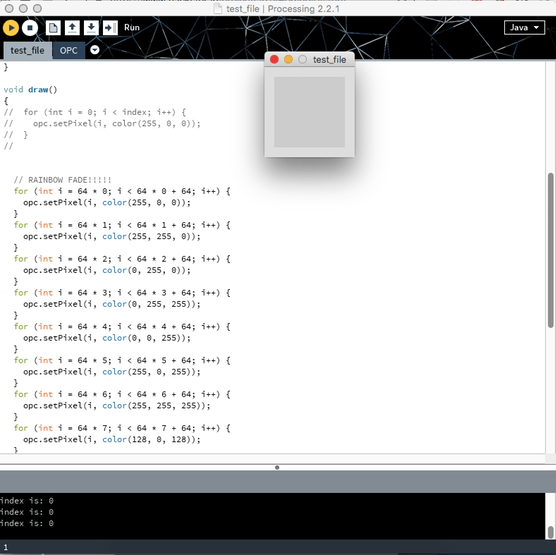
It lights each LED strip in the wing a different color. Then I can use my computer keys “x” and “z” to send a flashing LED back and forth to count how many LEDs there are in each strip.
// Test file to count how many LEDs are in each strip
OPC opc;
int flashIndex = 0;
int index = 0;
int max = 512;
void setup()
{
opc = new OPC(this, “127.0.0.1”, 7890);
frameRate(5);
colorMode(RGB, 100);
for (int i = 0; i < max; i++) {
opc.setPixel(i, color(0, 0, 0));
}
opc.writePixels();
}
void draw()
{
// for (int i = 0; i < index; i++) {
// opc.setPixel(i, color(255, 0, 0));
// }
//
// RAINBOW FADE!!!!!
for (int i = 64 * 0; i < 64 * 0 + 64; i++) {
opc.setPixel(i, color(255, 0, 0));
}
for (int i = 64 * 1; i < 64 * 1 + 64; i++) {
opc.setPixel(i, color(255, 255, 0));
}
for (int i = 64 * 2; i < 64 * 2 + 64; i++) {
opc.setPixel(i, color(0, 255, 0));
}
for (int i = 64 * 3; i < 64 * 3 + 64; i++) {
opc.setPixel(i, color(0, 255, 255));
}
for (int i = 64 * 4; i < 64 * 4 + 64; i++) {
opc.setPixel(i, color(0, 0, 255));
}
for (int i = 64 * 5; i < 64 * 5 + 64; i++) {
opc.setPixel(i, color(255, 0, 255));
}
for (int i = 64 * 6; i < 64 * 6 + 64; i++) {
opc.setPixel(i, color(255, 255, 255));
}
for (int i = 64 * 7; i < 64 * 7 + 64; i++) {
opc.setPixel(i, color(128, 0, 128));
}
for (int i = 0; i < 8; i++) {
int flash = (index % 2) == 0 ? 0 : 255;
color flashColor = color(flash, flash, flash);
opc.setPixel(i * 64 + flashIndex, flashColor);
}
// When you haven’t assigned any LEDs to pixels, you have to explicitly
// write them to the server. Otherwise, this happens automatically after draw().
opc.writePixels();
index++;
}
void keyPressed() {
if (key == ‘x’) {
flashIndex++;
}
if (key == ‘z’) {
flashIndex–;
}
println(“index is: “ + flashIndex);
}
Now that I know how many LEDs are in each strip, I’m able to map them in my config files. I reopen multi-device.json and remap them. Here is the updated mapping for my two fadecandies:
“devices”: [
{
“type”: “fadecandy”,
“serial”: “PTINAQHBFTXOUIDP”,
“map”: [
[ 0, 0, 0, 52 ],
[ 0, 52, 64, 51 ],
[ 0, 103, 128, 64 ],
[ 0, 167, 192, 64 ],
[ 0, 213, 256, 64 ],
[ 0, 295, 320, 63 ],
[ 0, 358, 384, 60 ],
[ 0, 418, 448, 63 ]
]
},
{
“type”: “fadecandy”,
“serial”: “FJEBWISCDPPWQUVN”,
“map”: [
[ 0, 470, 0, 52 ],
[ 0, 521, 64, 51 ],
[ 0, 584, 128, 64 ],
[ 0, 649, 192, 64 ],
[ 0, 713, 256, 64 ],
[ 0, 776, 320, 63 ],
[ 0, 836, 384, 60 ],
[ 0, 899, 448, 63 ]
]
}
]
There’s a reference for OPC.pde in Fadecandy’s documentation. I’m using the following mapping objects:
[ OPC Channel, First OPC Pixel, First output pixel, Pixel count ]
- I only have one channel (connected to two fadecandies), so each line begins with zero.
- The first OPC pixel is the starting pixel as I’d like to address it. By default each output of the fadecandy has and index of 0 and goes to 64 pixels, but since my strips are all different lengths, I add their indexes here according to the lengths of the strip.xxzzzzzzxxxxz
- The first output pixel is the corresponding number as handled by the fadecandy board. Since it regards every strand as having 64 pixels, these numbers are 64+=.
- The pixel count is the total pixel count of each strip. In my case, they’re all different lengths.
I’m also indexing the second fadecandy’s first OPC pixel at 470. If I gave it a zero address, the top and bottom wings would always be synced.
If you have an irregular array of LEDs, it’s easiest to map them in config. If your LEDs are in an even grid, it’s easier to simply map the total number of LEDs in config and then address them with a OPC’s grid method. Note that for irregular displays, symmetrical patterns that look great on grids, such as the examples “grid32x16z_rings” and “grid24x8z_waves” look totally distorted. Trying to do text is also quite difficult.
After you’ve changed your mapping, don’t forget to update the config file:
./fcserver-osx multi-device.json
Try out some of the samples and see how they look with your new mapping.
You can either try an unmapped sketch, like this one or try remapping one of the fadecandy grid examples, like grid24x8z_waves. Simply replace the three 8×8 grids in the sketch with something like this:
opc.ledGrid(0, 64, 16, width/2, height/2, width / 70.0, 10, 0, false);
Note:
If you install command line tools, you can run a sketch from the command line like this (assuming that the the “dragonfly-wings” code is in a folder named Downloads):
processing-java –sketch=/Users/[USERNAME]/Downloads/dragonfly-wings/rainbow-test –force –run
5. Raspberry Pi setup
I’m using a Raspberry Pi (instead of my laptop) in the actual installation.
Install Processing
Go to pi.processing.org and follow the instructions for flashing your Pi there. The latest version of Raspian comes with Processing already installed.
If you already have your Pi formatted and don’t feel like reformatting it, you can download Processing in your Raspberry Pi’s terminal using curl:
curl https://processing.org/download/install-arm.sh | sudo sh
You always want to make sure your Pi is up to date. Open terminal and type:
sudo apt-get -y update
sudo apt-get -y upgrade
The ‘-y’ stands for yes, so this breezes through those pesky ‘type yes’ prompts that you’d always type yes to anyway. Needless to say, don’t use it if you’re not sure that you’re sure you want to answer yes.
Retrieve the Fadecandy software from Github:
git clone git://github.com/scanlime/fadecandy
The package includes a pre-built executable for Raspberry Pi, but it’s built on an older version of Raspbian and won’t work on the current system. Not to worry, a new one can be compiled in just a few steps:
cd fadecandy/servermake submodulesmake
This takes about 10 minutes to complete. Once it’s finished, type:
sudo mv fcserver /usr/local/bin
Then create a new configuration file:
sudo nano /usr/local/bin/fcserver.json
We’re going to copy and paste the config file that we’ve previously created on our laptop here, with the updated mapping.
Connect each of your fadecandies to the rasbperry pi’s USB ports. Run in terminal:
cd pibin/
sudo fcserver
I had some trouble running this, but found that it worked after rebooting
sudo reboot
Once fcserver is running, try some of the example processing sketches that looked good, E.G.:
cd ~/fadecandy/examples/processing/grid32x16z_wavefronts
processing grid32x16z_wavefronts.pde
Read More Detail…