This is an updated version of UbiMaker’s Open Source People Counter with new scripts.
Where I have made mistakes, I will note them, in the hopes that you don’t have to do the same!
People Counters are an especially useful tool for libraries, and one that many cannot afford. The total cost for my build was under $100.
This tutorial assumes that your Pi is already set up (I recommend using Raspbian) and you’ve already configured your WiFi dongle.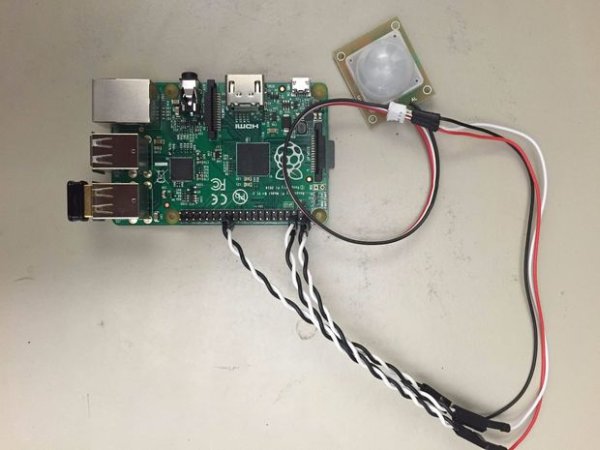
Step 1: Gather Your Materials
You’ll need:
- Raspberry Pi B+
- A Micro SD Card (at least 8 GB)
- A PIR Sensor (Note: The one I have pictured and purchased is from SparkFun and is more useful for Ardunio projects, If you buy the Parallax option listed in the original tutorial you’ll save yourself a step and some jumper wires)
- 3 Male-to-male jumper wires (Note: Not necessary if you buy the PIR sensor linked above)
- 3 Female-to-female jumper wires
- A USB WiFi Dongle (Note: Only purchase if it explicitly says it will work with Raspberry Pi
- Optional: USB Charger/Battery Pack if you want to go Wireless (helpful to have this pre-charged)
- Optional but helpful: Some kind of casing (not pictured)
Step 2: Sign up for an Ubidots Account and Grab Info
- Create an account with Ubidots or sign into your pre-existing account
- Grab your account specific API (found in your profile)
- Create a new data source titled “People Counter” and retrieve the variable ID
- Click “Sources” in the top navigation menu
- Click “Add a Data Source”
- Choose “Raspberry Pi” as source type
- Title this “People Counter” or something similar
- Your variable ID will be displayed on the left column

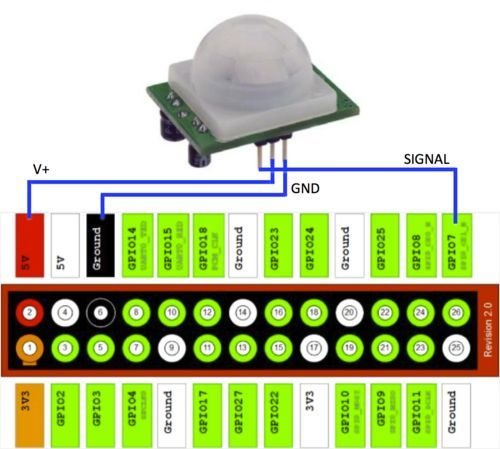
Step 3: Wire it up!
Even though the Raspberry Pi B+ has added ports, the schematics from the previous tutorial are still usable and the ports are the same.
- V+ to 5 volt power source (Pin 2)
- Ground to ground (Pin 6)
- Signal to GPIO07 (Pin 26)
Because I bought a PIR sensor that had the leads pre-soldered and combined, I had to use male-to-male jump wires to connect the sensor to female-to-female jump wires and then to the board itself. If you are clever and bought the Parallax sensor, you can connect your female-to-female wires directly from the sensor to the board.
For more detail: Updated People Counter with Raspberry Pi