1. Abstract
The idea of a self-driving car is one which is actively studied and tested for use on the road.
In addition, the machine learning tools required to create such a vehicle has become more and more
available to the public as time goes on. With a number of different libraries and softwares available
for free download to design and train neural networks and with affordable but powerful miniature
computers on the market, one can explore the possibility of creating a self-driving vehicle. The goal
of our project was to construct such a car on a small scale using parts and software that are accessible
to anyone on an affordable budget ($250), and to test the effectiveness of MagmaDNN software
neural networks on training such a car.
2. Background
A large portion of machine learning involves neural networks, which are programs which take
input data in the form of numbers and apply a number of matrix multiplications and operations to
them to designate a certain type, or output class, identifying what sort of thing that data sample is. To
do this, at each step of the data transformation, a network will either multiply the values in the current
matrix by another matrix containing predesignated values called weights which help distinguish
between output classes, apply a certain function to each matrix value, or add a matrix of predesignated
numbers called biases. at the end of the network, each output class is assigned a probability value,
and that with the highest probability is designated as the one which the network believes to be correct.
When training a network, each data sample is given a label designating which output class it actually
belongs to, such that if the network guesses wrong, then the weights are changed based on the
differences for each output class between the ideal probability value (1 for the correct output class and
0 for the others) and the given output class (known as the loss). In training, the network will look at a
set of data inputs of a designated size, known as a batch, and alter the weights after each set. When
every available piece of data for training is sent through the network, it is known as an epoch. A
typical training consists of a number of epochs, often ten or fifteen. To test the effectiveness, the
network is used on a much smaller set of data which was not used to train, merely comparing the
outputs to the actual output class answers to determine the network’s accuracy rather than changing
the network in any way. [1]
In the instance of image classification, which is the function of a neural network which
controls a self-driving car, convolutional networks are the standard and most effective mechanism. A
convolutional network is a neural network which looks at a window of pixels from an input image and
assigns a matrix value based on all the values of the pixels rather than one individual one, and this
window is moved along the entire image, sometimes with overlap between successive windows, to
process the input.
3. Objective
This project had two main objectives. The first was to construct a miniature car which can
drive itself around the second floor of the part of the Claxton Complex below the JICS. The second
objective was to demonstrate the capability of MagmaDNN software to control such a device.
4. Equipment list
This section lists all components we used to build the autonomous vehicle. Some of the parts
are 3D printed, and we provide the .STL files in the appendix to print these parts.
Tools needed
- Pliers
- Soldering iron and solder
- Screwdrivers
- Multimeter
5. Procedures
5.1 3D printing
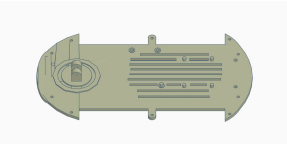
5.1.1 3D printing model design
TinkerCAD is used to design the 3D printing models in this project. Since we
installed additional components, including camera, Jetson Nano, and power source, on the car
unit, we need extra space to put all the individual modules together and form a Jetson Nano
Car.
The car frame is placed on the top of the original car by using copper pillars. It
provided an extra layer for the car to put the additional parts on there. The pins on the car
frame matched with the holes of the base of Jetson Nano Case so that they can be combined
without using screw or glue.
The camera parts are used to protect the Rpi Camera module and allowed the camera
to adjust its angle. The arm is only needed to extend the reach if required.
The cases provided simple protection that avoid physical damages when the car
crashed into the walls, and also made the car looks cool.
5.2 Hardware Setup
5.2.1 Assemble the Car
In this project, Elegoo Car Kit V2 is used, the construction of the car is simple, just follow the
official instructions that came with the car.
5.2.2 Camera & Installation
The Jetson Nano Developer Kit supports Mobile Industry Processor Interface Camera Serial
Interface (MIPI-CSI) cameras. MIPI-CSI protocol supports high-speed data transmission between
cameras and host devices as it is directly connected to the processor, there is not much overhead
compared with USB cameras. Therefore, it is suitable for our autonomous vehicle which requires
real-time images captured for movement predictions.
Raspberry Pi Camera Module V2
In our project, the Raspberry Pi (RPi) Camera Module V2 with ribbon connector is used. It
connects to the board using a simple connector. Besides, the Jetson Nano Developer Kit has an RPi
camera compatible connector and device drivers for the Sony IMX 219 imager are pre-installed. So,
the camera is configured, and simply plug it in the Jetson Nano J13 Camera Connector.
Testing
Once installed the camera module, it would show up on /dev/video0. Then, test the camera
with GStreamer, which is used to interface with cameras on the Jetson Nano. The command line
below is used to test the camera:
$ gst-launch-1.0 nvarguscamerasrc ! ‘video/x-raw(memory:NVMM),width=1920, height=1080,
framerate=30/1, format=NV12′ ! nvvidconv flip-method=0 ! ‘video/x-raw,width=640, height=480' !
nvvidconv ! nvegltransform ! nveglglessink -e
The command requests GStreamer to create a camera stream with 1920×1080 at 30 frames per
second and display it in a window with a size of 640×480.
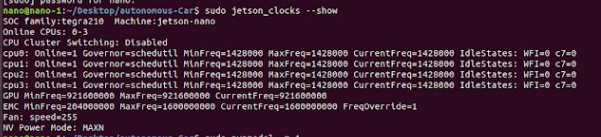
To switch the power mode, type:
$ sudo nvpmodel -m 0 Or $ sudo nvpmodel -m 1
for either mode 0 or mode 1.
To ensure Jetson Nano works in the best performance, we switched it into 10W mode.
5.2.4 Power Supply
There are three different ways to give power into the Jetson Nano:
Port Max. Voltage / Current
Micro-USB Connector 5V 2.5A
Barrel Jack Connector 5V 4A
GPIO Header 5V 6A
Power Connector
We ran the Jetson Nano in 10W mode, so it needs 5V 2A to perform normally. However, this
value is for the Jetson Nano compute module only, not the whole board and the extra attached
peripherals, such as camera, Arduino board, and Wi-Fi dongle. Therefore, if we use Micro-USB cable
to supply current, the Jetson Nano car would turn itself off randomly due to overdraw of current.
In this project, a barrel jack connector is used to connect the 5V 4A power supply and the
Jetson Nano. To enable the barrel jack connector, a jumper is needed to insert on pin J48 of Jetson
Nano. Pin J48 is located between the camera connector and the barrel jack connector. It tells the
Jetson Nano circuit to use the barrel jack instead of the micro-USB port to supply power, but the
micro-USB port is still available for data transmission with a computer.
Power Source
Supplying a sufficient amount of power to the Jetson Nano was important as the neural
networks were process-intensive. The Jetson Nano has two power modes: 5 watts and 10 watts. The
5W mode would work with the micro-USB connector but it would make the Jetson Nano too slow.
The 10W mode with the barrel jack connector would be the best for our situation. The lithium-ion
(Li-ion) battery pack (5V 2A) did not supply enough current, causing shutdowns while driving. We
then used a lithium polymer (LiPo) battery which could supply the necessary current. We used a
voltage regulator module (VRM) to ensure the Jetson Nano received the correct voltage and current
(5V 4A) from the barrel jack connector.
5.3 Software Setup
5.3.1 Initial Setup
Jetson Nano
The Jetson Nano Developer Kit does not have any eMMC (Embedded Multi-Media Card) or
SSD (Solid State Drive) for storage space, so we have to prepare a microSD card. A microSD card of
at least 64GB is recommended because we need much space for collecting images. For the first boot,
we followed the instructions from Nvidia and created the Linux account on the Jetson Nano.
Basic Setup
After the Jetson Nano boots up, run the script “install_basics.sh” in bitbucket and fix the
CUDA toolkit related paths issue. For example, the default path of “nvcc” is not in ${PATH}. The
script would add CUDA files into the LD_LIBRARY_PATH and PATH variables. After that, the
environment variables would setup properly at the next login.
Create Swap File
Then, we created a swapfile on the system and used as virtual memory. Swapfile is a feature
in the Linux Kernel which implements paged memory, it is a space on a storage space used as an
extension of computer RAM. The Jetson Nano has 4GB of RAM which is quite limited, it would
probably run out of memory when it is installing OpenCV, TensorFlow or running autonomous car
programs. Therefore, we made an 8GB swapfile by the commands below:
$ sudo fallocate -l 8G /mnt/8GB.swap
$ sudo mkswap /mnt/8GB.swap
$ sudo swapon /mnt/8GB.swap
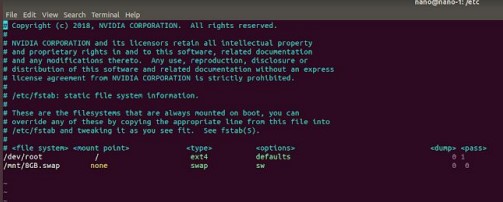
After reboot, the swapfile would get mounted automatically on the system.
5.3.2 Install OpenCV 3.4.6
To setup the software development environment for our project, we installed OpenCV which is used for capturing images. Although OpenCV 3.3.1 is pre-installed on the Jetson Nano, it does not support GStreamer that cannot utilize hardware H.264/H.265 codec on Jetson Nano. Therefore, we replaced it by OpenCV 3.4.6. To install OpenCV 3.4.6, execute the script “install_opencv-3.4.6.sh” which would download and build the source file from $ ~/src/opencv-3.4.6. The script would take approximately 3 hours for installation. When it finished, OpenCV should able to import (import cv2) in both python and python3. If timeout error appears, modify the script and add “–default-timeout=100” to following lines. sudo pip3 install –default timeout =100 -U protobuf numpy matplotlib sudo pip2 install –default timeout =100 -U protobuf numpy matplotlib If “error: Please include the appropriate gl headers before including cuda_gl_interop.h” appears: – Goto /usr/local/cuda/include/cuda_gl_interop.h – Disable line 62 to 68 (except line 67) by comment them – //#if defined(arm) || defined(aarch64) – //#ifndef GL_VERSION – //#error Please include the appropriate gl headers before including cuda_gl_interop.h – //#endif – //#else – #include – //#endif Then, remove the opencv-3.4.6 folder (rm -R opencv-3.4.6) in ~/src/ and run the script again.
5.3.3 Build TensorFlow-1.12.2
To build TensorFlow, make sure swapfile is created. Otherwise, it would probably fail due to
a lack of memory. At the beginning, we uninstalled the previous version of tensorflow and
tensorboard:
sudo pip3 uninstall -y tensorflow tensorboard
Then, we updated libprotobuf (3.6.1) by using the script “install_protobuf-3.6.1.sh” as version
3.6.1 of protobuf is the matching version in tensorflow-1.12 source code. This installation took about
1 hour to finish on Jetson Nano. After that, we install bazel 0.15.2 by using “install_bazel-0.15.2.sh”,
it is the building tool for tensorflow. Next, install and build tensorflow by running
“install_tensorflow-1.12.2.sh”. It needs approximately 14hours to run. The “pip3 install tensorflow”
would update python3 “protobuf” module to the latest version, but we do not need to. Therefore, we
have to uninstall the latest version and re-install version 3.6.1 of python “protobuf” module again.
$ sudo pip3 uninstall -y protobuf
$ cd ${HOME}/src/protobuf-3.6.1/python
$ sudo python3 setup.py install –cpp_implementation
5.3.4 Disable the Ubuntu GUI
We removed the Ubuntu GUI that pre-installed in the Jetson Nano because it consumes a lot
of RAM usage in background. The background memory usage decreased significantly after we did
that. One important thing is that, make sure you can ssh the Jetson Nano before doing this, because
you will not able to use your display as a terminal anymore. Backup before doing this.
Steps:
- boot to GUI and open a terminal
- run:
$ sudo systemctl enable multi-user.target
$ sudo systemctl set-default multi-user.target - Reboot and connect using ssh
- run:
$ sudo apt –simulate purge whoopsie
$ sudo apt purge whoopsie - Reboot again
5.4 Communicate with Arduino UNO
The Arduino Uno’s USB port can be used not only for sending code, but for serial
communication. We used the python library, PySerial, to create a python code that would interface the
Jetson Nano with the Arduino. This allowed the Jetson Nano to control the motors of the car, whether
that be for manual control or the output of the neural network.
5.5 Data Collection
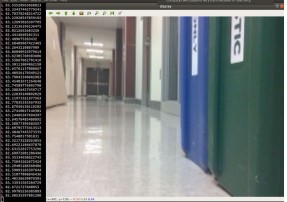
Data Collection was done with the Jetson Nano and the Pi Camera to ensure the most
similarity to the images that would be seen by the neural network. Typically, we would use the
PySerial code to drive the car manually and run an OpenCV python code that captured images
simultaneously.

5.6 Data Labeling
Each image was labeled in such a way that would correspond to the command the Nano
would give to the robot in response to it. Earlier on, images were simply labeled “W”, “R”, or “L”.
Which meant, respectively, that the car was faced with empty hallway and should go forward, the car
was veering toward the wall on the left and should turn right, and that the car was veering toward the
wall on the right and should turn left. Once enough images were collected that the car could
accurately execute these three commands in response to its environment, traffic signs were introduced
giving directives. Left and right turn signs were used at first, but these were insufficient to keep the
car from getting stuck in a dead end, so a u-turn sign was introduced. There was some difficulty
distinguishing between them since they all consisted of black arrows on small white signs. In the end,
left, right, and u-turn signs, each category with a distinct color, were used. This yielded three
additional output classes: “TL” in response to a green left turn sign, telling the car to turn 90 degrees
to the left; “TR”, in response to a yellow right turn sign, telling the car to turn 90 degrees to the right;
and “RE”, in response to a red u-turn sign, telling the car to turn 180 degrees.
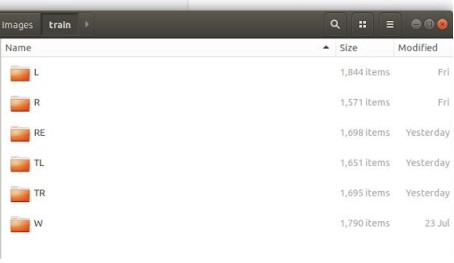
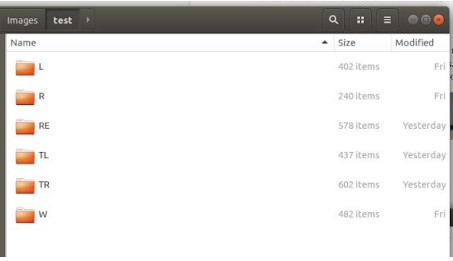
The mechanism by which the data was labeled was that they were sorted into folders
corresponding to their output classes after they were collected. Whenever a set of images was
collected, they would first be uploaded to Google Drive which was shared among the project
collaborators. Next, large groups of images would be selected and moved into new folders named
after their output classes (as aforementioned, “W”, “R”, “L”, “TL”, “TR”, and “RE”). one of each of
these folders were within the two larger folders “test” and “train”. About four fifths of the images
were put into their respective folders within “train” while the rest were placed in that of “test”. Then,
both the train and test folders were downloaded onto the workstation. When the training program was
run, it would then search the “test” and “train” folders, training the network with those images in
“train”, taking the images’ immediate directory names as their labels, and the images in “test” would
then be used in a similar fashion to test the network’s accuracy.
5.7 Model Training
The neural network trained to drive the car was the ResNet network from the ImageAI library
[2]. The ImageAI library is a free public source for image recognition with pre-trained object locators
and trainable neural networks. It runs on Python and required the installation of TensorFlow and
Keras, which were rather simple with pip install, and was run in a tensorflow virtual environment.
The code for the file which trained the network was remarkably simple, requiring the selection of one
of four neural networks, a function to save the model in an h5 file after training, and a training
function which took several parameters. These included number of output classes, number of epochs,
the option to enhance data (for a low number of data samples), the batch size, and the option to print
the network summary. Typically, the model was trained with a batch size of about 20 for a duration
of 10 epochs, enhancing the data only when recommended, which was when output classes had less
than 1000 samples.
6. MagmaDNN
The implementation of MagmaDNN in this project was limited, due to the amount of time
required to give the car self-driving capabilities and difficulties in installing and using it. However,
some work was done with it which demonstrates that it can be used on the Jetson Nano.
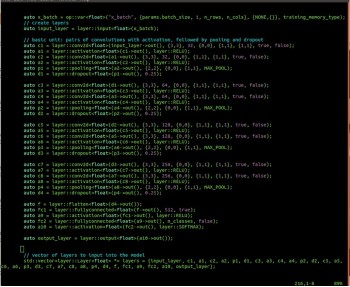
To give an overview, MagmaDNN is a neural network library which is written in c++. It is
designed in a way which is comparable to Keras, the basis for the ImageAI library and a Python
neural network library in which network layers are declared in sequence with their parameters and
combined with a training function. Although MagmaDNN is optimized for use on GPU and designed
to run faster than other neural networks, there were some obstacles and difficulties in attempting to
use it.
One of these is that there is some difficulty installing it. The source page on github supplies a
tutorial for doing so which is rather helpful, but there are a number of dependencies required which
may not necessarily be simple to set up properly. These include some form of BLAS (basic linear
algebra subsystem), CUDA, CuDNN, and Magma. When installing MagmaDNN, ensuring that each
individual dependency refers to the proper library paths of the others can be difficult.
Another issue is the GPU/CPU issue. While MagmaDNN can be used on just the CPU and
requires fewer dependencies to do so, on top of the obvious issue that it would run slower, it is
incapable of performing some of its critical functions, including convolutional layers. This made the
project more difficult since MagmaDNN could not be run on the workstation with its ample memory.
While it did have a GPU, it was an older model with insufficient compute power for CuDNN.
Another issue which may not be so much inherent to MagmaDNN as to neural network
software in general is that of reading input. The MagmaDNN download comes with a number of
examples which were set up to be run on the MNIST dataset. However, for this project and based on
how images were labeled for ImageAI, reading the dataset into a network would require extraction of
image files from directories and assigning labels based on which directory each image was in. While
code was written to do this with the OpenCV library and the c++ recursive file iterator, this code was
never tested due to the primacy of giving the car self-driving capability with the ImageAI library.
Further difficulties came from the Jetson Nano. One of these was that it came with CuDNN
pre-installed, but in an abnormal way that was difficult to find. Thus, in the end, CuDNN was still
installed from a download and the original CuDNN was partially removed to prevent conflict.
Furthermore, the Nano’s Ubuntu system was set up such that, despite the fact that all the dependencies
were installed and the Nano had a GPU, it nonetheless made the CPU version.
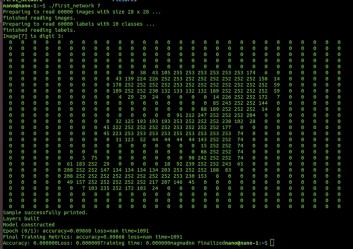
Eventually, it came to the point where a medium sized convolutional network could be trained
on the nano. A convolutional network designed to eventually drive the car was condensed and trained
on the nano. Sadly, with the Nano’s limited memory, it could not train particularly fast. The network
had 17 hidden layers. It was trained for one epoch on the MNIST dataset, which took about 1000
seconds and yielded an accuracy of 98.6%. This demonstrated that the Nano could be used to run
MagmaDNN, with some drawbacks. Since the current version of MagmaDNN does not have a model
saving function, any network would have to be trained and run at the same time, which would
probably take a long time. This also calls into question whether or not the trained network would run
fast enough to identify live images from the Raspberry Pi camera and give an output class soon
enough for the car to give a response.
7. Results
After we used ImageAI for a while, we had produced several neural networks. The initial
networks did not perform well. The car’s behavior appeared close to random. After adjusting input
images and retraining, the car began to perform better. It could now avoid the walls and drive in a
straight line. We continued by adding labels for pictures in which the car should turn left or right.
However, the images were too similar to the normal images used to avoid the walls, resulting in an
inaccurate network. Our final network utilizes colored arrows to indicate to the car to turn left or right
and performs far better.