Have you ever come across a computer priced at less than 5 dollars? If not, then you might not be familiar with the raspberry pi yet. It is a miniature computer originally designed for educational purposes but now widely utilized in various electronic components. As an aspiring electronics student or beginner, you may have heard about it from your teachers or experienced peers, but perhaps you haven't received sufficient guidance to motivate you to start learning and understanding it. However, worry not, as we present an engaging introductory guide to the raspberry pi that will assist you in getting started.

What is Raspberry Pi?
There is a common misconception among many people that the raspberry pi is merely a microcontroller used in various electronic projects. However, it is much more than that—it is essentially a fully functional computer that fits in the palm of your hand. The compact size of the raspberry pi may be surprising, as it encompasses all the components typically found in a computer. It provides everything necessary to connect peripherals like a monitor, keyboard, Wi-Fi, Bluetooth, and more. With the raspberry pi, you can browse the internet, create spreadsheets, play games, and perform various other computing tasks. Equipped with a quad-core processor, up to 8 gigabytes of RAM, and numerous other features that will be discussed later in this article, it truly packs a punch.
While it can certainly be used as a computer, electronic engineers, students, and programmers can reap additional benefits from this diminutive device. Its applications extend to site projects, such as controlling robots or transforming a regular TV into a smart TV. Therefore, the raspberry pi opens up numerous possibilities for programming and electronics enthusiasts. This small yet powerful motherboard offers capabilities beyond our imagination. In this article, we will delve into two important aspects related to the raspberry pi.
- Raspberry Pi Board:
- Utilizing the Raspberry Pi hardware platform.
- Setting up and configuring the operating system for Raspberry Pi.
- Programming applications specifically designed for the Raspberry Pi environment.
But, before starting anything you must know the history of that. So, first, we’ll discover its history.
History and Evolution of Raspberry Pi
The Idea
In 2006, a group of scientists recognized a concerning trend among undergraduate students: many lacked technical knowledge and understanding of computers. While students were using computers regularly, they had limited comprehension of the technical aspects involved. Edon Upton, one of the founders of the raspberry pi, mentioned in an interview that he and his colleagues in Cambridge grew increasingly concerned about the declining enrollment in computer science programs. Motivated by this, they embarked on a mission to create an affordable mini-computer specifically designed for educational purposes.
First Launch
After dedicating approximately six years to the project, the team finally unveiled the inaugural version of the raspberry pi in 2012. This initial iteration boasted 512 MB of RAM and 26 GPIO (General Purpose Input/Output) pins. The response to its release was overwhelmingly positive, with sales exceeding 20 million units in a short span of time. Over the years, the raspberry pi underwent multiple revisions, leading to the availability of different models, namely Model A and Model B. Model A is an affordable and straightforward option, whereas Model B offers enhanced capabilities, including Ethernet connectivity, making it a more powerful choice.
Different Versions of Pi
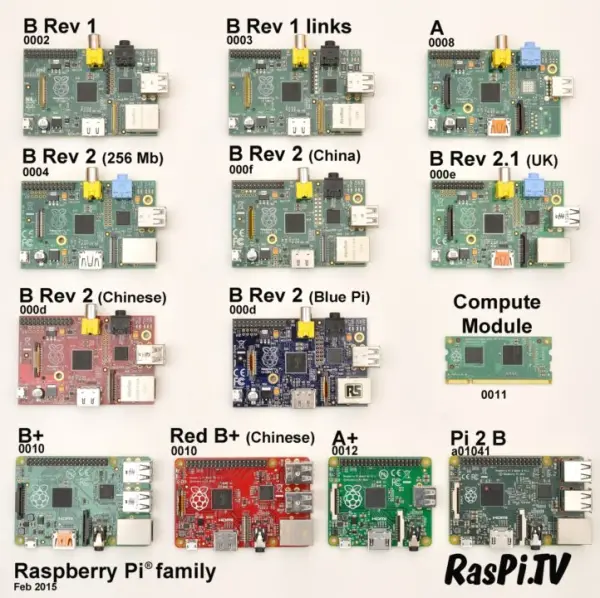
In 2015, a more powerful version of the raspberry pi called the Raspberry Pi 2 Model B was released. This new iteration boasted significant improvements, including 1 GB of RAM, a quad-core processor, and 40 GPIO pins. During the same year, in November, the Raspberry Pi Zero Model was introduced, targeting smaller projects with its 512 MB of RAM. Surprisingly, this version was priced at a mere 5 dollars.
The year 2016 saw the launch of the Raspberry Pi 3, which incorporated Wi-Fi and Bluetooth functionalities. In February 2017, an upgraded version of the Raspberry Pi Zero was introduced, known as the Raspberry Pi Zero W, featuring the same specifications as the Zero but now equipped with Wi-Fi and Bluetooth capabilities. This version proved highly beneficial for users working on smaller projects. Later in 2018, the Raspberry Pi Zero WH was released, featuring all the same attributes as the Zero W but with the added convenience of pre-soldered headers.
In March 2018, the Raspberry Pi 3 B+ was unveiled, offering additional features and components compared to the Pi 3 Model. Later that year, on November 15, a compact variant of the Pi 3 B+ was introduced as the Raspberry Pi 3 Model A+. This smaller version featured a reduced amount of RAM. June 2019 marked the release of the Raspberry Pi 4 B, which introduced notable improvements such as the Power over Ethernet Hat. However, the price of this fourth edition was higher compared to previous versions, reaching around 35 dollars. In 2020, the Raspberry Pi 4 B 8GB was launched, offering even more RAM than before.
Continuing in the same year, the Raspberry Pi 400 was introduced, featuring an improved CPU clock speed and the unique feature of being directly integrated into a keyboard, providing a streamlined and user-friendly experience.
Latest Version
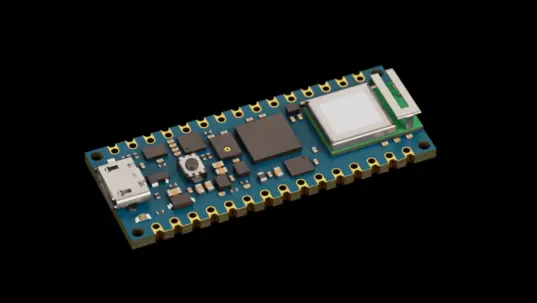
In the present year, a recently launched version has captured the interest of electronic students. This new iteration diverges from the conventional concept of a mini-computer and instead resembles the Arduino Nano, primarily functioning as a microcontroller. Referred to as the Raspberry Pi Pico, it represents a distinct departure from the typical Raspberry Pi model. Notably, this version lacks built-in Bluetooth, Wi-Fi, and Ethernet capabilities, marking a departure from the standard features found in other Raspberry Pi devices.
Raspberry Pi Board
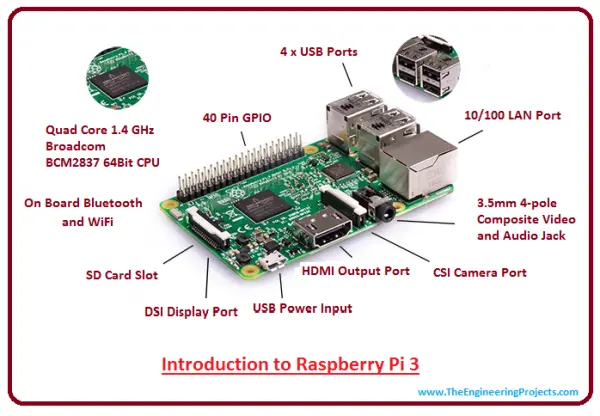
As mentioned earlier, the Raspberry Pi board has undergone significant evolution and transformation over the years. In this article, we will focus on the features and specifications of the Raspberry Pi 3. This particular iteration of the board was introduced in February 2016. Now, let's delve into the individual components and specifications of the Raspberry Pi 3 board.
On-chip Processor
The Raspberry Pi 3 features the Broadcom BCM2837 System on a chip, which incorporates an Arduino A53 processor. This includes a high-performance 1.4 GHz ARM Cortex-A53 quad-core processor, accompanied by 32kB of Level 1 cache, 512kB of Level 2 cache, and 1 GB of RAM. Additionally, it houses a VideoCore IV graphics processor that is connected to a 1GB LPDDR2 memory module. In simpler terms, this system-on-chip processor encompasses the CPU (central processing unit), GPU (graphics processing unit), and SDRAM (synchronous dynamic random-access memory). This combination of components provides a powerful and integrated computing solution within the Raspberry Pi 3.
CPU Clock: The Raspberry Pi relies on a powerful ARM Cortex-A53 quad-core processor with a clock frequency of 1.4GHz. As the central processing unit, it serves as the brain of the Pi, executing various tasks and computations.
GPU: The graphics processing unit, or GPU, is a dedicated chip designed to handle the intricate mathematical calculations involved in rendering graphics. The Raspberry Pi board is equipped with the VideoCore IV GPU, ensuring efficient and high-quality graphics processing.
SDRAM: The Pi board is equipped with 1GB of SDRAM, which is shared between the GPU and CPU. This shared memory allocation allows both components to access and utilize the available memory for efficient processing of graphics and general computing tasks.
Ports
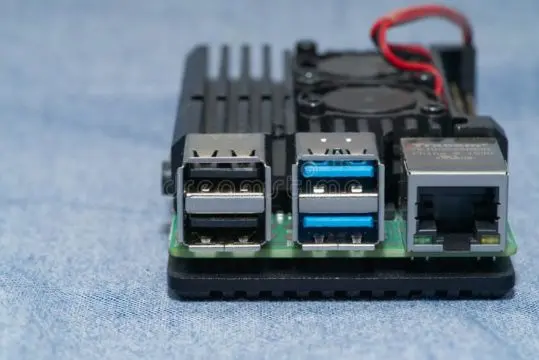
USB Ports: The Raspberry Pi 3 is equipped with four USB ports, allowing the user to connect up to four USB cables simultaneously.
Ethernet Port: The Raspberry Pi 3 Model includes an ethernet port, which serves the purpose of facilitating ethernet connections. This port enables users to establish connections between computers, modems, servers, routers, printers, switches, and more. The Raspberry Pi 3 supports 10/100 Mbps ethernet speeds.
HDMI Port: To facilitate connections with high-definition devices such as monitors and televisions, as well as to stream video or audio to computers or TVs, the Raspberry Pi 3 is equipped with an HDMI port. This port serves as a digital interface, allowing the transmission and reception of both audio and video signals.
CSI Port: The Raspberry Pi 3 features a Camera Serial Interface (CSI) port, specifically designed for interfacing with a camera. Users can directly connect the Pi camera module through this port.
SD Card Port: The Raspberry Pi Model 3 provides the capability for external storage. It includes an SD card port, allowing users to utilize external storage devices such as SD cards.
Wi-Fi and Bluetooth Interface
The Raspberry Pi version being discussed incorporates a Wi-Fi and Bluetooth interface, enabling the board to establish communication with the external world. This functionality proves particularly useful for creating various Internet of Things (IoT) devices by leveraging Wi-Fi connectivity, as well as connecting to electronic devices through Bluetooth technology.
GPIO Pin Connectors
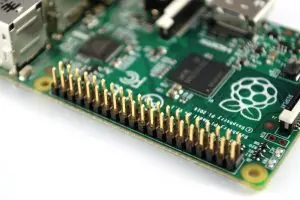
Description of GPIO Pins
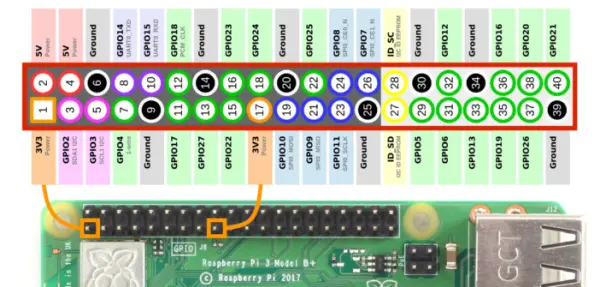
Power Pins: The Raspberry Pi features four power pins, with pins 2 and 4 providing 5 volts and pins 1 and 17 providing 3.3 volts.
Ground Pins: There are a total of eight ground pins available on the Raspberry Pi board, specifically pins 6, 9, 14, 20, 25, 30, 34, and 39.
PWM Pins: Pins 32, 33, 35, and 12 are designated as pulse width modulation (PWM) pins. These pins support hardware PWM, while software PWM can be utilized on all pins.
UART Pins: The Raspberry Pi offers two universal asynchronous receiver and transmitter (UART) pins, enabling communication between the Pi and external devices such as microcontrollers or computers. Pin 8 serves as the TX (transmit) UART pin for sending serial data, while pin 10 functions as the RX (receive) UART pin for receiving serial data.
SPI Pins: Serial Peripheral Interface (SPI) pins are used to facilitate communication between the Raspberry Pi and one or multiple peripheral devices. Different SPI pins serve different purposes. For example, SCLK (clock) pins are located at pins 11 and 21, MOSI (master output slave input) pins are at pins 10 and 20 for transmitting data from master to slave, and MISO (master input slave output) pins are at pins 9 and 19 for receiving data from slave to master. There are also chip enable (CE) pins, which are available at pins 8, 7, 18, and 17. Each peripheral device in the circuit should be connected to one CE pin. The Raspberry Pi provides two sets of SPI pins, namely SPI0 and SPI1. Pins 11, 10, 9, 8, and 7 belong to SPI0, while pins 21, 20, 19, 18, and 17 belong to SPI1.
I2C Pins: The I2C pins on the Raspberry Pi board are pins 3, 5, 27, and 28. These pins are used for data, clock, EEPROM data, and EEPROM clock, respectively. They enable two-wire communication between the Pi and various sensors or modules.
Installation and Setup of Operating System
To utilize a Raspberry Pi, the installation and setup of an operating system are required. The official operating system for the Raspberry Pi is Raspbian. Interestingly, the name “Raspberry” in Raspberry Pi is derived from the OS Raspbian, while “Pi” indicates its support for the Python programming language. However, there is an alternative called New Out of Box Software (NOOBS) that enables the installation of various other operating systems, including Raspbian. Many individuals prefer using NOOBS as it offers a simpler installation process compared to other methods.
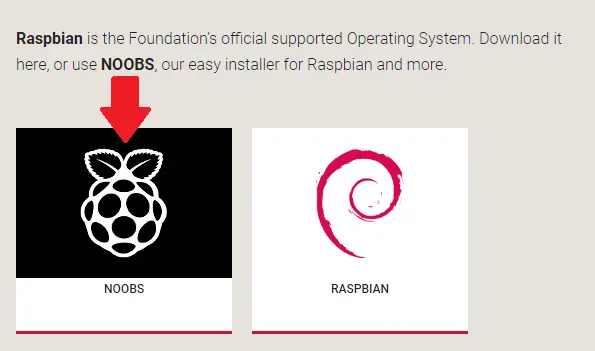
Download NOOBS
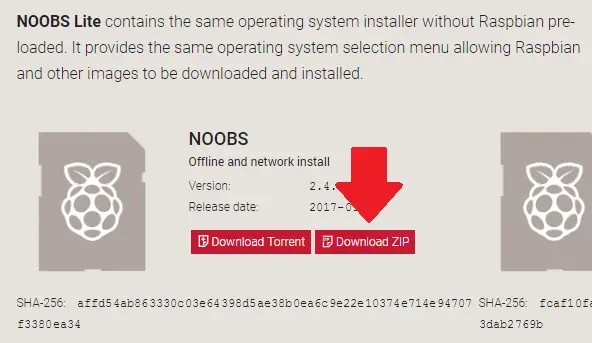
Copy the Files to the SD Card
Now, the next step involves transferring all the files from the NOOBS directory onto the formatted SD card. Once you have copied all the necessary files, safely eject the SD card from your computer and insert it into the SD card slot on the Raspberry Pi board.
Connect the Mouse, Keyboard, and Monitor
Next, you'll need to connect the USB cables of your mouse and keyboard from your computer to the USB slots on the Raspberry Pi board. Additionally, connect your monitor to the board using an HDMI cable. Finally, provide power to the Raspberry Pi board.
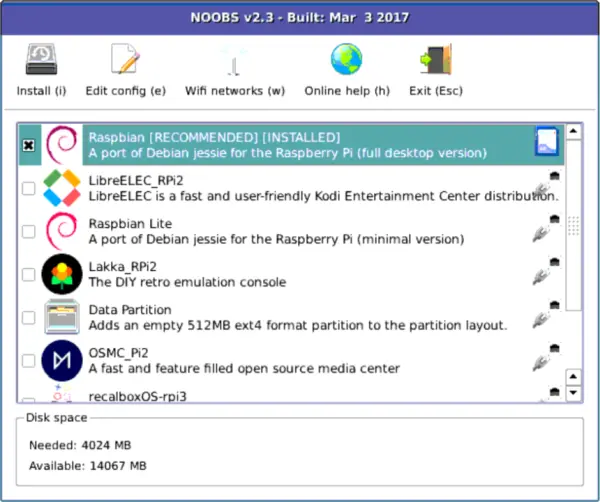
Install Respbian
After powering up the Raspberry Pi, a window will appear displaying various options based on the installed version of NOOBS. Select the option for Raspbian to initiate the installation process. Once the installation is complete, a dialogue box will appear. Simply click on “OK” to proceed. This will automatically reboot the Raspberry Pi, taking you to the Raspbian desktop environment.
Setup
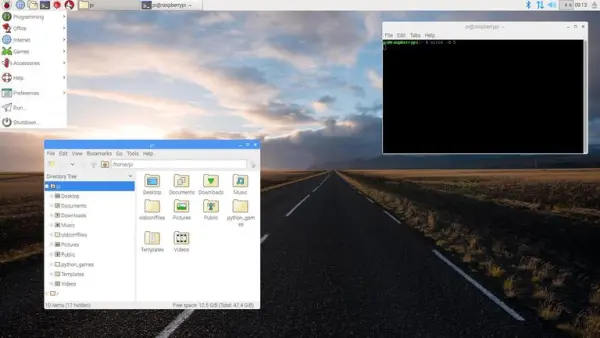
Initially, when setting up Raspbian, you will be prompted to provide information such as your country, change the password for your Pi, connect to your Wi-Fi network, and set the password for your Wi-Fi. Afterward, Raspbian will check for updates, ensuring that you have the latest software. Once this process is complete, you can begin using the Raspberry Pi like a regular computer. It includes various applications such as a web browser, video and audio player, office tools, and more, allowing you to perform typical computing tasks.
Programming on Raspberry Pi