
Embarking on Raspberry Pi projects can be an exciting endeavor, but it's important to start by gathering the necessary supplies and familiarizing yourself with the fundamentals. Here's a guide on how to get started.
In the past six years, a revolutionary single-board computer emerged in the market, transforming the landscape for tinkerers and DIY enthusiasts. The Raspberry Pi has become a highly sought-after device, serving as a dream machine for an array of projects, ranging from gaming consoles to home streaming and VPN servers, among others. However, before diving into your Raspberry Pi project, it's essential to begin by gathering the necessary supplies and acquiring a foundational understanding of the basics. If you're venturing into building something with the Raspberry Pi, this is the ideal starting point for you.
What Is the Raspberry Pi?
The Raspberry Pi is a compact computer, comparable in size to a deck of cards. It operates on a system-on-a-chip architecture, meaning that the CPU and GPU are integrated into a single integrated circuit. Additionally, the board incorporates soldered-on components such as RAM and USB ports, providing a comprehensive solution in one package.
While the Raspberry Pi lacks onboard storage, it offers an SD card slot that can be utilized to store the operating system and files. This feature contributes to its compact design. The Raspberry Pi is known for its low power consumption and affordability, with a price tag of just $35.
Initially, the Raspberry Pi Foundation developed the Raspberry Pi as an affordable computer with the intention of facilitating programming education. However, it swiftly gained popularity among do-it-yourself enthusiasts who sought a versatile and robust computing solution to power their electronic projects.
Since its inception, the Raspberry Pi has seen the release of numerous models, some of which have undergone multiple revisions. For instance, the Raspberry Pi 3 Model B+ improved upon the networking capabilities of its predecessor, the Model B.
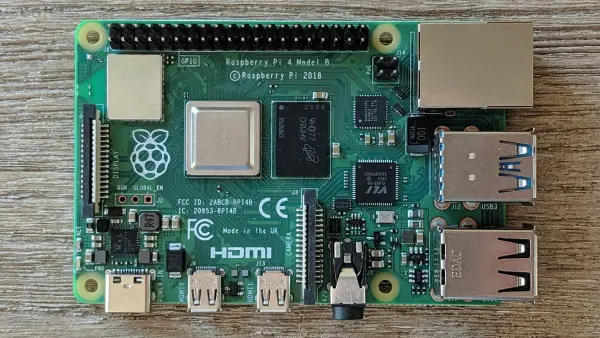
At the time of writing, the latest iteration of the Raspberry Pi is the Raspberry Pi 4, available for $189.95 on Amazon. This model boasts a 1.5GHz quad-core ARM CPU, a 500MHz VideoCore VI GPU, and 1GB of RAM, though options with up to 4GB of RAM are also available at a slightly higher price point.
While earlier models are still accessible for $35, it is worth noting that used models can often be found at slightly lower prices. These older versions tend to generate less heat, which can be advantageous if your project does not demand significant processing power.
What You Need to Get Started
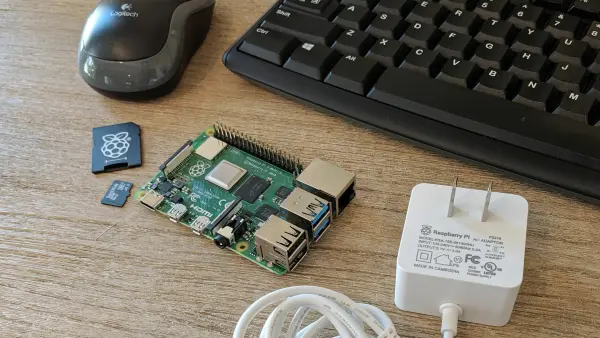
The Raspberry Pi serves as the central component of your project, but it alone cannot fulfill all requirements without the necessary power supply and storage. To successfully set up and operate your project, you will need several essential components:
The Raspberry Pi
The most recent model of the Raspberry Pi may be challenging to locate due to its high demand. To find its availability, you can consult an approved list of resellers. In addition, earlier models such as the Raspberry Pi 3 B+ and Raspberry Pi 2 are still accessible on Amazon. Furthermore, the Raspberry Pi Zero, which offers slightly less power but comes in a smaller form factor, is also available for purchase.
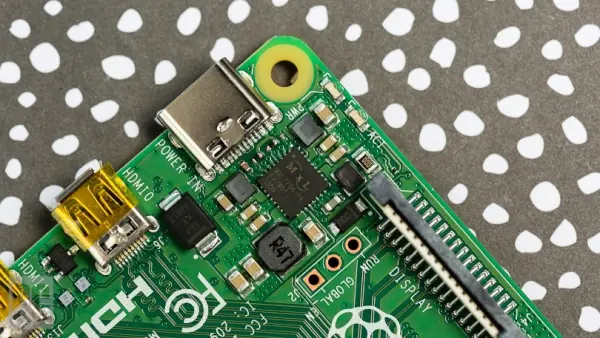
The earlier versions of the Raspberry Pi utilized microUSB for power delivery, but with the Raspberry Pi 4, there was an upgrade to USB-C, although it should be noted that it is not completely compliant with the standard. While some phone chargers may suffice for powering the Pi, I recommend investing in a power adapter specifically designed for the Raspberry Pi, such as the one offered by CanaKit or the official models provided by the Raspberry Pi Foundation. Using power adapters designed for the Pi ensures consistent and reliable power supply to the board, minimizing the need for troubleshooting and enhancing overall performance.
A microSD Card
Most of the newer Raspberry Pi models employ microSD cards for storage, while the original Pi models A and B use regular SD cards. It's important to note that not all SD cards function flawlessly with the Raspberry Pi. To ensure compatibility, your best options are either purchasing the official Raspberry Pi microSD card, which comes preloaded with an operating system, or selecting a tested and compatible option from a list of recommended cards, such as the SanDisk 32GB Ultra. Additionally, you will require a means to connect the SD card to your computer, which can be achieved with a USB adapter designed for this purpose.
A Case
While not strictly necessary, it is highly recommended to consider using a case to protect your Raspberry Pi. Having a case ensures that your board remains shielded and secure, preventing potential damage. Although cases for the Raspberry Pi 4 are still being introduced to the market, there are numerous options available for earlier models. One notable choice is the FLIRC case, which stands out due to its built-in heatsink, providing effective cooling for the board.
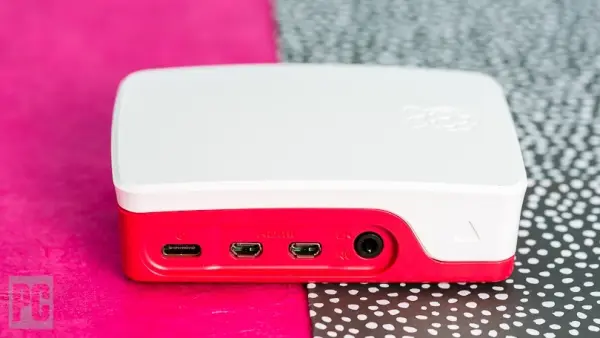
Certainly, various other appealing case options are available in the market, such as retro gaming cases that evoke a nostalgic feel and transparent cases that allow for a glimpse of the internal hardware. Additionally, numerous cases come equipped with separate heatsinks and/or fans, which contribute to maintaining optimal temperature levels for the system-on-a-chip. These alternative cases offer a range of choices to suit individual preferences and requirements.
Mouse, Keyboard, and HDMI Cable
The necessity of having a mouse and keyboard permanently connected to your Raspberry Pi may vary depending on your project. However, it is advisable to have them readily available during the initial setup process. If it's inconvenient to detach the mouse and keyboard from your primary computer, you can easily acquire an inexpensive set from online retailers like Amazon. Similarly, for connecting your Raspberry Pi to a display, you can purchase an affordable HDMI cable (or micro-HDMI cable for Raspberry Pi 4) to ensure proper connectivity.
Simplifying the process, you have the option to purchase all these accessories together as part of an official Raspberry Pi 4 kit or a Pi 3 kit from CanaKit. However, if you prefer to acquire the components individually, it may be possible to save some money if you already possess certain accessories. It is important to consider any additional components needed for your specific project. For instance, if you are constructing a retro gaming machine, you will require USB gamepads, in addition to the other necessary items.