
The utilization of real-time streaming presents an excellent opportunity for engaging with our surroundings, such as through a CCTV camera. But have you ever wondered about the underlying technology?

Imagine if we could achieve the same functionality using a Raspberry Pi. Specifically, we could stream the live feed from the Pi Camera to various client devices, allowing for seamless interaction. Additionally, we will explore practical applications of this concept.
This tutorial aims to provide a comprehensive guide on how to accomplish exactly that. We will demonstrate the process of creating a live camera streaming system from a Raspberry Pi to your smartphone or any other internet-connected device. If you've recently acquired a Raspberry Pi and are eager to embark on a new project, this endeavor could serve as an ideal starting point.
Introduction & Top Level Overview
Upon completing this tutorial, you will possess the skills to establish a wireless stream that allows you to view the camera feed from any device connected to your network. This capability opens up possibilities for creating personalized camera streams for various applications, such as a plant monitor, smart CCTV camera with face recognition, or even a portable camera.
The tutorial will guide you through the process of assembling the necessary components, installing the operating system, and setting up the Python stream. So without further ado, let's commence our journey!

Introduction Raspberry Pi
To gain a comprehensive understanding, it is always beneficial to familiarize ourselves with the hardware we will be utilizing. In this case, we have the remarkable Raspberry Pi—a miniature marvel. Essentially, a Raspberry Pi functions as a computer, albeit at a low cost. Similar to your MacBook or desktop computer, it comes equipped with USB peripherals and various ports like Audio Jack, Ethernet, and HDMI.
What makes the Raspberry Pi intriguing is its compact form factor, making it highly versatile for numerous real-world applications and immensely popular within the DIY community.
For the purpose of this article, we will be utilizing the Raspberry Pi 4 (4GB) model. However, it is worth noting that other models can also be used, though there may be variations in performance.

What is streaming & How does it work?
Flask can be regarded as a Python-based back-end web server or micro-framework, simplifying the process of constructing web frameworks with Python.
So how does it work?
We are currently obtaining real-time video from the Raspberry Pi camera and utilizing Flask to generate a live stream accessible to various client devices. Flask serves as an excellent connection between Python and HTML web pages, supporting Motion JPEG for streaming a series of individual JPEG images. Motion JPEG is commonly employed in both security IP cameras and webcams, and this is the method we employ to stream our live feed.
Moreover, any device connected to the same network as the Pi can access the URL and view the live stream footage. the OpenCV library would be used to access our video stream.
Pi Cam vs. camera module
If you are curious about the image comparison performance between the latest Pi Camera Module and another option, here is the comparison. While the Pi Camera module is pricier, it undoubtedly offers better image quality.
However, for the purpose of this project, we have opted to use the more affordable Pi Module.
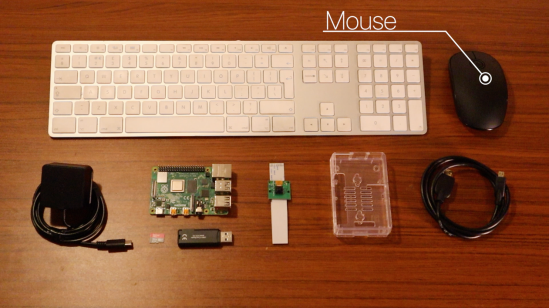
BUILDING PROCESS: 4 STEP PROCESS
To set up the Raspberry Pi Camera Module, follow these steps:
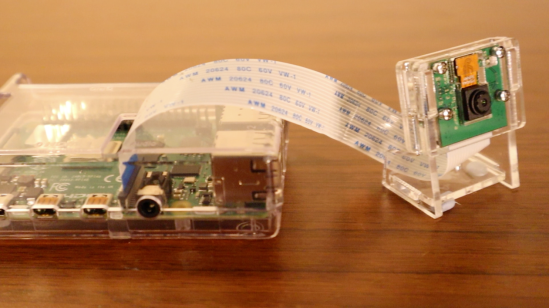
- Make sure the Pi is powered off, and gently pull on the Camera port latches to expose the camera module port.
- Insert the camera ribbon cable into the port and push the latch back into place. The correct orientation is typically with the blue part of the ribbon cable facing towards the USB ports. Note: Be careful when handling the camera port clips/latches as they are fragile. Optional: If you want to use a wired connection, connect your Pi to the Ethernet cable. If you prefer to use a monitor, connect the micro HDMI cable to the TV and the Raspberry Pi's micro HDMI port. That completes the installation process!”
ETCHING OS
Before we can power on the Raspberry Pi, we need to install the Raspbian OS on a MicroSD card. Here are the steps:
- Download the Raspbian OS image.
- Use Balena Etcher to flash the Raspbian OS onto the MicroSD card. The process may take up to 15 minutes, depending on your SD card.
- Once the flashing is complete, safely eject the MicroSD card.
- Insert the MicroSD card into the Raspberry Pi and connect the Ethernet cable if necessary.
- Power on the Raspberry Pi 4 by plugging in the USB-C cable.
PI OS SETUP
Ensure that your Raspberry Pi is connected to the internet, either through a wireless or wired connection.
For a wired connection, connect an Ethernet cable from the Pi to the LAN port of your router.
For a wireless connection, search for your Wi-Fi access point and enter the credentials to establish a wireless connection.
Once you have logged in to the Pi, proceed with the setup installation dialog boxes and complete the process.
The next step involves enabling the Camera Port and VNC (Virtual Network Computing). Enabling the Camera Port allows you to use the camera on the Pi, while enabling VNC enables remote access to the Pi without the need for a monitor.
To do this, open the terminal window and enter the following command:
sudo raspi-config
Select ‘Interface Options' and then ‘Camera Port' to enable the camera.
Select ‘Interface Options' and then ‘VNC' to enable VNC Viewer.
Enabling SSH (Secure Shell) is optional if you want to access the Pi via your laptop.
Once you have made the necessary selections, exit the configuration window. This may trigger a reboot of your Pi.
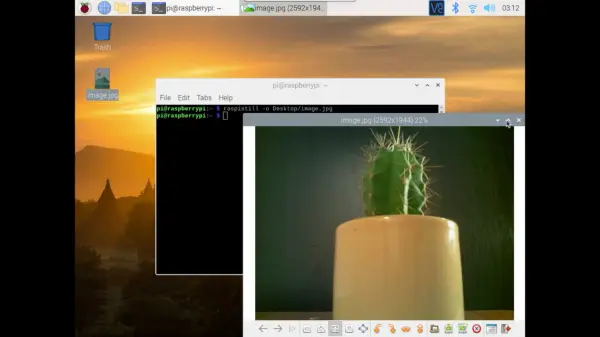
Camera Setup:
After rebooting your Pi, you can verify if the Pi camera is functioning correctly by capturing an image using the camera module. Enter the following command in the terminal:
raspistill -o Desktop/image.jpg
This command will capture an image and save it to the Desktop of your Pi.
Additionally, you can also record a short video output by using the following command:
raspivid -o Desktop/video.h264
SETUP OF PYTHON CAMERA STREAM
UPGRADING YOUR PI:
To ensure that all your libraries and packages are up to date, execute the following commands:
sudo apt-get update
sudo apt-get upgrade
Creating a virtual environment is optional but recommended:
Creating a virtual environment for Python3 library dependencies is a good practice. It allows us to install Flask within a container on the Raspberry Pi, so if any issues arise, we can avoid starting from scratch. However, for the purpose of this installation, we will skip creating a virtual environment since we are installing only a few libraries.
INSTALLING THE DEPENDENCIES
Installing the Dependencies:
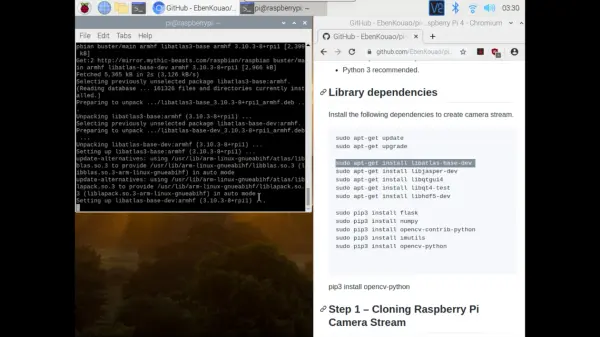
To set up a live stream, you may need to install the following dependencies depending on your Raspberry Pi.
sudo apt-get update

sudo apt-get upgrade

sudo apt-get install libatlas-base-dev

sudo apt-get install libjasper-dev

sudo apt-get install libqtgui4

sudo apt-get install libqt4-test

sudo apt-get install libhdf5-dev

sudo pip3 install Flask

sudo pip3 install numpy

sudo pip3 install opencv-contrib-python

sudo pip3 install imutils

sudo pip3 install opencv-python
Once the installation is complete, we are now ready to download the camera stream repository and proceed with creating the Pi stream.
GIT CLONE THE CAMERA STREAM REPO
The ‘Templates' folder is where the index.html webpage is stored. It serves as the basic HTML site that the client views in their browser and can be customized according to your needs. Please note that the webpage is constantly updated by the browser with the latest stream of JPEG images.
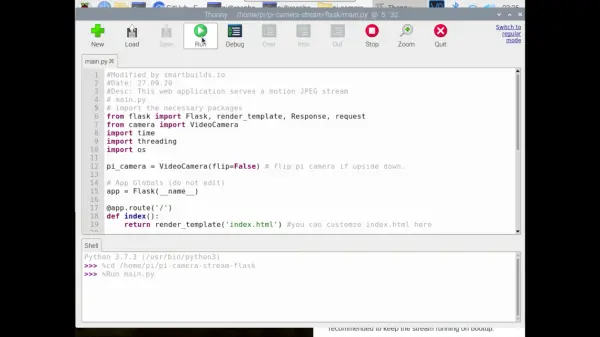
The Python scripts involved in the process are as follows:
- ‘Camera.py': This script utilizes openCV and enables the camera module's output, providing a sequence of frames in the form of Motion JPEG.
- ‘main.py': This script creates the Flask stream. The main application imports the camera class module.
To start the Flask Camera Stream, execute the following command:
sudo python3 /home/pi/pi-camera-stream-flask/main.py
Make sure to replace ‘/home/pi/pi-camera-stream-flask/main.py' with the correct direct path to your Python script. Alternatively, you can navigate to the file directly and run the Python script.
An optional step is to configure the camera stream to start automatically during the boot-up of your Pi. This eliminates the need to manually run the script every time you want to create the stream. Follow these steps:
- Open the ‘/etc/profile' file for editing using the following command:
sudo nano /etc/profile
- Scroll to the end of the file and add the following line (as mentioned earlier):
sudo python3 /home/pi/pi-camera-stream-flask/main.py
- This command will be executed automatically each time the Raspberry Pi boots up, creating a headless setup that can be accessed via SSH.
Note: Ensure that SSH is enabled before implementing this step.
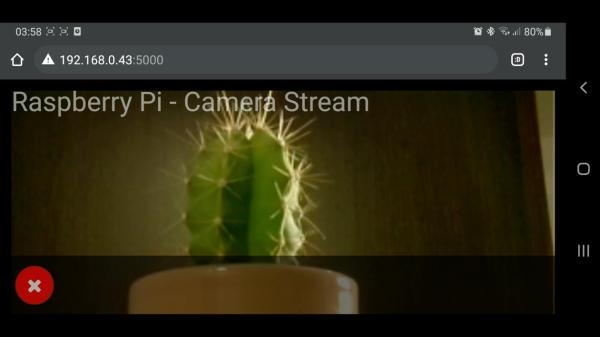
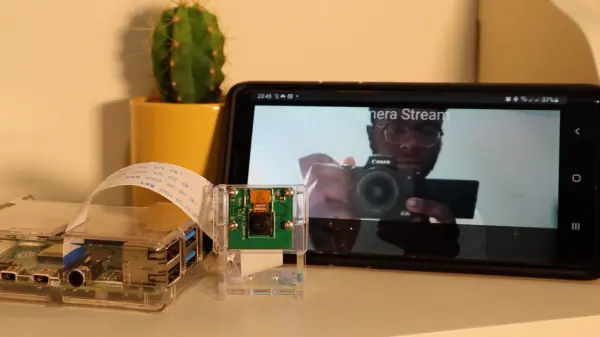
DEMO OF THE FLASK IMPLEMENTATION
To access the live stream of your Raspberry Pi, open a web browser on any device connected to the same Wi-Fi network. Enter the Pi's IP address followed by port 5000 (e.g., :5000) in the browser's address bar.
Note: To find your Pi's IP address, you can enter ‘ifconfig' in the terminal command. Look for the ‘Inet Address' information.
FINAL BUILD, REVIEW, AND PERFORMANCE

Final Build:
Stream Latency:
The latency of the Pi stream typically ranges from 1 to 2 seconds, and in some cases, it can be around 500 milliseconds. The performance of your stream may be influenced by several factors, including:
- Wi-Fi coverage
- Wi-Fi performance
- Raspberry Pi model (the Raspberry Pi 4 is recommended for optimal performance)
Congratulations! You have successfully created your Raspberry Pi Camera stream. There are endless possibilities to explore further, such as creating applications for indoor live feeds or portable cameras. Let your imagination guide you in expanding the capabilities of your setup.