
Introduction
Are you interested in setting up a web server at home with your Raspberry Pi? This guide will walk you through the simple process of launching a web server on your Raspberry Pi within minutes. Not only that, but we'll also show you some basic HTML coding so you can start building your very own website. By the end, you'll have a website hosted right on your Raspberry Pi that is accessible over the internet. We'll cover installing the necessary software, configuring the web server settings, and creating some sample HTML pages. Whether you want to learn web development skills or just want to experiment with hosting your own site, following this tutorial is a fun and easy way to get started with a Raspberry Pi web server.
What is a web server?
In its most basic terms, a web server is a computer that houses the software and files required to operate a website. Its key roles are running web server software to accept and respond to requests, and storing the website's components like HTML pages, images, videos and other media. For a website to be accessible, the web server must be constantly connected to the internet. Without this ongoing connection, users would be unable to access the site. If the web server itself were to shut down or lose its internet connection, the whole website it hosts would become unavailable until it was back online. In essence, a web server is the backbone that holds the entire website together and allows public access, functioning 24/7 to ensure the site remains live and reachable for visitors.
How are you able to visit websites through the browser?
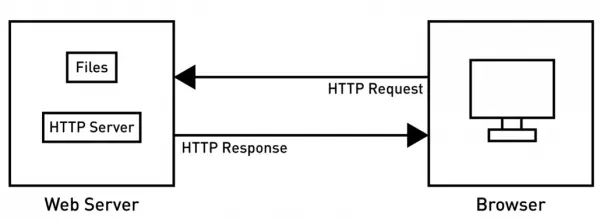
When a user enters a website URL in their web browser, several things happen behind the scenes to display the requested page. First, the browser takes that URL and converts it to the corresponding IP address. It then sends an HTTP request over the internet to the web server with that IP address. Upon receiving the HTTP request, the server's software kicks into action. It accepts the request from the browser and locates the specific file or page associated with the URL. Once found, the server packages up the requested webpage and sends it back to the originating browser through another HTTP response. With this response, the full page is transferred over the internet and rendered in the user's browser. This process allows anyone with a web browser to effectively ask a remote server for content and view it instantly through the URL-to-IP address translation and HTTP communication.
Advantages of building a web server on a Raspberry Pi
There are a number of benefits to using a Raspberry Pi as a homemade web server. For one, it provides a very cost-effective solution compared to commercial hosting plans, which can become quite expensive. Setting up your own Raspberry Pi web server saves electricity as well since these mini computers have an extremely low power footprint. Additionally, since everything runs from a portable single-board computer, it allows for true portability – you can easily transfer your entire server setup to another location if needed. You also have flexibility in choosing any Raspberry Pi model to host your site, from high-performing newer models down to the remarkably tiny yet capable Raspberry Pi Zero. Overall, a Raspberry Pi provides a highly affordable and energy-efficient means of self-hosting a website from any location using minimal hardware resources.
Building an Apache Web Server on a Raspberry Pi
While there are numerous web server options available, this tutorial will focus on setting up the very popular Apache server on the Raspberry Pi. Apache is one of the most commonly used and well-supported open source web servers, making it an excellent choice for a beginner project. It has the ability to serve HTML files to clients using both the HTTP and secure HTTPS protocols. Additionally, Apache can be expanded with modules to deliver dynamic content through technologies like PHP. However, for simplicity in this introductory guide, we will configure Apache in its most basic form to only host static HTML pages. This stripped-down approach allows us to quickly get a functional website up and running on the Raspberry Pi without overcomplicating the initial setup process. Down the road, more advanced Apache features can be explored once the fundamentals are in place.
Material required
Setting up an Apache web server on the Raspberry Pi is really quite straightforward. Here are the basic items you'll need:
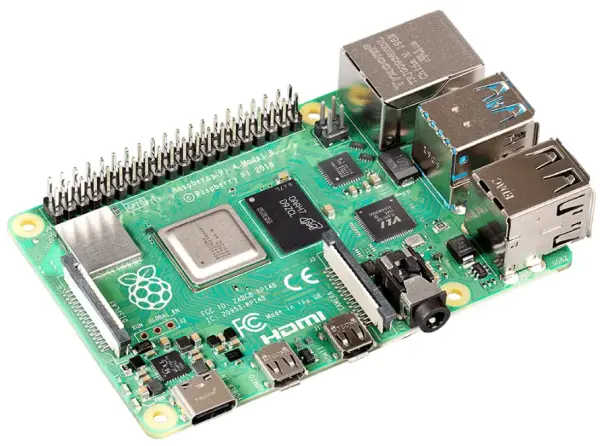
Raspberry Pi computer
USB type-C cable and power adapter for connectivity and power
MicroSD card with an installed Raspberry Pi OS image, along with an SD card reader
(Optional) Argon ONE Raspberry Pi 4 aluminum case
We recommend the Argon ONE case as your Raspberry Pi will be running continuously once the Apache server is live. Proper cooling is important during extended usage, and this case provides both effective heat dissipation as well as a stylish aluminum enclosure.
The Raspberry Pi itself along with power and an SD card containing the operating system are the minimum requirements. But for best long-term performance of your new home web server, the optional case helps ensure everything runs smoothly without overheating issues. Now you're equipped to easily create your own low-cost, low-power Apache hosting solution.

Configuring the Raspberry Pi for initial boot
Unlike some single-board computers, the Raspberry Pi does not ship with an operating system pre-installed. So the first step is to prepare a micro-SD card with a Linux distribution specifically made for the Raspberry Pi. This involves downloading the Raspberry Pi OS image, writing it onto the SD card using disk imaging software on your regular computer, and then inserting the micro-SD card into the Pi. Once powered on, the Raspberry Pi will boot from this card rather than internal storage, since it has no other means to run an operating system without one first being provisioned on the micro-SD. So preparing the SD card with a Raspberry Pi OS is an essential preliminary step before powering on the tiny computer for the first time.
Step 1
To begin, we need to acquire a Linux operating system that is compatible with the Raspberry Pi hardware. While other distributions like Ubuntu can be used, this guide will stick with the official Raspberry Pi OS from the Raspberry Pi Foundation. It offers a lightweight desktop-oriented OS tailored specifically for Raspberry Pis. Head to the Raspberry Pi download page and obtain the ‘with desktop and recommended software' version of Raspberry Pi OS. This fuller image contains desktop tools that make setup and usage more user-friendly compared to the minimal install. Downloading the full Raspberry Pi OS from the supplier themselves ensures we have an OS built for our needs as we prepare the SD card and start our web server setup process.

Step 2
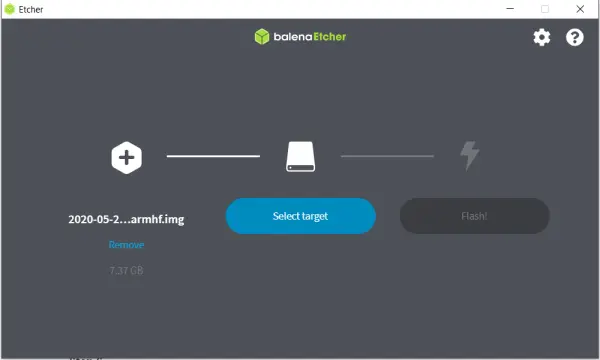
Next, we'll need a disk imaging tool to write the operating system image to the microSD card in a format the Raspberry Pi can boot from. A popular cross-platform application for this task is called balenaEtcher. It provides an easy graphical interface for imaging files onto SD cards. Head to the balenaEtcher download page and obtain the latest version for your system. This software will allow us to take the Raspberry Pi OS file we downloaded earlier and burn it directly onto the microSD, preparing it to function as the boot device for our Raspberry Pi. With balenaEtcher in hand, we're ready to head into the setup process for authorizing our microSD with a working OS.
Step 3
Once balenaEtcher is installed, take the microSD card you want to use for the Raspberry Pi and insert it into your regular computer's SD card reader. If your computer lacks a built-in microSD slot, no problem – simply use a microSD to standard SD card adapter first before connecting the memory card. Alternatively, you can opt for a USB microSD card reader to interface with the tiny storage card. The important thing is getting the microSD connected to your computer somehow so you can prepare it for use in the Raspberry Pi. Whether via built-in reader, adapter or separate USB device, connect up the microSD now so we're ready for the next step of writing the operating system image.
Step 4
With the microSD card now connected to your computer, launch the balenaEtcher application. Use the file selection dialog to navigate to and choose the Raspberry Pi OS image file you downloaded earlier. Then, select the microSD drive from the dropdown menu. This identifies the target for writing the OS image. Finally, click the “Flash!” button to initiate the burn process. BalenaEtcher will now copy the installation files over to the microSD, formatting it accordingly. Please be patient as this can take several minutes to fully write the image. Sit back and let balenaEtcher do its work – when complete, you'll have a bootable microSD ready to use in your Raspberry Pi for installing and running your web server OS!
Step 5
Next we'll configure the WiFi connection so the Raspberry Pi can join our network automatically. This step allows remote access for administration and management. However, if you have a monitor, keyboard and mouse to directly connect to the Raspberry Pi, you can bypass wireless setup for now and move ahead to installing the Apache server software.
Additionally, if you have a Seeeduino XIAO microcontroller board, you can use it with the Raspberry Pi to establish serial communication between the two devices as described in this guide. Once that connection is in place, you can forego WiFi setup as well and move directly to installing Apache.
The goal of this step is to establish a link for remote access. If you can hook up locally with peripherals instead, feel free to skip wireless configuration for now. Let's get the network or serial link prepared to continue our Raspberry Pi web server installation.
Step 6
To set up the wireless connection, we first need to create a network configuration file on the Raspberry Pi. Connect to the Pi via SSH or mount its filesystem on your local computer. Then navigate to the root directory and use a text editor to create a new file called “wpa_supplicant.conf”.
country=US
ctrl_interface=DIR=/var/run/wpa_supplicant GROUP=netdev
update_config=1
network={
ssid=”WiFi-name”
psk=”WiFi-password”
key_mgmt=WPA-PSK
priority=1
}
Step 7
Create a blank file called “ssh” in this directory
Step 8
Then eject the micro-SD card from PC and insert it into the Raspberry Pi.
Step 9
Power up the Raspberry Pi through a Type-C USB cable and a power adapter
Step 10
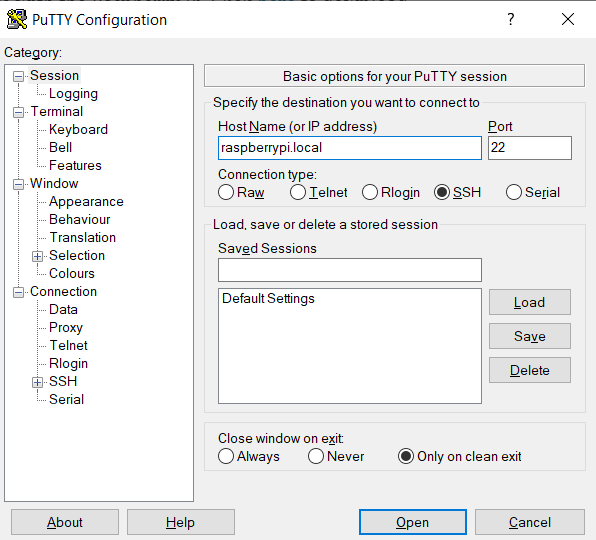
For the next steps, we will need an SSH client program to establish a remote command line connection to the Raspberry Pi. A cross-platform tool widely used for this purpose is called PuTTY.
Head to the PuTTY download page to obtain the latest version compatible with your system. PuTTY provides a simple terminal interface over SSH, allowing us to log into the Raspberry Pi and administer it from a connected PC or laptop.
By downloading PuTTY now, we'll have the remote access client ready for when we power on the Pi for the first time. Its SSH daemon will be running, awaiting our connection. So go ahead and acquire PuTTY so we can communicate with the Raspberry Pi as we complete the Apache setup process remotely.
Step 11
Open Putty and set hostname as “raspberrypi.local” and port as “22”. Then press “Open”.
Installing Apache Web Server
Step 1
To begin the Apache installation, we'll first ensure the Raspberry Pi has the latest available package information. This allows the software management tools to “know” about any new or updated packages that are available.
sudo apt-get update
sudo apt-get upgrade
Step 2
Then install Apache2 package by entering the following command
sudo apt install apache2 -y
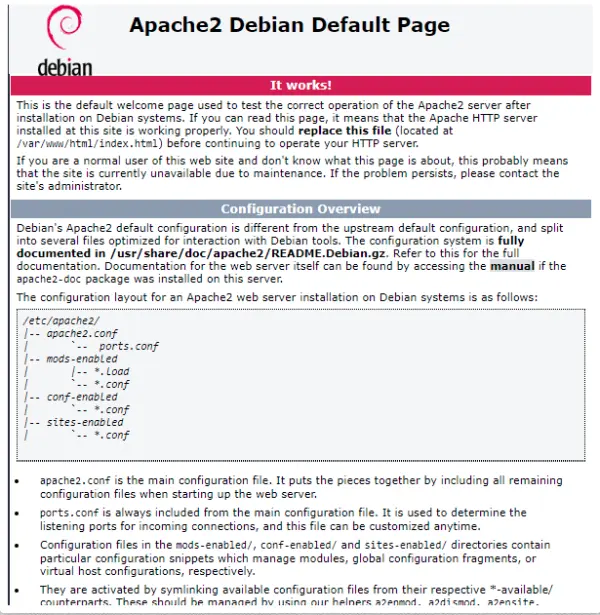
That’s it! Just two steps and you have an Apache Web Server up and running on your Raspberry Pi!
To confirm whether this web server is running or not, enter the following command.
sudo service apache2 statusNow, in order to check that Apache is running, you can enter the IP address of your Raspberry Pi on a web browser and you will be presented with a simple web page as follows.
To access the Apache server remotely, you'll need the actual IP address of the Raspberry Pi device. If unknown, enter this command on the Pi itself to find it:
hostname -I
The server you just set up is only accessible via your home network and its not accessible through the internet. In order to make this server accessible from anywhere, you need to set up port forwarding on your router. However, we don’t plan to discuss this in this blog.
Setting up HTML page for editing
The basic test page displayed earlier is simply a default HTML file included with the Apache installation for verification purposes. However, we can easily create our own custom web content.
Let's go ahead and build out a unique webpage by generating a new HTML document on the Raspberry Pi's filesystem. We'll craft our own HTML markup, style it with CSS, and populate it with meaningful information or code snippets specific to our needs.
Creating a personalized site is a great way to get hands-on practice with web development. It also gives us a webpage hosted on the Pi's Apache server that we can continue developing and improving and even share publicly once port forwarding is configured.
So let's switch gears now to designing our own webpage. We'll start by writing an HTML file customized with our own content rather than relying on Apache's basic test file.
Step 1
First, let’s find the location of this HTML file on the Raspberry Pi. Enter the following command in the terminal
cd /var/www/html Step 2
Then type the following command to list all the files in this directory
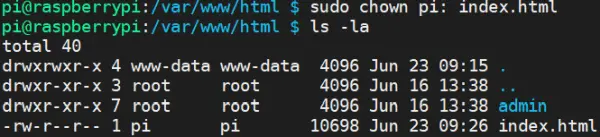
ls -al You will be presented with all the files available in this directory with index.html file being owned by the root user.
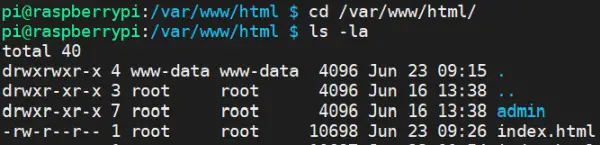
Therefore to edit this file, you need to change its ownership to your own username. Here we will choose the default username of the Raspberry Pi which is “pi”.
sudo chown pi: index.htmlNow you are able to edit this file and once you save the file after editing, you just need to refresh your browser to see the changes.
Building your first HTML page
At this point, we'll shift gears to covering some fundamentals of HTML so you can build out customized web content.
To get started, let's open the main index.html file that will serve as our homepage. Enter this command:
sudo nano index.html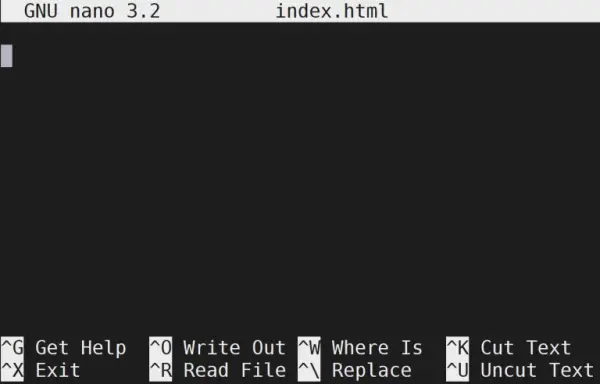
HTML Tags
The most fundamental building blocks of HTML are tags. Tags allow us to logically structure different elements on a webpage and apply specific formatting to content.
At their core, tags are markers enclosed in angle brackets that delineate sections of an HTML document. Most tags come in pairs – an opening and closing tag that encapsulate content.
For example, the <b> tag is used to bold text when its opening and closing tags surround content, like this:
<b>This text will appear bold</b>
The opening <b> tag flags the start of bold text, while </b> closes the formatting when placed at the end.
More generally, tags are what allow us to semantically identify paragraphs, headings, lists, links and other components. They also control things like text styling, images, videos and beyond.
By understanding basic tags and how the opening/closing structure works, we lay the foundation for building full HTML documents and styling web pages. So tags are really the primary building blocks we'll be working with.
This is my new website
The word “new” will be bolded. Note that opening tag has <> and closing tag has </>