Other applications of facial recognition include the use in surveillance and security due to enhanced technology in the Facial recognition system. This guide will go over how to create a facial recognition door lock system using a Raspberry Pi. There are three main steps:
- Collecting data: We will gather approved facial samples to unlock the device.
- Teaching the Recognizer: Face samples gathered will be utilized for training the Face Recognizer.
- Facial recognition: The trained recognizer will be used to identify faces. If a face is successfully identified by Raspberry Pi, the door will be unlocked.
Paraphrased: For this project, we shall need Raspberry Pi 3, a solenoid lock, and Raspberry Pi Camera to ensure that the door lock system is powered by face recognition. Earlier, we tried to learn how to set up a solenoid lock with Raspberry Pi and various other projects using Pi cameras such as Web Controlled Raspberry Pi Surveillance Robot, IoT-based Smart Wi-Fi doorbell Smart CCTV Surveillance System.
Components Required
Paraphrased: “To build the face recognition-based door lock system, you will need the following components:
– Raspberry Pi 3 (any version)
– Solenoid Lock
– Relay Module
– Jumper Wires”
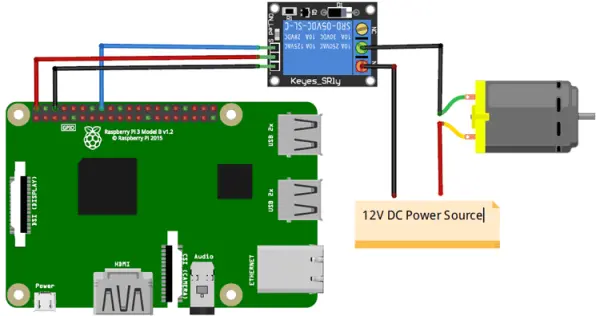
Circuit Diagram
Circuit diagram for Face Recognition Door Lock using Raspberry Pi is given below.
Paraphrased: This we will require using Raspberry Pi 3, a solenoid lock, and a Pi camera for developing the door lock system based on face recognition project. Earlier, we have seen how to implement solenoid lock control using Raspberry Pi, and how to develop several projects using Pi camera such as Web Controlled Raspberry Pi Surveillance Robot, IoT based Smart Wi-Fi doorbell, Smart CCTV Surveillance System etc.
The Solenoid Lock’s positive pin is linked to the 12V adapter’s positive rail, and its negative pin is linked to the relay’s Common (COM) terminal. The negative terminal of the 12V adapter is connected to the Normally Open (NO) terminal of the relay.
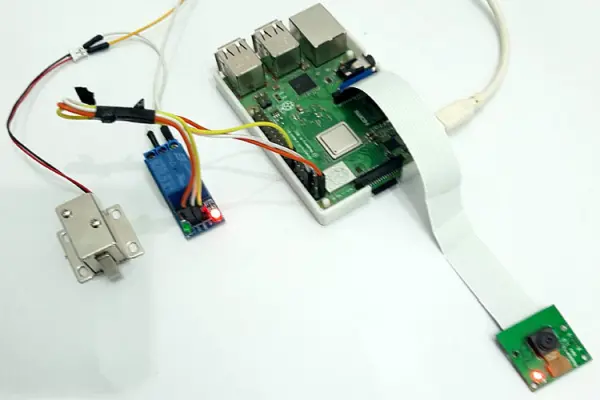
The breadboard setup for Raspberry Pi 3 Face Recognition Door Lock is shown below:
Installing OpenCV in Raspberry Pi 3
Here OpenCV library is used to detect and recognize faces. To install the OpenCV, first, update the Raspberry Pi.
sudo apt-get update
Then use the following commands to install the required dependencies for installing OpenCV on your Raspberry Pi.
sudo apt-get install libhdf5-dev -y
sudo apt-get install libhdf5-serial-dev –y
sudo apt-get install libatlas-base-dev –y
sudo apt-get install libjasper-dev -y
sudo apt-get install libqtgui4 –y
sudo apt-get install libqt4-test –y
After that, use the below command to install the OpenCV on your Raspberry Pi.
pip3 install opencv-contrib-python==4.1.0.25
Installing other Required Packages for Face Recognition
Before we start programming the Face Recognition Door Lock System using Raspberry Pi, we need to install the necessary packages.
To install dlib, a modern toolkit that includes Machine Learning algorithms and tools for real-world problems, use the following command.
pip3 install dlib
Installing face_recognition module:The face recognition library is used to recognize and manipulate faces from Python through the command line. To install this library, use the following command.
Pip3 install face_recognition
The imutils library is used to simplify essential image processing functions, such as translation, rotation, resizing, skeletonization, and displaying Matplotlib images when working with OpenCV. To install the imutils library, execute the following command.
pip3 install imutils
Installing pillow: Pillow is used to open, manipulate, and save images in a different format. Use the below command to install pillow:
pip3 install pillow
Programming for Raspberry Pi Face Recognition Door Lock
As mentioned previously, this project is divided into three phases: data gathering, training the Recognizer, and face recognition. The programs for each phase are provided at the end, and we will now explain each of them in detail.
- Data Gathering
During the initial phase of the project, you need to create a dataset to store the faces with different IDs. To accomplish this, start by creating a project directory where all the project data will be saved.
mkdir FaceRecognition
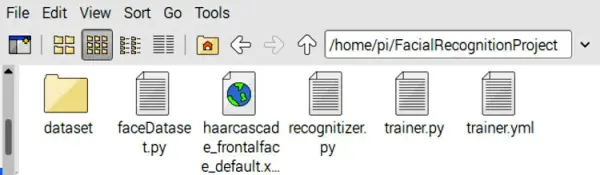
Besides the three python program and Dataset, this directory also has a Facial Classifier file. All three python programs and Facial Classifier file is given at the end of the page.
Within the FaceRecognitionProject directory, create a new subdirectory called Dataset to store the face samples.
mkdir Dataset
Next, open a Nano editor file in the FaceRecognitionProject directory and copy-paste the data gathering program provided at the end.
sudo nano dataset.py

Data Gathering program is explained below:

Initialize the face detector by using the facial classifier file.
face_detector = cv2.CascadeClassifier('haarcascade_frontalface_default.xml')
Now provide a user input command so that the user can enter the numeric face id before gathering the data.
face_id = input('\n enter user id end press ENTER ==> ')
Inside the while loop, use the detector to extract the faces.
ret, img = cam.read()
img = cv2.flip(img, -1) # flip video image vertically
  gray = cv2.cvtColor(img, cv2.COLOR_BGR2GRAY)
  faces = face_detector.detectMultiScale(gray, 1.3, 5)
Subsequently, save each captured frame as a file in the “dataset” directory, associating it with the corresponding person ID.”
cv2.imwrite("dataset/User." + str(face_id) + '.' + str(count) + ".jpg", gray[y:y+h,x:x+w])
Execute the Python scripts and input the face ID. Once a face is detected, the program will begin capturing samples and save them in the Dataset directory.
This is how the directories and program files will be structured:
- Training the Recognizer
Paraphrased: “After collecting the face samples, proceed to train the Recognizer using these samples to enhance its accuracy in predicting faces.
Open a Nano editor file in the FaceRecognition directory, paste the trainer code provided (found at the end), and save it as trainer.py.
The Python script for training the Recognizer is described below:
Begin the code by importing all the necessary library files.”
import cv2
import numpy as np
from PIL import Image
import os
After that, enter the path where you saved the face samples.
path = 'dataset'
Subsequently, utilize the haarcascade_frontalface_default.xml facial classifier file to detect faces in the sample images. Then, employ the recognizer variable to instantiate an LBPH (Local Binary Pattern Histogram) Face Recognizer.
detector = cv2.CascadeClassifier("haarcascade_frontalface_default.xml");
recognizer = cv2.face.LBPHFaceRecognizer_create()
Now navigate to the directory containing the face samples using the previously initialized path.
imagePaths = [os.path.join(path,f) for f in os.listdir(path)]
After that, create two lists for storing face samples and IDs.
faceSamples=[]
ids = []
Convert the image samples to grayscale. Then, convert the PIL image to a numpy image.
PIL_img = Image.open(imagePath).convert('L') # convert it to grayscale
img_numpy = np.array(PIL_img,'uint8')
To extract the ID from the image path in the Dataset directory, we will split the path and retrieve the User ID and sample number.
id = int(os.path.split(imagePath)[-1].split(".")[1])
Now call the Faces and IDs list and feed them into trainer file.
faces,ids = getImagesAndLabels(path)
recognizer.train(faces, np.array(ids)
- Recognizer
In the final step of the project, we will utilize face recognition technology to recognize faces from a live video feed. When Raspberry Pi identifies a recognized face, it will activate the relay module to open the solenoid lock.
The complete program for face recognition is provided at the end of the page. Here are some important aspects of the code:
The program uses the same library files and classifier file as the trainer program.
An array is used to associate names with each face ID.
names = ['None', 'Ashish', 'Thor']
Now capture video feed from the Raspberry Pi camera with a resolution of 640×480. If multiple cameras are being used, replace zero with one in the line cam = cv2.VideoCapture(0).
cam = cv2.VideoCapture(0)
cam.set(3, 640) # set video widht
cam.set(4, 480) # set video height
After that, inside the while loop, break the video into images and then convert it to grayscale.
ret, img =cam.read()
    img = cv2.flip(img, -1) # Flip vertically
   gray = cv2.cvtColor(img,cv2.COLOR_BGR2GRAY)
Use recognizer. predict function to check how much the face matches with the samples.
cv2.rectangle(img, (x,y), (x+w,y+h), (0,255,0), 2)
id, confidence = recognizer.predict(gray[y:y+h,x:x+w])
If confidence is less than 100, then open the lock. 0 means the perfect match.
if (confidence < 100):
            id = names[id]
            confidence = "  {0}%".format(round(100 - confidence))
            GPIO.output (relay, 1)
Testing the Raspberry Pi Face Recognition Door Lock
To run these Python scripts, you will require an additional monitor or a virtual monitor such as a VNC viewer. Execute the dataset program to gather the facial samples. Upon running the program, a window will appear where you can enter the ID number and then press the Enter key. Afterward, an additional window will show up to gather the facial samples with the Raspberry Pi camera.
Afterward, execute the trainer program. After it runs without errors, it will generate a ‘trainer.yml’ file in the folder of your project. This document will be used by the Recognizer to identify faces.
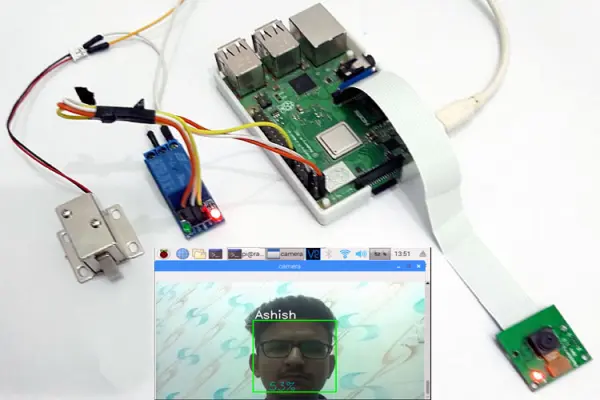
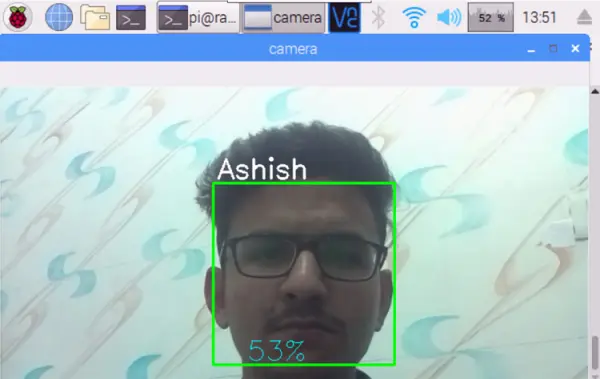
At last, execute the recognizer software. A box will show up around the detected face in the video feed, with the person’s name displayed, as shown in the image below:
import cv2
import os
cam = cv2.VideoCapture(0)
cam.set(3, 640) # set video width
cam.set(4, 480) # set video height
face_detector = cv2.CascadeClassifier(‘haarcascade_frontalface_default.xml’)
# For each person, enter one numeric face id
face_id = input(‘\n enter user id end press <return> ==> ‘)
print(“\n [INFO] Initializing face capture. Look the camera and wait …”)
# Initialize individual sampling face count
count = 0
while(True):
ret, img = cam.read()
img = cv2.flip(img, -1) # flip video image vertically
gray = cv2.cvtColor(img, cv2.COLOR_BGR2GRAY)
faces = face_detector.detectMultiScale(gray, 1.3, 5)
for (x,y,w,h) in faces:
cv2.rectangle(img, (x,y), (x+w,y+h), (255,0,0), 2)
count += 1
# Save the captured image into the datasets folder
cv2.imwrite(“dataset/User.” + str(face_id) + ‘.’ + str(count) + “.jpg”, gray[y:y+h,x:x+w])
cv2.imshow(‘image’, img)
k = cv2.waitKey(100) & 0xff # Press ‘ESC’ for exiting video
if k == 27:
break
elif count >= 30: # Take 30 face sample and stop video
break
# Do a bit of cleanup
print(“\n [INFO] Exiting Program and cleanup stuff”)
cam.release()
cv2.destroyAllWindows()
import cv2
import numpy as np
from PIL import Image
import os
# Path for face image database
path = ‘dataset’
recognizer = cv2.face.LBPHFaceRecognizer_create()
detector = cv2.CascadeClassifier(“haarcascade_frontalface_default.xml”);
# function to get the images and label data
def getImagesAndLabels(path):
imagePaths = [os.path.join(path,f) for f in os.listdir(path)]
faceSamples=[]
ids = []
for imagePath in imagePaths:
PIL_img = Image.open(imagePath).convert(‘L’) # convert it to grayscale
img_numpy = np.array(PIL_img,’uint8′)
id = int(os.path.split(imagePath)[-1].split(“.”)[1])
faces = detector.detectMultiScale(img_numpy)
for (x,y,w,h) in faces:
faceSamples.append(img_numpy[y:y+h,x:x+w])
ids.append(id)
return faceSamples,ids
print (“\n [INFO] Training faces. It will take a few seconds. Wait …”)
faces,ids = getImagesAndLabels(path)
recognizer.train(faces, np.array(ids))
# Save the model into trainer/trainer.yml
recognizer.write(‘trainer.yml’) # recognizer.save() worked on Mac, but not on Pi
# Print the numer of faces trained and end program
print(“\n [INFO] {0} faces trained. Exiting Program”.format(len(np.unique(ids))))
import cv2
import numpy as np
import os
import RPi.GPIO as GPIO
import time
relay = 23
GPIO.setwarnings(False)
GPIO.setmode(GPIO.BCM)
GPIO.setup(relay, GPIO.OUT)
GPIO.output(relay ,1)
recognizer = cv2.face.LBPHFaceRecognizer_create()
recognizer.read(‘trainer.yml’)
cascadePath = “haarcascade_frontalface_default.xml”
faceCascade = cv2.CascadeClassifier(cascadePath);
font = cv2.FONT_HERSHEY_SIMPLEX
#iniciate id counter
id = 0
# names related to ids: example ==> Marcelo: id=1, etc
names = [‘None’, ‘Ashish’, ‘Loki’]
# Initialize and start realtime video capture
cam = cv2.VideoCapture(0)
cam.set(3, 640) # set video widht
cam.set(4, 480) # set video height
# Define min window size to be recognized as a face
minW = 0.1*cam.get(3)
minH = 0.1*cam.get(4)
while True:
ret, img =cam.read()
img = cv2.flip(img, -1) # Flip vertically
gray = cv2.cvtColor(img,cv2.COLOR_BGR2GRAY)
faces = faceCascade.detectMultiScale(
gray,
scaleFactor = 1.2,
minNeighbors = 5,
minSize = (int(minW), int(minH)),
)
for(x,y,w,h) in faces:
cv2.rectangle(img, (x,y), (x+w,y+h), (0,255,0), 2)
id, confidence = recognizer.predict(gray[y:y+h,x:x+w])
# Check if confidence is less them 100 ==> “0” is perfect match
if (confidence < 100):
id = names[id]
confidence = ” {0}%”.format(round(100 – confidence))
GPIO.output(relay, 0)
print(“Opening Lock”)
# time.sleep(1)
# GPIO.output(relay, 1)
else:
id = “unknown”
confidence = ” {0}%”.format(round(100 – confidence))
GPIO.output(relay, 1)
cv2.putText(img, str(id), (x+5,y-5), font, 1, (255,255,255), 2)
cv2.putText(img, str(confidence), (x+5,y+h-5), font, 1, (255,255,0), 1)
cv2.imshow(‘camera’,img)
k = cv2.waitKey(10) & 0xff # Press ‘ESC’ for exiting video
if k == 27:
break
# Do a bit of cleanup
print(“\n [INFO] Exiting Program and cleanup stuff”)
cam.release()
cv2.destroyAllWindows()