
Introduction
Let me tell you the tale of GreenPiThumb: a gardening robot designed to water houseplants automatically, but with a tendency to occasionally unintentionally harm them.
The tale commences approximately a year ago, when a sudden urge to own a houseplant gripped me. I believed that having a plant would enhance the aesthetics of my surroundings, provide me with essential oxygen, and give the impression to visitors that I was a responsible adult capable of nurturing a living organism.
However, being a programmer rather than a gardener, I realized that owning a plant would require regular watering and monitoring of its health, which seemed like a tedious task. As a solution, I decided to invest several hundred hours in constructing a robot that could handle these responsibilities for me. If the plant managed to survive for 80 years, I would consider my efforts a success.
Why GreenPiThumb?
Similar to most software projects I undertake, my primary objective with GreenPiThumb was to expand my knowledge of new technologies. In my previous project, ProsperBot, I delved into learning Go, Ansible, and Redis. With GreenPiThumb, I saw an opportunity to delve into front-end development, specifically focusing on JavaScript and AngularJS.
During this time, my friend Jeet had recently embarked on his programming journey, so I proposed the idea of collaborating on GreenPiThumb. It seemed like a valuable opportunity for him to gain insights into essential software engineering practices such as code reviews, unit testing, and continuous integration. Jeet eagerly accepted the offer, and together we embarked on what we initially anticipated to be a two- or three-month endeavor.
Powered by Raspberry Pi
The Raspberry Pi is an affordable, compact computer designed for hobbyists. It has been widely utilized by enthusiasts to develop a range of innovative projects, including futuristic smart mirrors, retro gaming consoles, and even electric skateboards.
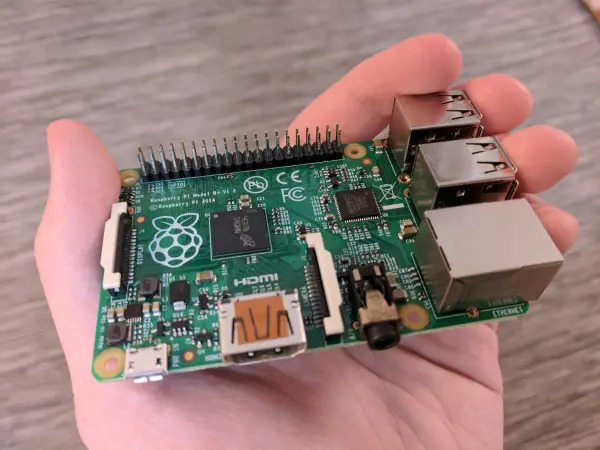
Over the past few years, I have been experimenting with Raspberry Pis, primarily using them as inexpensive servers. However, as a software-focused individual, I had not explored their potential beyond that. The Raspberry Pi has gained popularity among enthusiasts due to its seamless integration with consumer electronics.
Given the extensive availability of sensors and integration resources, using the Raspberry Pi for GreenPiThumb was an obvious choice. I believed that incorporating the Raspberry Pi would not only allow me to leverage its hardware capabilities but also provide an opportunity to understand and utilize its GPIO pins effectively.
Why make another Raspberry Pi gardening bot?
While we were not the first to conceive the idea of a Raspberry Pi-powered gardening bot, there were notable projects like PiPlanter and Plant Friends that preceded us, along with a few others.
We chose to build our own for two reasons: the enjoyment of creating something from scratch and our emphasis on prioritizing high-quality software for our bot.
Most Raspberry Pi projects are developed by electronics enthusiasts who excel in hardware but lack professional software experience. In contrast, we aimed to take the opposite approach: focusing on exceptional software while dealing with hardware that sometimes barely functions and becomes excessively hot, even causing our breadboard to melt.
The open-source code for GreenPiThumb encompasses the following features:
Comprehensive unit tests Tracking of code coverage Continuous integration implementation Debug logging functionality Thorough documentation, including README files and code comments Adherence to a consistent style guide Inclusion of an installer tool
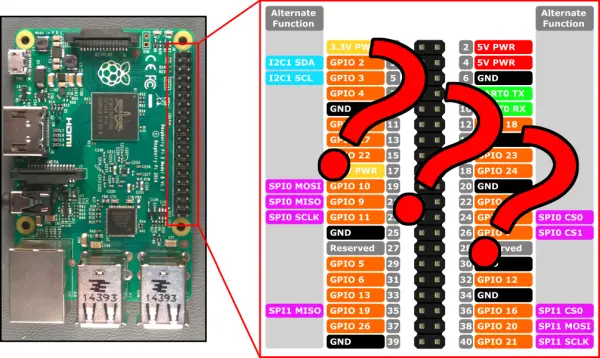
Hardware architecture
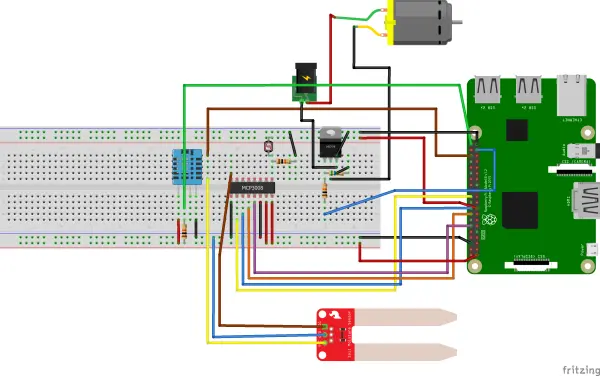
The Raspberry Pi, being designed to read digital signals, cannot directly read analog sensors. To overcome this limitation, we utilize the MCP3008 analog-to-digital converter, which enables us to obtain digital readings from the analog soil moisture sensor and light sensor.
For detecting temperature and humidity in the air, we employ the DHT11 sensor, which generates a digital signal that can be directly connected to the Raspberry Pi.
Additionally, we have a 12V water pump, but since the Raspberry Pi can only output 5V, we connect a 12V power adapter to the pump in conjunction with a MOSFET in series. The MOSFET serves as a digital switch for the Raspberry Pi, allowing it to control the pump by interrupting or completing the circuit as needed.
Software architecture
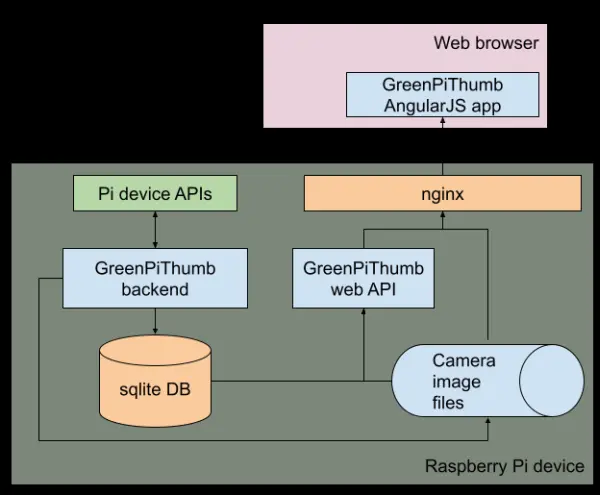
GreenPiThumb back end
The backend of GreenPiThumb performs the crucial tasks and operations. It is a Python application that handles the following responsibilities:
- Managing the physical sensors, such as soil moisture and temperature sensors.
- Controlling the activation and deactivation of the water pump.
- Logging events and recording sensor readings in the database.
GreenPiThumb web API
The web API acts as an HTTP interface that provides access to information about the state and history of GreenPiThumb. It serves as a lightweight layer on top of GreenPiThumb's database, translating data into JSON format for easier consumption by web applications.
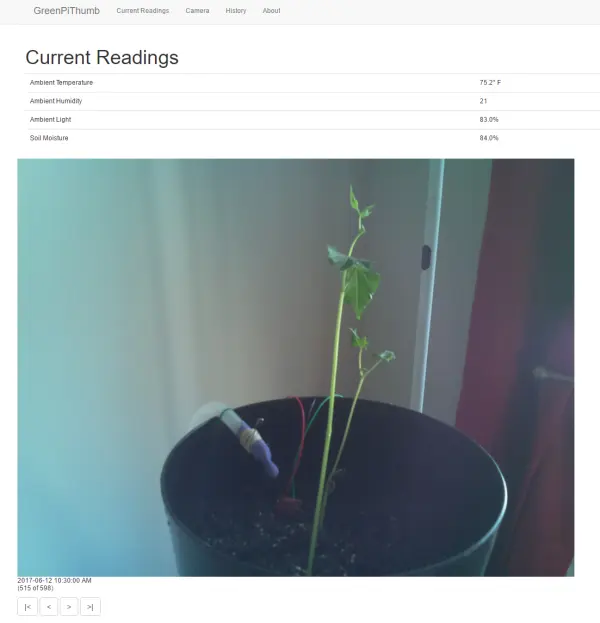
GreenPiThumb web dashboard
The web-based control panel displays the present status of GreenPiThumb and generates graphical representations of sensor data trends across different time intervals.
Although our Raspberry Pi falls short of the requirements to function as an internet-facing web server, we have created a static replica of the GreenPiThumb dashboard, which faithfully mirrors our local version.
http://greenpithumb.mtlynch.io
Deployment
For the deployment of GreenPiThumb onto our Raspberry Pi device, we employ Ansible, a widely used open-source IT automation tool.
To streamline the process, we have developed a customized Ansible configuration specifically tailored for GreenPiThumb, referred to as an “Ansible role.” This role encompasses all the necessary software components required by GreenPiThumb, including the backend and frontend code, as well as any essential third-party software dependencies.
By executing a few straightforward commands, this tool can be employed on a fresh Raspberry Pi device, swiftly setting up and launching GreenPiThumb's software components within a matter of minutes.
Bumps along the way
GreenPiThumb encountered unforeseen hurdles throughout its development journey, extending the completion timeline to over a year—significantly longer than initially anticipated. These roadblocks impeded progress for extended periods, and I will outline some of the noteworthy challenges faced below.
Water distribution
Regrettably, other Raspberry Pi gardening projects fail to address the crucial aspect of effectively distributing water across the soil, which is rather unfortunate because we have yet to find an optimal solution for this challenge.
During our initial attempt at pumping water into the planter, the tube directed a narrow stream of water into a single spot, resulting in excessive saturation in that particular area while leaving the rest of the soil dry. We contemplated the possibility of coiling the rubber tubing around the inner wall of the planter and puncturing holes in the tube to disperse water more evenly. However, we remained uncertain if this method would effectively reach the central portion of the soil. Another approach involved using a showerhead, but we struggled to securely attach it to the tubing while maintaining a watertight seal and retaining control over the direction of the water stream.
In the end, we resorted to a rather unconventional solution we dubbed “spray and pray.” This approach emerged from a haphazard search around my apartment, grabbing random items in the hopes of resolving our dilemma. Our chosen method involved severing a finger from a small kitchen glove, securely attaching it to the water tube using tightly doubled rubber bands, and creating multiple holes in the glove using a sewing needle and nail clippers.
Upon activating the pump, to our surprise, the severed finger promptly detached from the tubing, resulting in an unintended water spray that drenched my apartment wall. After reattaching everything, we modified our approach by inserting a safety pin just ahead of the rubber bands, effectively preventing their forward sliding and ensuring a more stable setup.
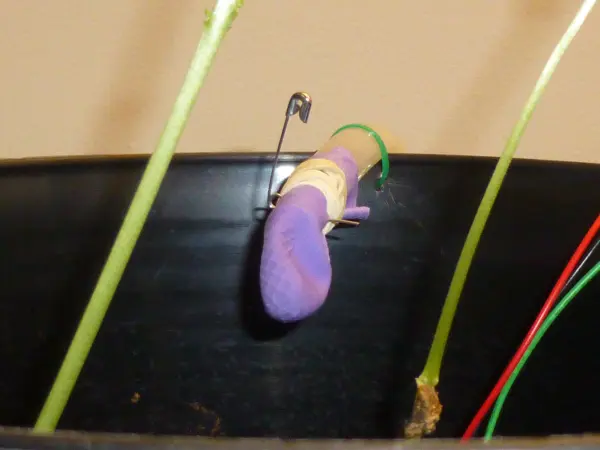
It’s not the most elegant solution, but it mostly works.
The gardening part wasn’t supposed to be hard
Initially, we anticipated that the electronics aspect of GreenPiThumb would pose the greatest challenge, assuming that gardening itself wouldn't be too difficult. In fact, green beans were often regarded as resilient plants that required only basic gardening knowledge for successful cultivation.
However, it became evident that our own gardening skills were far from basic. GreenPiThumb was designed to automate the human involvement in tending to an indoor garden, but for any automation to occur, humans must possess a clear understanding of what constitutes “correct” care. We struggled to determine whether GreenPiThumb was providing excessive or insufficient water since we ourselves lacked the necessary expertise on appropriate watering amounts. Regrettably, this lack of knowledge resulted in unintentionally documenting a distressing sequence of events akin to a horticultural tragedy.
How hard can it be to measure moisture?
The most perplexing and persistent issue we encountered revolved around the soil.
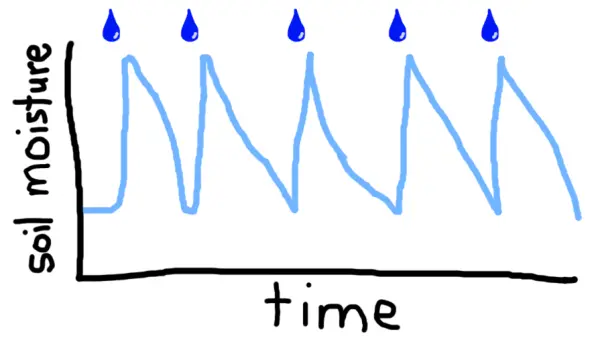
At the onset of constructing GreenPiThumb, we held the assumption that soil moisture levels would rise on days when we watered the plant and decline on days when we refrained from watering. Consequently, GreenPiThumb's primary task would involve maintaining the appropriate moisture level by dispensing water whenever the readings fell below a predetermined threshold.
Below, we have employed sophisticated and costly modeling software to generate a visualization depicting the anticipated soil moisture pattern for GreenPiThumb:
Bad readings
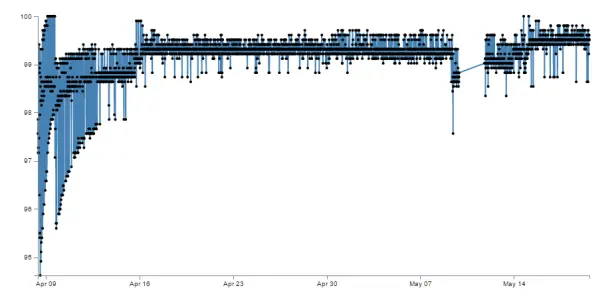
The soil proved to be uncooperative in our endeavors. In our initial implementation, the soil moisture readings exhibited fluctuation between 95% and 100%, eventually settling at approximately 99.5%. Perplexed by this behavior, we conducted tests on the soil sensor using various substances, including air, water, a damp paper towel, our hands, and completely dry soil. Surprisingly, the sensor provided reasonable readings for all these materials, except when it encountered soil with any level of moisture, causing the readings to skyrocket close to 100%.
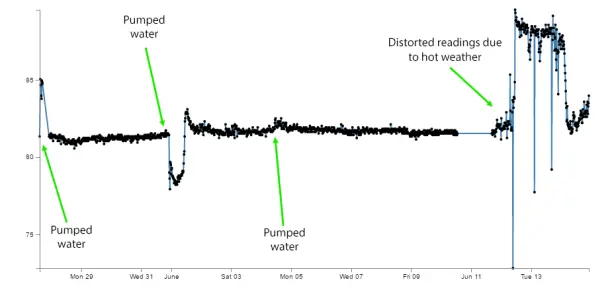
Initially, we implemented Dickson Chow's Plant Friends soil probe in our setup, but later decided to replace it with the SparkFun soil sensor. With the new sensor, we obtained a moisture reading of 82% when the soil was damp, and it promptly increased to 85% right after watering. However, over the course of a few hours, the reading would gradually drop back to 82% and persist at that level for several days. We observed that the sensor exhibited difficulty in discerning between soil that had been watered merely three hours prior and soil that had remained dry for an extended period of five days.
I think my dirt is broken
Perhaps the issue lied with the composition of the soil itself. The potting soil we initially used was a commercially packaged blend from Miracle-Gro, boasting an “easy to water formula.” This raised some suspicion, as it seemed plausible that this specially engineered soil had properties that prevented it from drying out naturally. This could explain why our soil sensors were experiencing confusion.
In an attempt to find a solution, we sought out a different approach by acquiring an organic potting mix. To test its characteristics, we filled a plastic cup with the organic soil, added water, created drainage holes at the bottom, and allowed it to sit undisturbed for three days to mimic the soil conditions within our GreenPiThumb planter. At the conclusion of the three-day period, we proceeded to test our sensor on both types of soil.
Remarkably, we obtained identical readings from both soil samples, registering at 82%. Consequently, we couldn't attribute the issue to the soil itself, as it did not exhibit any discernible discrepancies between the Miracle-Gro blend and the organic alternative.

Giving up
With our options dwindling, we turned back to the projects that served as inspiration for GreenPiThumb, hoping to uncover how they tackled this persistent issue.
To our surprise, Plant Friends did not incorporate any water pumping mechanism at all, while PiPlanter relied on a fixed schedule for watering, disregarding the actual moisture level of the soil. Further research into other Raspberry Pi gardening projects yielded claims of watering solely based on soil moisture, but unfortunately, none of them made their source code or result data available to the public. Consequently, we arrived at the conclusion that it was reasonable to assume that watering solely based on moisture level proved to be an unattainable goal. This realization led us to acknowledge that GreenPiThumb was performing at its best within the limitations imposed by the physical world.
As a result, we made the decision to adopt a hybrid system for GreenPiThumb. It now employs a combination of approaches: watering the plant if the soil becomes excessively dry or if a period of seven days has passed since the last watering. This hybrid approach allows us to leverage the benefits of both moisture-based watering and timed intervals, accommodating the inherent challenges we faced.
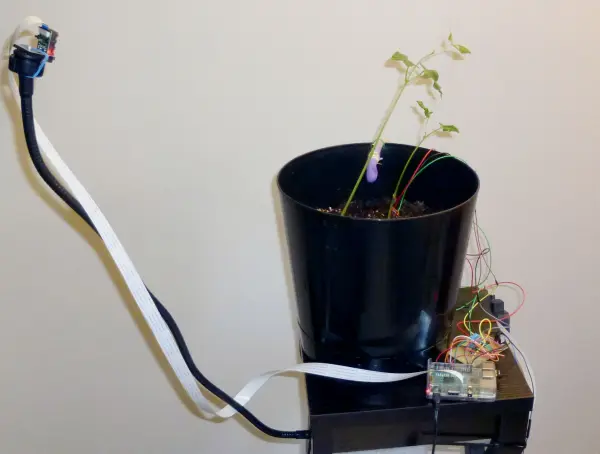
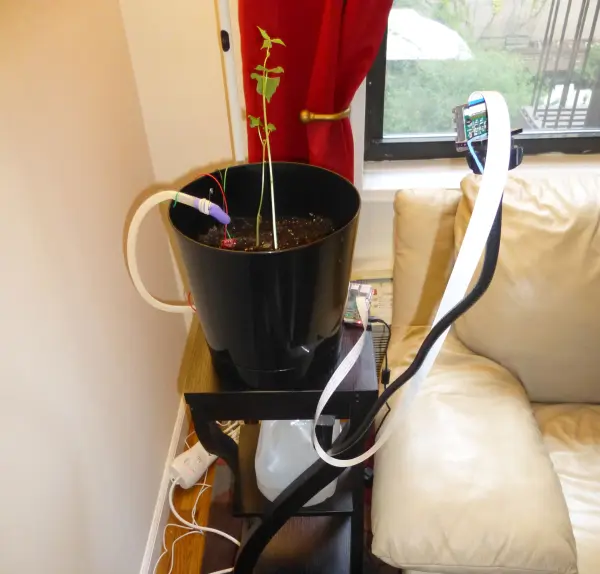
The final product
Below are some images of our completed GreenPiThumb build:
Lessons learned
Nothing is as simple as it seems
Initially, I naively anticipated that this project would be a straightforward endeavor lasting only two to three months. However, the reality proved to be far more complex, resulting in a completion timeline exceeding a year. It served as a poignant reminder of a valuable lesson imparted by Joel Spolsky, a renowned software essayist: nothing is as simple as it appears at first glance. This lesson has been ingrained in me for quite some time, and I fully anticipate encountering similar challenges and learning experiences on future software projects.
Electronics: start with the basics
When I embarked on the GreenPiThumb project, my understanding of electronics was limited to vague recollections from my high school physics class. To bridge this knowledge gap, I decided to invest in an Arduino starter kit and diligently worked through the accompanying tutorials. This approach proved to be both enjoyable and immensely beneficial.
The tutorials were thoughtfully designed, gradually introducing concepts in a way that allowed me to grasp the fundamentals before delving into more advanced topics. The incremental progression helped solidify my understanding and build a strong foundation in electronics. As a result, I wholeheartedly recommend this kit to anyone who is new to electronics and eager to explore this fascinating field.
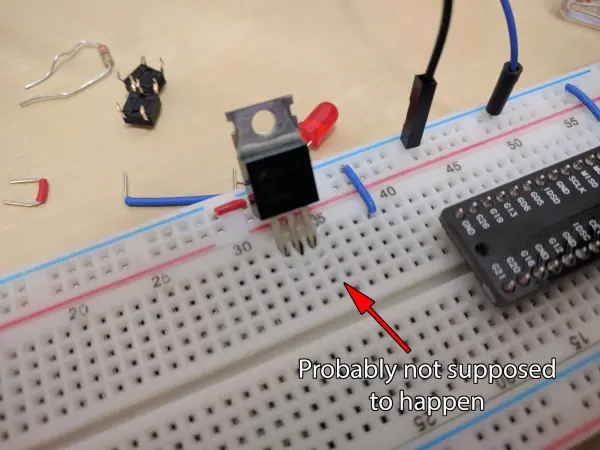
Test hardware in isolation
Some individuals who have collaborated with me on software projects have used terms like “anal retentive” or “overly pedantic” to describe my coding style. However, I prefer to perceive my approach as “rigorous.” In the case of GreenPiThumb, we prioritized the software development phase and meticulously adhered to a rigorous process. Each software component underwent thorough peer review and comprehensive testing, ensuring its reliability and functionality.
However, when it came to the hardware aspect, our methodology was far from rigorous. In fact, one might even describe it as cavalier and laughably naive. Our initial strategy for testing the hardware components involved writing a basic version of GreenPiThumb's software, connecting all the sensors on a test board, and running the system to observe the results.
To our disappointment, this approach yielded nothing of value. It quickly became apparent that this was an ineffective strategy for testing hardware. Each electronics component within a system carries the potential for failure, whether due to inherent defects or faulty installation. By connecting all the components simultaneously, we lacked the means to identify which specific piece or pieces were malfunctioning.
As we gained more experience, we developed a valuable lesson in testing our sensors in isolation. We recognized the importance of creating dedicated diagnostic scripts for each hardware component. Now, whenever we make adjustments to the hardware setup, our initial step is to run these diagnostic scripts to ensure that the readings obtained are logical and accurate.
In instances where a new hardware component fails to function properly, we have adopted a systematic approach using a multimeter to identify the underlying cause. In hindsight, acquiring the multimeter earlier would have been a wise decision. Its affordable price of just $13 belies the countless hours of frustration and confusion it could have saved us.