
The Raspberry Pi, a compact yet powerful computer, operates seamlessly with a micro USB cable for power. Its latest iteration boasts features like WiFi, an ethernet port, four USB ports, and an HDMI port. Additionally, it includes a micro SD card slot for storage, serving as its primary storage medium.

The Raspberry Pi operates on Raspbian Linux, a Debian-based distribution, rendering it familiar to Ubuntu users who can easily install software via sudo apt-get. While it's possible to install PHP and create a website, the capabilities extend far beyond basic web development on this Linux-based platform.
Equipment
To begin, we'll require a Raspberry Pi, preferably the latest model equipped with built-in WiFi for convenient SSH access. Additionally, gathering some basic electronics gear is essential. A starter kit comprising a breadboard, jumper wires, resistors, LEDs, and push buttons is highly recommended. These kits are readily available on Adafruit, while similar packs can be found at more affordable prices on platforms like Amazon and eBay.
Setup
The official Raspberry Pi website offers a comprehensive quick start guide to facilitate your setup process. After successfully installing Raspbian Linux on your device, you can employ the following command to install PHP:
sudo apt-get install php5
Alternatively, you can opt for PHP7 installation, which though slightly more intricate, delivers superior performance. This guide provides clear instructions to assist you through the process effectively.
General Purpose Input Output (GPIO) Pins
Located on the edge of a Raspberry Pi board are two sets of metallic pins designed for connecting electronic circuits. These pins serve various functions: some provide grounding, others supply 5 volts, some offer 3.3 volts, while the majority function as GPIO (General Purpose Input/Output) pins.
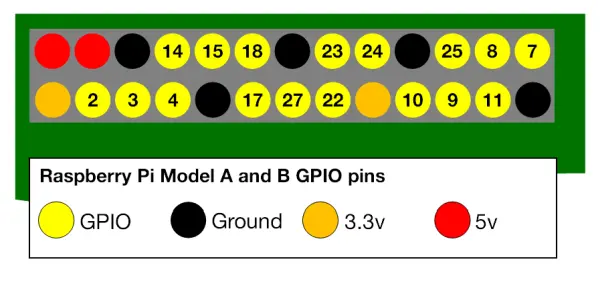
Attributed to www.raspberrypi.org: When a GPIO pin is set as an output, the Raspberry Pi can be instructed to set its voltage either high (3.3V) or low (0V), facilitating the control of devices. Conversely, when a GPIO pin is configured as an input, it enables voltage monitoring and detection of voltage fluctuations, enabling sensor readings and detecting events like button presses. While GPIO pins can be utilized for various purposes such as Serial, i2c, or SPI communication, understanding their basic functionalities suffices for now.
Getting Started with PiPHP
PiPHP: GPIO is a PHP library that can be conveniently installed via composer, enabling you to manage GPIO pins effortlessly. Here's an illustration of its usage in blinking an LED upon detecting a button press. The accompanying diagram depicts the configuration for connecting an LED to GPIO pin 2 and a push button to GPIO pin 3 using a breadboard, which serves as a reusable platform for crafting electronic circuits. The interconnected rows and rails on the breadboard facilitate electronic connections. To power the setup, we link the first two rails to the ground and 3.3V pins on the Raspberry Pi. Incorporating two resistors is crucial: the first (~220 Ω) regulates the LED's current, while the second (~10 kΩ) acts as a pull-up resistor for the button. It's worth noting that while some Raspberry Pi pins feature internal pull-up resistors, employing an external one is optional, though beneficial.
Upon returning to the Raspberry Pi, create a project directory and utilize Composer to install piphp/gpio:
“`
composer require piphp/gpio
“`
After placing the following file within your project directory, execute it (`php led-blink.php`). You'll notice that pressing the button triggers the LED to blink five times, replicating the behavior shown in the video.
<?php // led-blink.php

require_once 'vendor/autoload.php';

use PiPHP\GPIO\GPIO;
use PiPHP\GPIO\Pin\InputPinInterface;
use PiPHP\GPIO\Pin\OutputPinInterface;

// This GPIO object can be used to retrieve pins and create interrupt watchers
$gpio = new GPIO();

// Configure pin 2 as an output pin and retrieve an object that we can use to change it
$ledPin = $gpio->getOutputPin(2);

// Configure pin 3 as an input pin and retrieve an object that we can use to observe it
$buttonPin = $gpio->getInputPin(3);

// Configure this pin to trigger interrupts when the voltage rises.
// ::EDGE_FALLING and ::EDGE_BOTH are also valid.
$buttonPin->setEdge(InputPinInterface::EDGE_RISING);

// Create an interrupt watcher (this is a type of event loop)
$interruptWatcher = $gpio->createWatcher();

// Register a callback for handling interrupts on the button pin
$interruptWatcher->register($buttonPin, function () use ($ledPin) {
    echo 'Blinking LED...' . PHP_EOL;

    // Toggle the value of the LED five times
    for ($i = 0; $i < 5; $i++) {
        $ledPin->setValue(OutputPinInterface::VALUE_HIGH);
        usleep(100000);
        $ledPin->setValue(OutputPinInterface::VALUE_LOW);
        usleep(100000);
    }

    // Returning false would cause the loop below to exit
    return true;
});

// Loop until an interrupt callback returns false, this code will iterate every 5 seconds
while ($interruptWatcher->watch(5000));