This is not the definitive story on Pi and Arduino orchestration. Just my version.
Step 1: Berryboot
1. Get Berryboot. Berryboot will allow you to download several Raspberry Pi images.
Step 2: SD Card Preperation
Now extract the zip files to a blank SD card.
Step 3: Berryboot
Put the BerryBoot SD card in your Pi and boot it up.
2. Setup RPi with Raspbian Wheezy (first option).
Step 4: WiFi Dongle
3. Setup your WiFi dongle. I believe BerryBoot will now setup your WiFi dongle on initial boot, which it did for me (even gave me the option to download the image via WiFi). But, I had trouble getting my WiFi dongle pulled up after booting Raspbian Wheezy.
If you have difficulty with manual WiFi dongle setup, you might try this video.
Lastly, if you are looking for a WiFi dongle for cheap, with good range, and uses very little mAhs (the Pi can only feed about 700mAhs through the USB port). You might try this one, $6.17.
Step 5: SSH
4. Setup PuTTY on your Desktop Computer. Follow this video. This will allow you to begin SSHing into the Pi. That way you don’t have to look at a little RCA screen like me. For those who aren’t familiar with SSH (like I was before this video), the video will explain it. At risk of oversimplification, it allows you to access your Raspberry Pi command line through your desktop.
You have to plug in your Pi’s network number. You can find this by pulling up your wireless hub’s configuration page. You should see what address your Pi is listed at. For some strange reason, if it doesn’t list the device name, just view the page while the Pi is up, then unplug your Pi and refresh the wireless hub configuration page. The device that disappeared is your Pi. I’ve never had to change the port number, but beware you might need to depending on your setup.
Step 6: SSH
You have to plug in your Pi’s network number. You can find this by pulling up your wireless hub’s configuration page. You should see what address your Pi is listed at. For some strange reason, if it doesn’t list the device name, just view the page while the Pi is up, then unplug your Pi and refresh the wireless hub configuration page. The device that disappeared is your Pi. I’ve never had to change the port number, but beware you might need to depending on your setup.
If you want to know whether your have the correct information, try login’ in and if you get a screen like this, your good.
Your username and password are by default: pi, raspberry
Remember! In the case of a Raspberry Pi, always share your password, ’cause everyone has it anyway 🙂
Step 7: SSH
Once you have PuTTY setup, you should be able to bring up your Pi command line, something like this:
Step 8: VNC
5. Setup VNCServer on your Raspberry Pi. Follow this video. (Or this walkthrough). Putty will let you access your Pi’s command line, but setting up a VNC will actually allow you to access your Pi’s Desktop GUI from your PC, in the same manner as Putty.
6. Setup a VNC Client on your Desktop Computer. Real VNC. There are many different programs, I happened to end up using Real VNC.
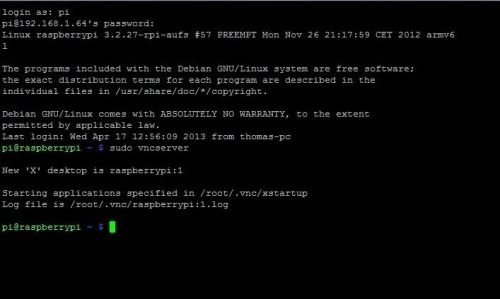
Once you have VNC setup on both machines, PuTTY into your Pi and start the VNC server.
$sudo vncserver
Step 9:
Two notes here, if you did better with the video instructions than I did, your vncserver will start automatically on boot. Unfortunately, I have to type it each time (I’m too lazy to figure out the boot part of it). As a result, you’ll have problems running certain Python scripts through VNC if you don’t use $sudo vncserver
You should end up with at a windowed version of your Raspberry Pi desktop. One more note, somewhere in the video it gets you to setup the “geometry” of the VNC desktop. The limitations you put there will be reflected in the quality of the desktop you see in the window. In essence, if you put in 640×480, that’s the resolution this desktop will end up. So, please, take advantage of the Pi’s GPU 🙂
Use something like this, “-geometry 1024×728 -depth 24”
Step 10: SD Card Resize
Step 11: GIT
8. Git manager will allow you to pull code from git hubs (again, this should already be installed, but just in case).
Install the git manager:
At Raspberry Pi prompt: $sudo apt-get install git
The way to use it is like so,
At Raspberry Pi prompt: $sudo git clone https://github.com/adafruit/Adafruit-Raspberry-Pi-Python-Code.git
Step 12: SMBus
9. Install SMBus. This is specifically for my setup, since I’ll be using the I2C bus to communicate between the Pi and the Arduino.
At Raspberry Pi prompt: $sudo apt-get install python-smbus
For more detail: How to Make a Arduino+Raspberry Pi Robot Platform