
A notice board is made with help of Oled connected to a Raspberry Pi. This project will be divided into two parts. In the first part, there will be a website where a user can type the message to be sent on the Notice Board. When the user types the message on the website it gets saved in the database. In the second part of the project, the Raspberry Pi reads the database and displays the message on the Oled display
Idea behind the project:
Mobile Technology has dominated the electronics market as well as way of communication. Designed primarily for calls and messages they became smart
and led to addiction. Parents when they are away from their children they only have
two ways to communicate either through phone or through internet using social media
Both leads to addiction and may also led to misuse. On the other hand elders find it
too difficult to use smartphones or internet.
We thought to overcome this problem we can make a notice board using embedded device and enable it with IoT so that it can receive messages send over to it through
a particular website. Parents can easily send messages and children or elders can easily
read it on the Notice Board the advantage is its easy for elders plus children no longer
need a phone. As it is an embedded device its portable and as we were using Raspberry Pi for our project we can easily provide internet 24X7 using dongle or Wi-Fi. Similarly power can be supplied using power bank or mobile charger
Requirements for the Project:
Hardware :
- The hardware requirement of this project is very minimal
- We just need one Raspberry Pi 3B + board
- One 6 pin SSD1306 128×64 Oled SPI display
- For connecting OLED display to Raspberry Pi we need 6 female to female connecting wires
- For powering up the Raspberry Pi you can use either Power Bank or mobile charger
- For providing internet you can use Wi-Fi, Ethernet, mobile hotspot or dongle with sim card
- 16 GB SD card
Software:
- Raspbian Operating software should be installed in SD card and then it should be inserted in Raspberry Pi board
- Real VNC software should be installed on laptop or PC so that we can virtually control the Raspberry Pi
- WinSCP software should be installed on laptop or PC for transferring files
- Eclipse J2EE software should be installed on laptop or PC for coding using java
- For testing, you also need an apache Tomcat server
- A website hosting provider with inbuild C panel we are using mochahost.com
Build the Project:
Let's start with a block diagram which conceptualizes the project
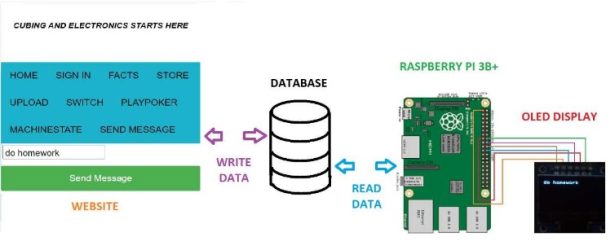
As seen in the block diagram this project is divided into two parts In the first part, a message is typed on the website https://www.cubeminx.com under the SEND MESSAGE tab, and on clicking the Send Message button the message gets saved in the database. In the second part, the Raspberry Pi is connected to the Oled display. After that, a code is executed on Raspberry pi so that it continuously reads the database and displays the message on the Oled display
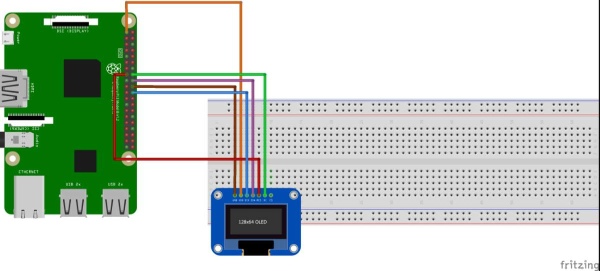
Before we dive into the functionality of the project lets do the connection
between Raspberry Pi and Oled display
As seen in the diagram given below the connection is very simple
we just need 6 female to female wires for making the connection
and this is the only hardware connection we do besides connecting
mobile charger to power up the Raspberry Pi.

The connection is based on wiring for Pi Project more details for the same can be found on the link
https://pi4j.com/1.2/pins/model-3b-plus-rev1.html
Detailed Functionality:
This project should make you excited because we are making our own website which will make
the IoT functionality possible
Let's begin with the first part of the project building a website on which we can type a message
and on clicking the Send Message button it will save that message on the database.
In this project, I am using my existing website https://www.cubeminx.com
But for this project, I will share the details required for the project and the entire code for the project
is available in the code section.
We will be making the entire project from scratch
Build The First Part :
Download the eclipseJ2EE software with the link given below
https://www.eclipse.org/downloads/packages/release/oxygen/r/eclipse-ide-java-ee-developers
Under the Download, links click on windows x-86-64 for windows or macOS x-86-64 for mac
And install it on your laptop or PC
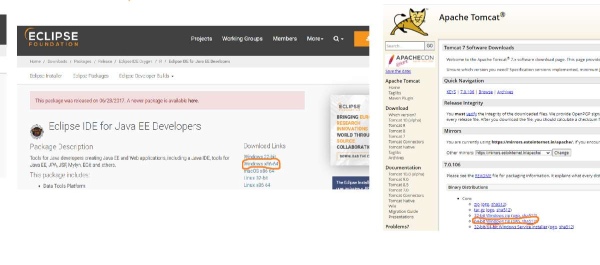
Download the Apache Tomcat Software with the link given below
https://tomcat.apache.org/download-70.cgi
And unzip it
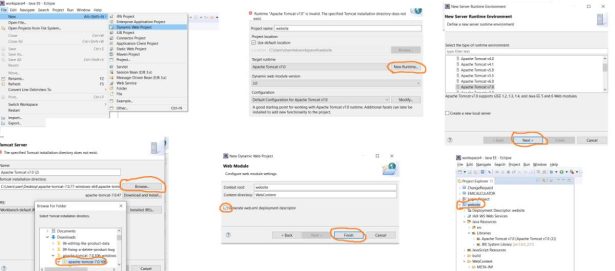
Open the eclipse ide
- Go to File –> New –> Dynamic Web Project
- Under the project name type website
- Under Target Runtime click on New Runtime
- Select Apache Tomcat v7.0 click on next
- Click on browse and select the path where you have unzipped the downloaded Apache Tomcat from the link given above and click on finish
- You will be redirected to the first-page click on next twice
- Tick mark the generate web.xml option and click on Finish
- This creates an empty dynamic web project
- Download and unzip the receivemessagesonoled folder from the code section
- Open the lib folder website –> WebContent –> WEB-INF –> lib
- Copy all the jar files and paste it in the lib folder inside our website project
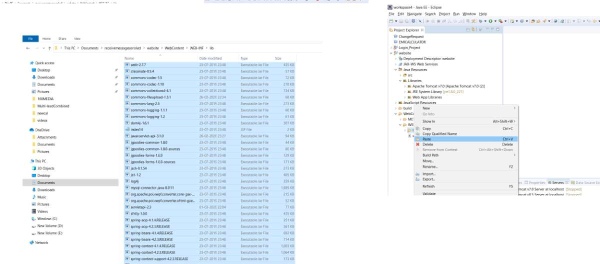
Copy the files in the WEB-INF except for the lib folder and copy it in the WEB-INF folder in our project
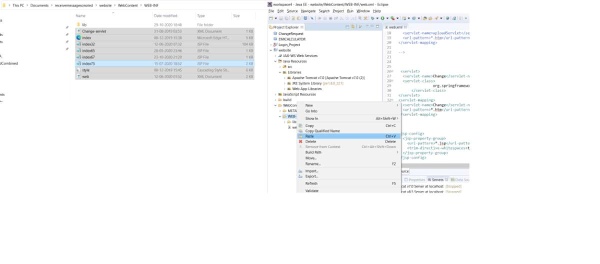
Copy the files in the Web-Content except for the WEB-INF folder and copy it in the Web-Content folder in our project
Now lastly copy the files in the src folder and paste them under the src folder of our project
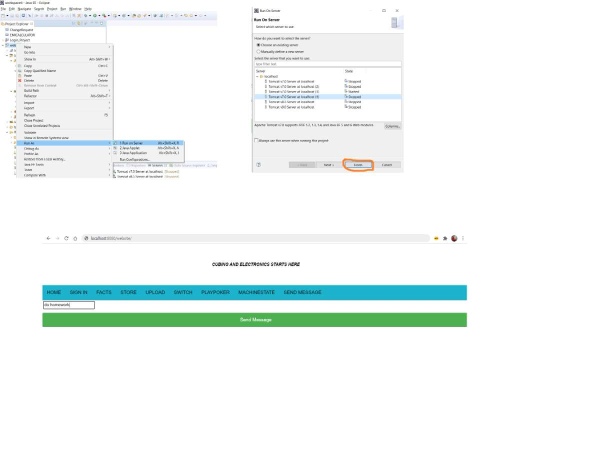
This completes the building of the website now lets run it on our local Apache Tomcat server
Right Click on the folder and select Run As –>Run on Server
There are still two sections remaining in the first part of our project first creating the database and then deploying our code into the C panel of mochahost.com
So let's start with deployment the following diagram shows the steps for deploying our website code on the server
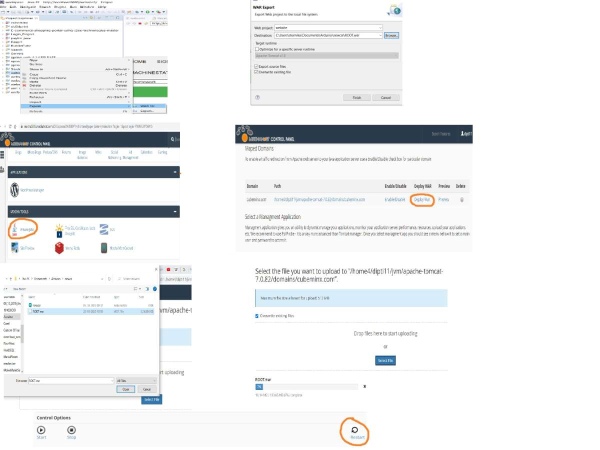
- Right-click on project select Export and then select war file
- Click on the Browse button and select a Destination and click on Finish
- A window will appear in the File name select ROOT.war and save type as .war and click on save
- Login into the mochahost Cpanel with your credentials and the Cpanel screen will appear
- In that select Private JVM option
- Select Deploy war option and another screen will appear
- Tick mark OverExisting Files and click the Select Files button
- Browse to the destination where ROOT.war file is present and clicks open
- A progress bar will appear wait till it gets to 100% and after completion, its blue color turns green
- Go back and click on Restart that will restart the server
- This finishes our deployment and this makes our website live
Now the only part left in the first part is creating a database to save our message which will be read
by Raspberry pi. To create our database the following diagram shows the step

- Login into the mochahost Cpanel with your credentials and Cpanel screen will appear
- Select the phpMyAdmin option under the DATABASES
- Select the server by clicking on the topmost label highlighted in orange
- Click on the SQL button a screen will appear
- Type the sql code given below and click go button this step creates a table named newmessage
- Click on the newmessage table and select Edit this has to be done only once
- Select ID as 12 and message you can type any string data and click on go
- This completes our database creation and we are done with the first part of our project
  CREATE TABLE IF NOT EXISTS `newmessage` (
   ID int NOT NULL UNIQUE,
  `msgvalue` varchar(50) DEFAULT NULL

  ) ENGINE=InnoDB DEFAULT CHARSET=latin1;
Let's understand the first part of code :
Let's look into web.xml page which does all the mapping
As seen in the code the URL pattern is .htm and the page that first loads is index32.jsp which is similar to HTML page. As you can see in the snippet of the code inside the div element with id message there is a form with action sendmessage.htm and method post as the button Send Message is clicked the form gets submitted with the value of input text field named sendmessage
<%@ page language="java" contentType="text/html; charset=ISO-8859-1"
    pageEncoding="ISO-8859-1"%>
<!DOCTYPE html PUBLIC "-//W3C//DTD HTML 4.01 Transitional//EN" "http://www.w3.org/TR/html4/loose.dtd">
<html>
<head>


<meta name="viewport" content="width=device-width, initial-scale=1">
<meta name="viewport1" content="width=device-width, initial-scale=1">

<meta name="viewport" content="width=device-width, initial-scale=1">
<link rel="stylesheet" href="https://www.w3schools.com/w3css/4/w3.css">

<meta name="viewport" content="width=device-width, initial-scale=1">
<meta content="text/html; charset=iso-8859-2" http-equiv="Content-Type">
<link rel="stylesheet" href="https://www.w3schools.com/w3css/4/w3.css">


<meta http-equiv="Content-Type" content="text/html; charset=ISO-8859-1">
<title>CUBEMINX</title>


<meta name="viewport" content="width=device-width, initial-scale=1">


</head>

<body>


<br>
<br>
<center>
<p><i><b>CUBING AND ELECTRONICS STARTS HERE</b></i></p>
</center>
<br>
<br>

<!-- this div is for creating tabs -->

<div class="tab1">
  <button class="tablinks1" onclick="openCity1(event, 'Home')" id="defaultOpen1">HOME</button>
  <button class="tablinks1" onclick="openCity1(event, 'Signin')">SIGN IN</button>
  <button class="tablinks1" onclick="openCity1(event, 'FACTS')">FACTS</button>
   <button class="tablinks1" onclick="openCity1(event, 'STORE')">STORE</button>
   <button class="tablinks1" onclick="openCity1(event, 'UPLOAD')">UPLOAD</button>
   <button class="tablinks1" onclick="openCity1(event, 'SWITCH')">SWITCH</button>
   <button class="tablinks1" onclick="openCity1(event, 'PLAYPOKER')">PLAYPOKER</button>
   <button class="tablinks1" onclick="openCity1(event, 'MACHINESTATE')">MACHINESTATE</button>
    <button class="tablinks1" onclick="openCity1(event, 'MESSAGE')">SEND MESSAGE</button>

</div>

<div id="Home" class="tabcontent1">


<div class="tab">
  <button class="tablinks" onclick="openCity(event, 'Paris')"id="defaultOpen">Oled on Raspberrypi using java</button>
  <button class="tablinks" onclick="openCity(event, 'Mulund')">LED Rubik's cube Theme Decoration</button>
  <button class="tablinks" onclick="openCity(event, 'Pune')">UART communication Raspberrypi & Arduino</button>
  <button class="tablinks" onclick="openCity(event, 'Rome')">Fibonacci Flower</button>
  <button class="tablinks" onclick="openCity(event, 'Delhi')">Rubik's cube Solver Code</button>
  <button class="tablinks" onclick="openCity(event, 'London')" >Oled Displaying Images</button>
  <button class="tablinks" onclick="openCity(event, 'Newyork')">Bluetooth tutorial for Oled using Arduino</button>
  <button class="tablinks" onclick="openCity(event, 'Mumbai')">Oled Clock Tutorial</button>
  <button class="tablinks" onclick="openCity(event, 'Thane')">Weighing Scale using Arduino</button>
  <button class="tablinks" onclick="openCity(event, 'Banglore')">Rubik's cube solver using ARM</button>


   <button class="tablinks" onclick="openCity(event, 'Panvel')">TFT 3.5" calculator Tutorial using Ardunio</button>

</div>

</div>


<!-- this div with form which has action sendmessage.htm which maps in the controller when the form
is submitted -->

<div id="MESSAGE" class="tabcontent1">


<form  action="sendmessage.htm" method=post>


   <table>
      <tr>

      <td> <input type="text" name="sendmessage" value=""></td>
   </tr>

   </table>
   <button class="btn" type="submit">Send Message</button>
</form>

  </div>


</body>
</html>
<?xml version="1.0" encoding="UTF-8"?>
<web-app xmlns:xsi="http://www.w3.org/2001/XMLSchema-instance" xmlns="http://java.sun.com/xml/ns/javaee" xmlns:jsp="http://java.sun.com/xml/ns/javaee/jsp" xsi:schemaLocation="http://java.sun.com/xml/ns/javaee http://java.sun.com/xml/ns/javaee/web-app_2_5.xsd" id="WebApp_ID" version="2.5">
  <display-name>ChangeRequestPortal</display-name>
  <welcome-file-list>
    <welcome-file>index32.jsp</welcome-file>
  </welcome-file-list>

  <!--

  This does all the mapping from jsp/html page to the PageController class
  The mapping is done where the action in the form is matched with *.htm extension
   -->


   <!--We have defined a servlet name Change  -->

   <servlet>
    <servlet-name>Change</servlet-name>
    <servlet-class>
                  org.springframework.web.servlet.DispatcherServlet
        </servlet-class>
  </servlet>
  <servlet-mapping>
    <servlet-name>Change</servlet-name>

    <!-- the mapping is defined as *.htm -->

    <url-pattern>*.htm</url-pattern>
  </servlet-mapping>


  <jsp-config>
    <jsp-property-group>
      <url-pattern>*.jsp</url-pattern>
      <trim-directive-whitespaces>true</trim-directive-whitespaces>
    </jsp-property-group>
  </jsp-config>


</web-app>
Inside the src folder, there is a package named common_things which has a class named DB_Connection
This class contains the logic for making a connection with the MySQL database on mochahost server.Mochahost
because I am using their platform for deploying my website .For security reasons the password is different than what is shown
package common_things;

import java.sql.Connection;
import  java.sql.DriverManager;
import java.sql.SQLException;


/*
 *
 * This class is for establishing connection with the database which is present in a server
 * NOTE: For security reasons the password shown here is different than the actual password
 *
 *
 */
public class DB_Connection {


	public static void main(String[] args)

	{


		// A db object of the class defined above i.e DB_Connection is created
		DB_Connection db=new DB_Connection();
		System.out.println(db.getConnection());

	}

	//A method getConnection is defined which returns a method connection
	public Connection getConnection()
	{

		Connection connection=null;   // A connection object is set to null
		System.out.println("Connection Called");


		//A try block is executed which will try to establish a connection
		try{

			//java needs a driver to establish connection with mysql

			Class.forName("com.mysql.jdbc.Driver");  // A driver is defined

			// for establishing connection with localhost
			//connection=DriverManager.getConnection("jdbc:mysql://localhost:3306/login?useSSL=false","root","silicon17");


			//for establishing connection with the database present on the server


			//we initialize the getConnection method with the url where the database is present,the schema name, password and in this case also the timezone

			connection=DriverManager.getConnection("jdbc:mysql://mysql3000.mochahost.com:3306/dipti11_login_project?useTimezone=true&serverTimezone=UTC","dipti11_login","silicon17");
			//connection=DriverManager.getConnection("jdbc:mysql://mysql3000.mochahost.com:3306/dddprint_3d?useTimezone=true&serverTimezone=UTC","dddprint_login","silicon17");
			System.out.println("Connection successful");

		}


	catch(ClassNotFoundException e)
		{

		e.printStackTrace();


		System.out.println("Connection  not successful class not found");


		}

		catch(SQLException e)
		{

		e.printStackTrace();
		System.out.println("Connection  not successful sql exception");
		}


		return connection;


	}


}
The code is very simple to understand it has method getConnection() which returns a connection
A driver is called for making connections in our case its mysql-jdbc which stands for MYSQL java database connectivity. A connection object is called and initialized with url of the database, name of schema, username, and password
As the code for establishing the connection is written in the try-catch block if the try block is executed successfully that means the connection is established otherwise it catches either of the two exceptions.
Now again in the src folder, there is a package named controller which has a class named PageController
this class acts as our main class.
There is another class named to send a message which has a methods getSendmessage() which stores the value of the input text field when the Send Message button is clicked
package controller;


/*
 *
 *  A sendmessage class with getter and setter functions to receive the message
 *  from the text field when the form is submitted on button click
 *  The name of the input text should be  same as the String sendmessage
 *
 *
 */
public class sendmessage

{


	public  String sendmessage;

	public String getSendmessage() {
		return sendmessage;
	}

	public void setSendmessage(String sendmessage) {
		this.sendmessage = sendmessage;
	}


}
We are using the Spring MVC technique in which the request made from jsp or html pages are mapped to the URL using Request Mapping and xml
In simple words when one types a message and the Send Message button is clicked a form is submitted and it comes to the PageController and the RequestMapping matches the value of the form action
sendmessage.htm to the RequestMapping value=“/sendmessage.htm” is executed
Inside the block the message object is generated which calls the getSendmessage() and stores the value
into a new message after that a connection object DB is generated to call the methods of DB_Connection class
A connection object of class Connection which established the connection with the database then a update query is executed which saves the newmessage into the database. After that it loads a page index67.jsp
package controller;

import java.io.InputStream;
import java.io.IOException;
import java.sql.Connection;
import java.sql.PreparedStatement;
import java.sql.ResultSet;
import java.sql.DriverManager;
import java.sql.SQLException;
import java.sql.Statement;
import java.text.SimpleDateFormat;
import java.util.Calendar;
import java.util.Date;
import java.util.HashMap;
import java.util.Iterator;
import java.util.LinkedList;
import java.util.List;

import javax.servlet.ServletException;
import javax.servlet.annotation.MultipartConfig;
import javax.servlet.annotation.WebServlet;
import javax.servlet.http.HttpServlet;
import javax.servlet.http.HttpServletRequest;
import javax.servlet.http.HttpServletResponse;
import javax.servlet.http.HttpSession;
import javax.servlet.http.Part;


import org.springframework.stereotype.Controller;
import org.springframework.ui.Model;
import org.springframework.web.bind.annotation.ModelAttribute;
import org.springframework.web.bind.annotation.RequestMapping;
import org.springframework.web.bind.annotation.RequestMethod;
import org.springframework.web.servlet.ModelAndView;


import common_things.DB_Connection;


//this class acts as our main class
@MultipartConfig(maxFileSize = 16177215)
@Controller
public class PageController {


	HashMap<String, String[][]> hmr = new HashMap<String, String[][]>();


	 //the htm mapping redirects to this request mapping


	@RequestMapping(value="/sendmessage.htm", method = RequestMethod.POST)
	  public ModelAndView SendMessage(HttpServletRequest request, HttpServletResponse response,@ModelAttribute("message") sendmessage message) {
     //the message object is created for the class sendmessage


     ModelAndView model1 = new ModelAndView(); //model1 object is created of  ModelAndView


     //message object calls the getSendmessage function
     //the getSendMessage return the text which it receives from  the html form on clicking the submit button

     String newmessage =message.getSendmessage();
     System.out.println("msg is " + newmessage);

     //the connection object db is made for the DB_Connection class

     DB_Connection db=new DB_Connection();
     Connection connection=null;  //connection object is set to null

     connection=db.getConnection(); //the connection object calls the getConnection function
       Statement st1=null;
	   ResultSet rs=null;

	   PreparedStatement ps1=null;
	   ResultSet rs1=null;

	   String query3=""; // A query is initialized

       // A try block is executed
     try {


  	    // An update query is made on the table newmessage where it updates the value of field msgvalue where the ID is 12
    	 query3="UPDATE newmessage SET " + "msgvalue" + "="  +"'"  +newmessage+ "'" +    "WHERE ID=12";


    		st1=connection.createStatement();
	    	st1.execute(query3);  //the query is executed if the code goes to the next line the query is successful
	    	System.out.println( "success");

	    	//model1 object is set with the value of newmessage and it is passed to the index67.jsp page
	           model1.addObject("newmessage",  newmessage);
	     	   model1.setViewName("index67"); // index67 page is loaded


    //if there is an exception in the try block the catch block executes

		} catch (Exception e) {
			    System.out.println("failed to  save data");
				e.printStackTrace(); // all the error message is printed
				model1.setViewName("index67"); //index67 page is executed


		}


     return model1;


	   }


}
Using the model1.addObject(“newmessage”, newmessage) the newmessage object is passed with newmessage value which is displayed on index67.jsp
<%@ page language="java" contentType="text/html; charset=ISO-8859-1"
    pageEncoding="ISO-8859-1"%>
<!DOCTYPE html PUBLIC "-//W3C//DTD HTML 4.01 Transitional//EN" "http://www.w3.org/TR/html4/loose.dtd">
<html>
<head>
<meta http-equiv="Content-Type" content="text/html; charset=ISO-8859-1">
<title>The message is</title>
</head>
<body>
<!-- the model object newmwssage is displayed on this page -->
<h1>The message is ${newmessage}</h1>


</body>
</html>
Build The Second Part :
Now let's proceed with building the last part of our project
We are using java as our coding language and using the same eclipse ide
The second part of the code is for Raspberry Pi
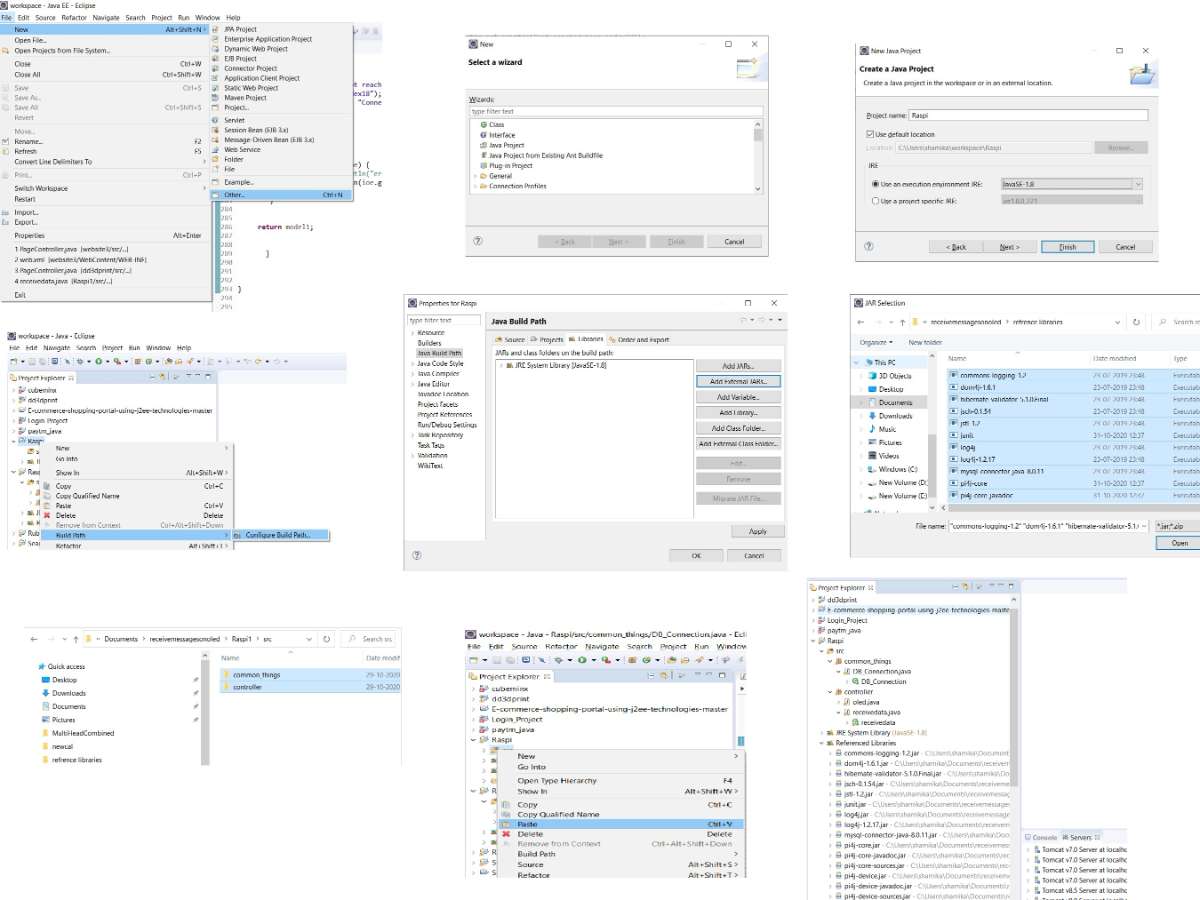
- Open the eclipse ide
- Go to File –>New –>Other
- A screen will appear select Java Project and click on Next
- Type Project name Raspi and click on Finish
- Right-click on the Raspi project –>Build Path –>Configure build path
- A screen will appear select libraries click on Add External Jars
- Open the receivemessagesonoled folder go to reference libraries folder and select all
- You will be directed to the previous screen click on OK
- Open the receivemessagesonoled folder go to the Raspi –>src folder copy the subfolders
- Paste them into the src folder present in our Raspi project
- This completes the building of the code for Raspberry Pi
The Raspi Project is on or Pc or laptop we have to transfer and run the code on Raspberry pi
In order to do so, we have to follow the steps given below
- Power up the Raspberry Pi and give it internet by connecting wi-fi ,dongle or hotspot from phone
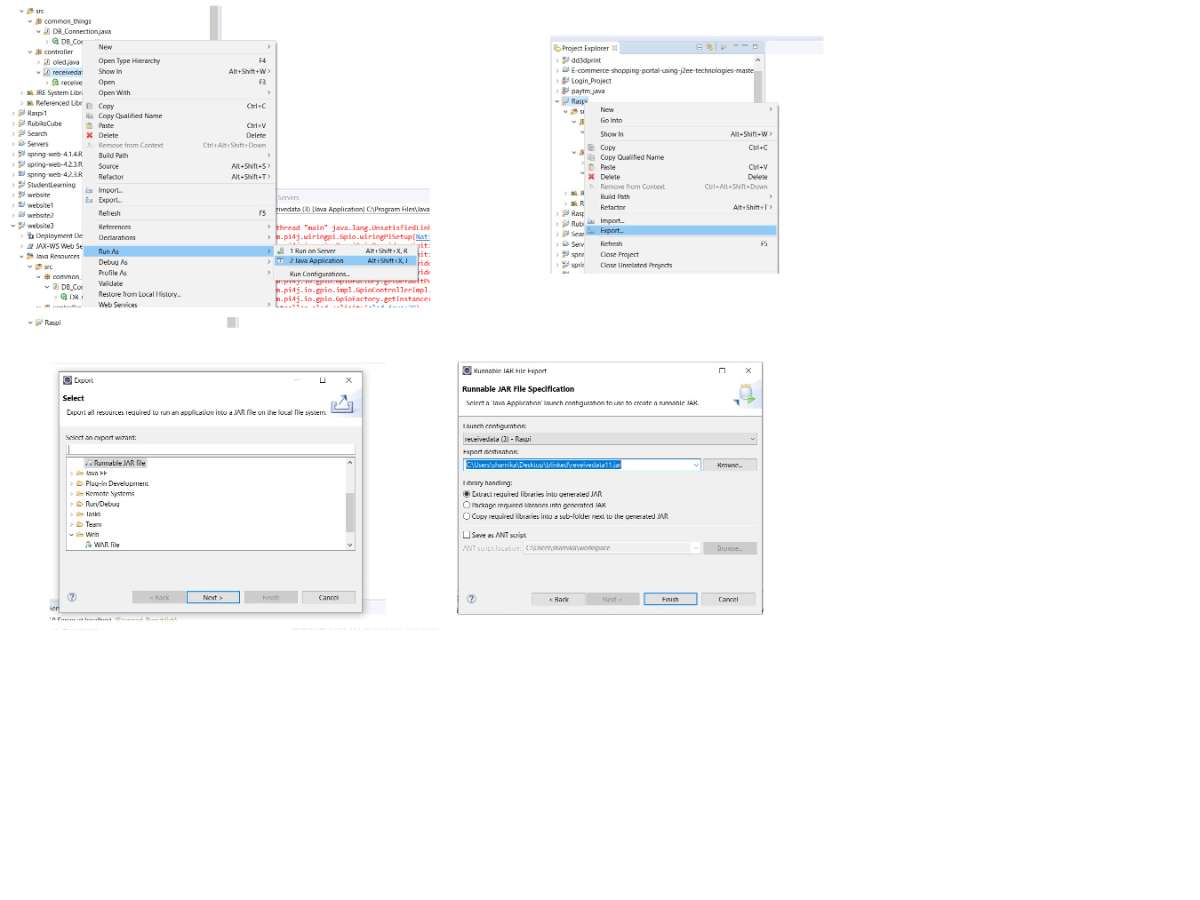
- Right Click on the receivedata in Raspi project on our laptop and select Run As –> Java application
- Ignore the error as some libraries won't work on a laptop
- Open the raspi project and right-click on it select export as Runnable jar file click on next
- Under Launch configuration select receivedata(Raspi)
- Under Export, destination click on the browse button and choose appropriate path
- Make sure your exported file has .jar (receivedata11.jar) extension and click on finish button
- Open the WinSCP software on your pc or laptop a login screen will appear
- Under hostname type the IP address of the Raspberry pi
- Under user name type pi or your assigned user name
- Under password enter your password and click login button
- A screen will appear to drag the required file from left (pc/laptop) to right (Raspberry Pi)
- Once this is done the required jar file is on our Raspberry Pi
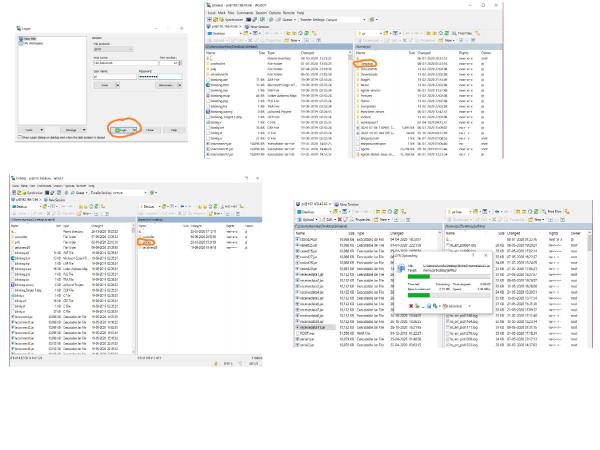
- On pc/laptop open the real vnc software
- Open tab below Address book
- An authentication screen will appear to enter the same credentials which we entered for winSCP
- Raspberry Pi screen will appear on the VNC software
- Click on the pi icon go-to accessories and select terminal
- On our Raspberry pi, we have saved the required jar file in jarfiles folder which is in desktop folder
- Hence on terminal type cd Desktop and press Enter
- After that type cd jarfiles and press Enter
- To execute our jar file on the Raspberry pi type the following command on the terminal
- sudo java -jar receivedata11.jar and press Enter
Let's understand the second part of the code:
The controller package has a class receivedata for this project we will be using two additional classes DB_Connection from common things package for making database connections similar to what we did in the first part of the project. And we will be using oled class from the controller package
Unlike the Arduino library for OLED on Raspberry Pi is not available so I have written the code for the same
you can find the entire tutorial for the same on my website https://www.cubeminx.com
I am also attaching the youtube video which has a detailed explanation of the code
For our project, we will be calling the methods of the oled class using an object
As you can see in the code given below we are importing the required jar files
For controlling the GPIO's of the Raspberry pi we are using pi4j library and more details for the same
can be found on their website https://pi4j.com/1.2/index.html
Their project is intended for java developers to use the full I/O capabilities of Raspberry Pi
package controller;

import java.io.InputStream;
import java.sql.Connection;
import java.sql.PreparedStatement;
import java.sql.ResultSet;
import java.sql.SQLException;
import java.sql.Statement;
import java.util.concurrent.TimeUnit;

import com.pi4j.io.gpio.GpioController;
import com.pi4j.io.gpio.GpioFactory;
import com.pi4j.io.gpio.GpioPinDigitalOutput;
import com.pi4j.io.gpio.RaspiPin;


import common_things.DB_Connection;

public class receivedata {

	//this is a function for reading the database on Raspberry Pi
	public static void readDatabase()
	{


		Connection connection=null; //A connection object is set to null

		// try block is executed
		try
		{


		    DB_Connection db=new DB_Connection(); //A database object db is defined for DB_Connection class


		    // PreparedStatement,ResultSet and Statement are set to null


			PreparedStatement ps=null;
			ResultSet rs1=null;
			Statement st1=null;
			connection=db.getConnection();  //connection object is initialized with getConnection method


			 //A query is defined which reads the column from table newmessage where id id 12

			 String query1="select * from newmessage where ID=12";

             st1=connection.createStatement();

             //A query is executed and its result is stores in ResultSet
 			rs1=st1.executeQuery(query1);


 			//if the query has result
 			while(rs1.next())
 			{


 				//Its String value is extracted and stored in receivedmessage
 				String	receivedmessage = rs1.getString("msgvalue");


				System.out.println("the msg is" + receivedmessage );

				//oled object is called which calls the function to clear the first line of oled display

				oled.oledClearFirstLine();


		    	 System.out.println("printing message");


		    	 //oled object is called which calls the function to write the string on the oled display at location 0,0
				oled.oledWriteString(0, 0, receivedmessage);


				System.out.println("successfully read data");

				//System.out.println("successfully saved data in the backend");
				// model1.setViewName("index26");


 			}


		}

		//if the exception occurs in try block catch block is executed
		catch(Exception e)
		{


			//This exception occurs when there is a problem to read the database
			e.printStackTrace();
			System.out.println("unsuccessfully  read the database");

		}


		//this block executes by default
		finally
		{


			//we close the connection after it reads the database and before doing that we check its not null


			if(connection!=null)

			{
				//executing the closing connection in try block
				try {
					connection.close();  //closing the connection
					System.out.println("successfully closed connection");
				}
				//if exeception occurs catch block is executed
				catch (SQLException e) {


					System.out.println("connection not closed");
				}
			}


		}


	}


	public static void main(String[] args)


	{
		int k;
		//In side the main blocK
		System.out.println("Hello World 3");


		//GpioController gpioController= GpioFactory.getInstance();
		//GpioPinDigitalOutput pinOut= gpioController.provisionDigitalOutputPin(RaspiPin.GPIO_08);


		k=1;

		System.out.println("Good night 3");

	   //oled object is used to call the method from oled class which initializes the oled display

		  oled.OledInit();
	     System.out.println("oled initialized");

	     //oled object is used to call the method from  oled class which clears the oled display
	     oled.oledClear();

	     System.out.println("oled cleared");

	     //oled method is used to call the method which writes a string on oled display
	     oled.oledWriteString(0, 0, "data");


	     //now a while loop runs continously

	     while(true)
	     {

	    	 //with a  time delay of 5 seconds a function readDatabase is executed

	    	 try {
					TimeUnit.MICROSECONDS.sleep(5000000);
					System.out.println("read data");
					readDatabase();                  // function readDatabase is called


				} catch (InterruptedException e) {
					// TODO Auto-generated catch block
					e.printStackTrace();
				}


	     }


	}


}
As explained in the code in our main method we are initializing and clearing the oled
Then in a continuously running while loop we are calling a function readDatabase() with delay of 5secs
Now let's see what the readDatabase() function does in that we first establish a connection with the database
then we execute a select query and store the result of the query in a String and call oledWriteString method and pass the value of that String to print the message on the Oled display after that we print a success message and then we close the connection
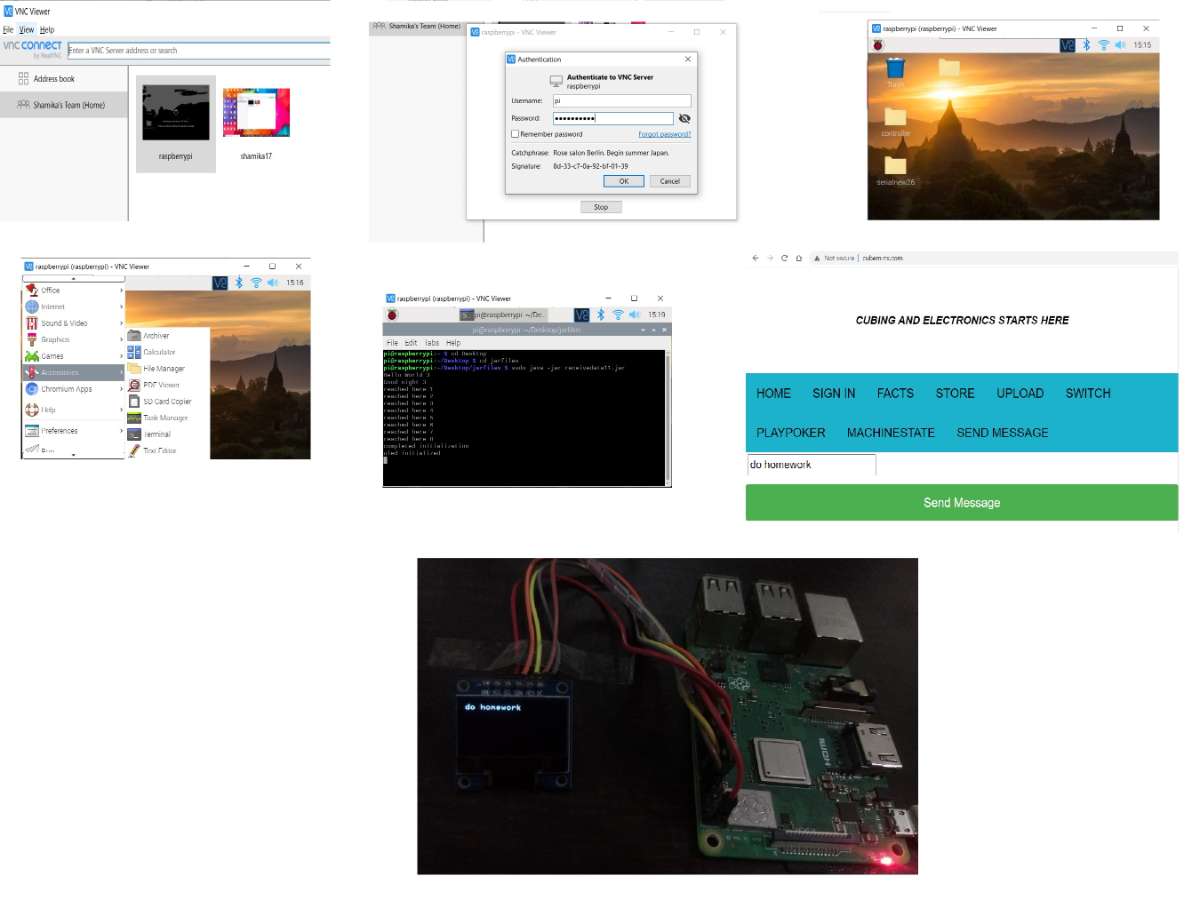
Execution of the project:
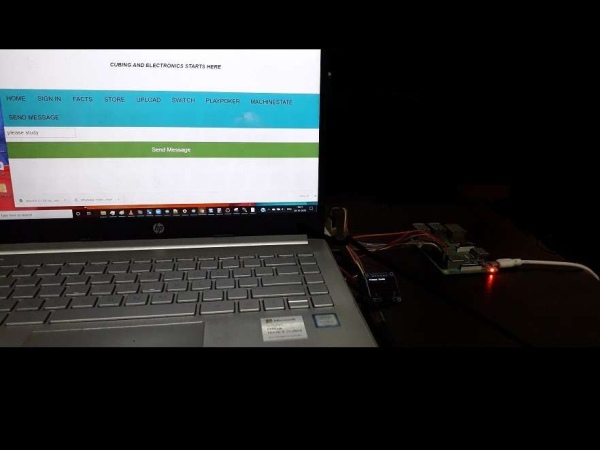
Our project is ready the code is executing on our Raspberry Pi
Now open your created website or open https://www.cubeminx.com
Click on the Send Message tab
Type the message you want to send and click the Send Message button
As you can see in the image the message appears on the OLED display.
Demonstration Video:
Source: Notice Board for receiving messages on Oled display using embedded device and IoT