
Introduction
The Pi Camera module is designed for capturing high-resolution photos and videos on the Raspberry Pi board. It utilizes the CSI (Camera Serial Interface) interface, which allows for direct attachment to the Raspberry Pi.
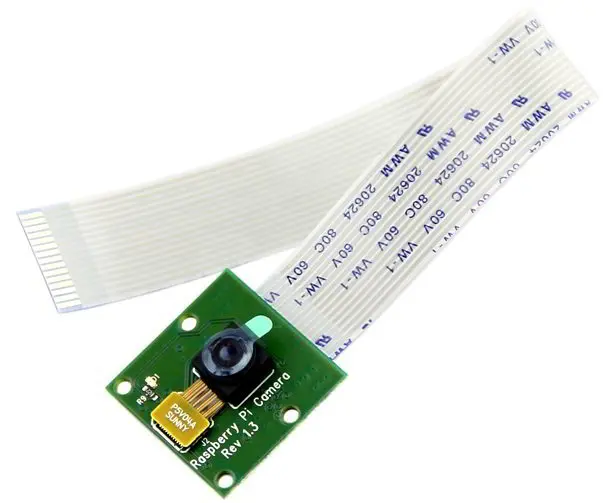
To connect the Pi Camera module to the Raspberry Pi, a 15-pin ribbon cable is used, which connects to the CSI port on the Raspberry Pi board. This interface enables seamless communication and integration between the camera module and the Raspberry Pi.
Features of Pi Camera
In this case, we have utilized the Pi Camera v1.3, which offers the following features:
- Resolution: 5 MP
- HD Video recording capabilities: 1080p @30fps, 720p @60fps, 960p @45fps, and more.
- It can capture high-resolution still images with a size of 2592×1944 pixels.
- Enabled CSI interface for seamless integration with the Raspberry Pi board.
How to attach Pi Camera to Raspberry Pi?
Connect Pi Camera to the CSI interface of the Raspberry Pi board as shown below,
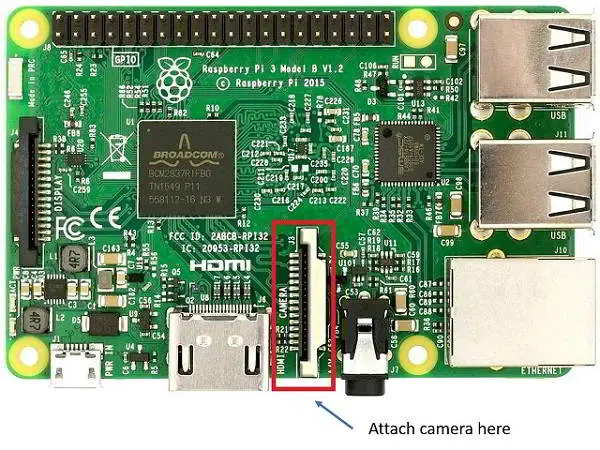
Now, we can utilize the Pi Camera for capturing both images and videos using the Raspberry Pi.
However, before we can start using the Pi Camera, we need to enable it to ensure its proper functionality.
How to Enable Camera functionality on Raspberry Pi
To enable the camera on the Raspberry Pi, open the Raspberry Pi configuration by executing the following command:
sudo raspi-configNext, select the “Interfacing options” within the Raspberry Pi configuration menu. From there, choose the camera option to enable its functionality.
After making the selection, reboot your Raspberry Pi for the changes to take effect.
Once the reboot is complete, you will be able to access and utilize the camera on your Raspberry Pi.
Now, you can capture images and videos using the Pi Camera on your Raspberry Pi.
Example
To capture images and save them to a specified directory, you can use Python. Below is an example Python program that utilizes the PiCamera package/library to capture images using the Pi Camera on the Raspberry Pi:
In this program, the PiCamera class from the picamera package is used. You can specify the desired directory and file name to save the captured image by setting the image_path variable accordingly. After capturing the image, the program will print a message indicating the location where the image has been saved.
Feel free to modify the image_path variable and customize the program according to your specific requirements.
Pi Camera Python Program for Image Capture
”' capture images on Raspberry Pi using Pi Camera http://www.electronicwings.com ”' import picamera from time import sleep #create object for PiCamera class camera = picamera.PiCamera() #set resolution camera.resolution = (1024, 768) camera.brightness = 60 camera.start_preview() #add text on image camera.annotate_text = ‘Hi Pi User' sleep(5) #store image camera.capture(‘image1.jpeg') camera.stop_preview()
Functions Used
To use picamera python based library we have to include it in our program as given below
import picamera
This picamera library has PiCamera class for the camera module. So, we have to create an object for PiCamera class.
PiCamera Class
To utilize the Pi Camera in Python on the Raspberry Pi, you can utilize the PiCamera class, which provides various APIs for camera functionality. Start by creating an object for the PiCamera class, as shown in the example below:
By creating an object of the PiCamera class, you can access and utilize the camera's functionalities in your Python code.
Camera = picamera.PiCamera()
The above PiCamera class has different member variables and functions which we can access by simply inserting a dot (.) in between object name and member name.
E.g.
Camera.resolution = (1080, 648) capture()It is used to capture images using Pi Camera.
E.g.
Camera.capture(“/home/pi/image.jpeg”)The capture() function has different parameters which we can pass for different operations like resize, format, use_video_port, etc.
E.g.
Camera.capture(“/home/pi/image.jpeg”, resize=(720, 480))
resolution= (width,height)
It sets the resolution of the camera at which image captures, video records, and previews will display. The resolution can be specified as (width, height) tuple, as a string formatted WIDTHxHEIGHT, or as a string containing commonly recognized display resolution names e.g. “HD”, “VGA”, “1080p”, etc.
E.g.
Camera.resolution = (720, 480)
Camera.resolution = “720 x 480”
Camera.resolution = “720p”
Camera.resolution = “HD”
Annotate_text = “Text”
It is used to add text on images, videos, etc.
E.g.
Camera.annotate_text = “Hi Pi User”start_preview()
It displays the preview overlay of the default or specified resolution.
E.g.
Camera.start_preview()stop_preview()
It is used to close the preview overlay.
E.g.
Camera.stop_preview()Pi Camera Python Program for Video Recording
'''
	Record video on Raspberry Pi using pi Camera
	http://www.electronicwings.com
'''
import picamera
from time import sleep

camera = picamera.PiCamera()
camera.resolution = (640, 480)

print()
#start recording using pi camera
camera.start_recording("/home/pi/demo.h264")
#wait for video to record
camera.wait_recording(20)
#stop recording
camera.stop_recording()
camera.close()
print("video recording stopped")
Functions used
We have to create an object for PiCamera class. Here, we have create objects as camera.
start_recording()
It is used to start video recording and store it.
E.g.
Camera.start_recording(‘demo.h264’)It records video named demo of h264 format.
wait_recording(timeout)
Wait on the video encoder for specified timeout seconds.
E.g.
Camera.wait_recording(60)stop_recording()
It is used to stop video recording.
E.g.
Camera.stop_recording()