
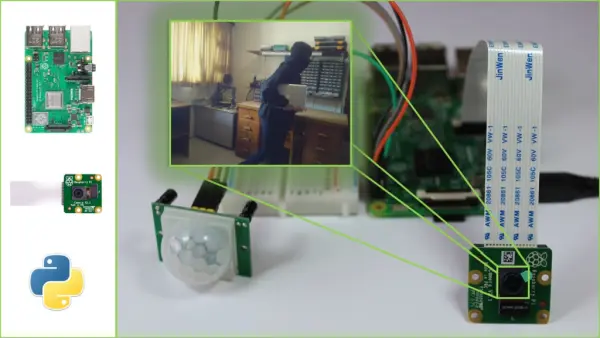
This project demonstrates how to utilize a Raspberry Pi to capture photos when motion is detected. It can be employed as a burglar detector, for wildlife photography, or in various other applications. The setup involves utilizing a Raspberry Pi V2 camera module, and the programming code will be written in the Python programming language.
Please note that this project is an excerpt from our “20 Easy Raspberry Pi Projects” book. If you are interested in building electronics projects with the Raspberry Pi using Python, we highly recommend reading our comprehensive Raspberry Pi Projects book. It is available in both digital and paperback formats, providing detailed instructions and guidance for a wide range of Raspberry Pi projects.
Prerequisites
Before proceeding with this project, it is recommended that you have some familiarity with the Raspberry Pi board. If you are new to Raspberry Pi, you can start by reading the “Getting Started with Raspberry Pi” guide.
Additionally, ensure that you have installed either the Raspbian or NOOBS operating system on your Raspberry Pi.
If you are using the Raspberry Pi Camera V2 module for the first time, we suggest referring to the “Guide to Raspberry Pi Camera V2 Module” to familiarize yourself with its features and functionality.
If you are interested in exploring different camera options for your Raspberry Pi projects, you may find our article on “What's the Best Raspberry Pi Camera For Your Project?” helpful.
Having a basic understanding of the Raspberry Pi board, installing the operating system, and being acquainted with the Camera V2 module will provide a solid foundation for successfully undertaking this project.
Parts Required
To complete this project, you will need the following components:
- Raspberry Pi board – If you are new to Raspberry Pi, you can explore the “Best Raspberry Pi Starter Kits” to find a suitable kit that includes the necessary components.
- Breadboard – This will be used for creating the circuit connections.
- Raspberry Pi Camera Module v2 – This module is specifically designed for capturing images with the Raspberry Pi. Make sure you have the Camera Module v2 for this project.
- HC-SR501 PIR motion sensor – This sensor will detect motion and trigger the camera to capture photos.
- Pushbutton – The pushbutton will be used to enable the alarm mode.
- Jumper wires – These wires will be used to connect the various components together on the breadboard.
By gathering these components, you will be ready to proceed with the project.
Project Overview
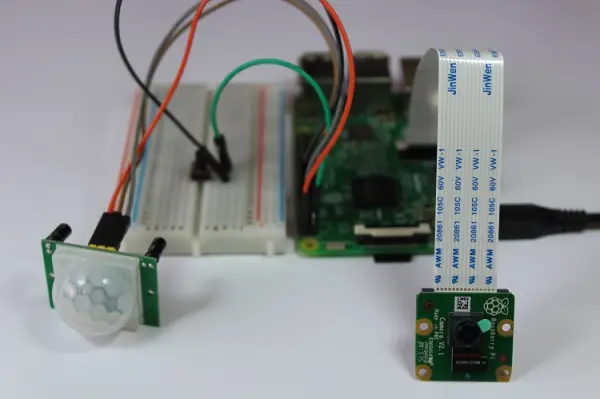
The circuit for this project involves connecting a PIR motion sensor, a pushbutton, and a camera module to your Raspberry Pi. The pushbutton serves as an additional component that enables you to halt the execution of the Python script.
To create the circuit, you will need to connect the following components to your Raspberry Pi:
- Connect the PIR motion sensor to the Raspberry Pi following the wiring instructions specific to your sensor model. Ensure that you connect the appropriate pins of the motion sensor to the corresponding GPIO pins on the Raspberry Pi.
- Connect the pushbutton to the Raspberry Pi, again referring to the wiring instructions for your specific pushbutton. Make sure to connect the necessary pins to the designated GPIO pins on the Raspberry Pi.
- Connect the camera module to the dedicated CSI (Camera Serial Interface) port on the Raspberry Pi. Ensure that it is securely attached.
By establishing these connections, you will have set up the circuit for the project, allowing the PIR motion sensor and pushbutton to interact with the Raspberry Pi and camera module.
To program the Raspberry Pi for this project, we will utilize a Python script and leverage the built-in picamera library. This library simplifies the process of controlling the camera module. Additionally, we will use the gpiozero library to handle the GPIO (General Purpose Input/Output) pins on the Raspberry Pi. The gpiozero library offers classes for various components such as pushbuttons, LEDs, motion sensors, and more, making it convenient to interact with these components in our project.
Enable the Camera
Before you can utilize the camera module on your Raspberry Pi, you must enable the camera software. Here's how you can do it:
- In the desktop environment, navigate to the main menu.
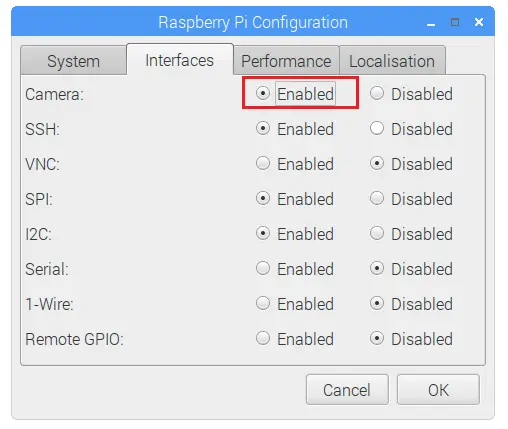
- From the menu options, select “Preferences” and then choose “Raspberry Pi Configuration.”
- This will open a window with several tabs. Click on the “Interfaces” tab.
- Within the “Interfaces” tab, you should find an option related to the camera. Ensure that the camera option is selected or enabled.
- Once enabled, click “OK” to save the changes.
By following these steps, you will have successfully enabled the camera software on your Raspberry Pi, allowing you to use the camera module for capturing photos and videos.
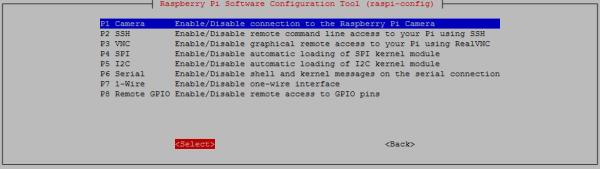
Alternatively, in the Terminal window, type the following command:
pi@raspberry:~ $ sudo raspi-config
You should see the Raspberry Pi software configuration tool. Select the Interfacing Options:
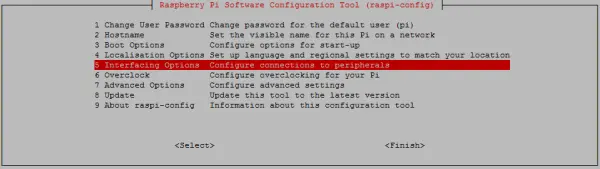
Enable the camera and reboot your Pi:
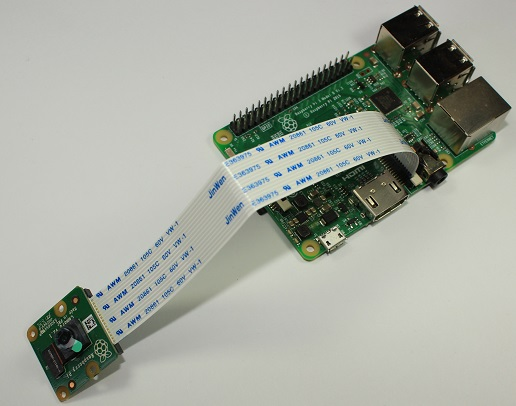
Connect the Camera
Now that you have enabled the camera software, follow these steps to connect the camera module to your Raspberry Pi:
- Shut down your Raspberry Pi.
- Locate the CSI (Camera Serial Interface) port on your Raspberry Pi board.
- Take the camera module and ensure that the blue letters are facing upward.
- Align the camera module with the CSI port, making sure it is correctly oriented.
- Gently insert the camera module into the CSI port until it is securely connected.
- Once the camera module is connected, start up your Raspberry Pi again.
By properly connecting the camera module to the CSI port, you will be ready to utilize it for capturing photos and videos with your Raspberry Pi.
Build the Circuit
With the camera connected, follow the next schematic diagram to wire the rest of the circuit.
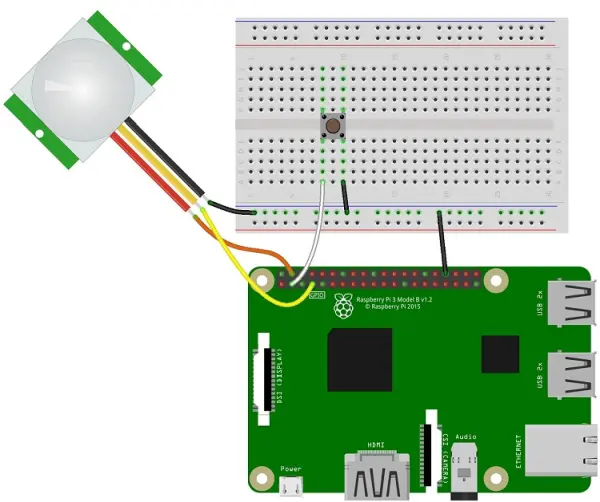
For this project, you will need to connect the pushbutton and the PIR motion sensor to specific GPIO pins on your Raspberry Pi. Here are the GPIO pin connections:
Pushbutton: Connect it to GPIO 2. PIR motion sensor: Connect it to GPIO 4.
It's important to note that the PIR motion sensor used in this project requires 5V power, so make sure to connect its power pin to the appropriate 5V pin on the Raspberry Pi. However, please keep in mind that different sensors may have different voltage requirements, so always refer to the specifications of your specific sensor to ensure correct wiring.
Ensure that you have properly wired the pushbutton and the PIR motion sensor to their respective GPIO pins, providing the necessary power according to the specifications of your components.
Writing the Script
To control the camera and implement the desired functionality, you will utilize the picamera library. Here's an overview of what the code should accomplish:
- Initialize the camera using the picamera library.
- When the PIR motion sensor detects movement, capture a photo using the camera module.
- Save the captured photos to a designated folder on your desktop.
- Assign incremental names to the photos, such as image_1.jpg, image_2.jpg, and so on, to keep track of the order in which they were taken.
- Implement a functionality to stop the camera when the pushbutton is pressed. This is crucial for exiting the camera preview that appears on your screen.
By following these steps and utilizing the picamera library, you can control the camera module and achieve the desired functionality for capturing photos based on motion detection.
Entering the script
To begin, open a new file in the Python 3 (IDLE) editor and copy the provided code below. Afterward, save the code with the name “burglar_detector.py” in your Desktop folder.
#Project 13 - Burglar Detector With Photo Capture
#latest code updates available at: https://github.com/RuiSantosdotme/RaspberryPiProject
#project updates at: https://nostarch.com/RaspberryPiProject

#import the necessary packages
from gpiozero import Button, MotionSensor
from picamera import PiCamera
from time import sleep
from signal import pause

#create objects that refer to a button,
#a motion sensor and the PiCamera
button = Button(2)
pir = MotionSensor(4)
camera = PiCamera()

#start the camera
camera.rotation = 180
camera.start_preview()

#image image names
i = 0

#stop the camera when the pushbutton is pressed
def stop_camera():
    camera.stop_preview()
    #exit the program
    exit()

#take photo when motion is detected
def take_photo():
    global i
    i = i + 1
    camera.capture('/home/pi/Desktop/image_%s.jpg' % i)
    print('A photo has been taken')
    sleep(10)

#assign a function that runs when the button is pressed
button.when_pressed = stop_camera
#assign a function that runs when motion is detected
pir.when_motion = take_photo

pause()
How the code works
In the beginning of the code, the necessary libraries are imported to enable the required functionalities. The picamera library is imported to control the camera module, while the gpiozero library is used to work with the pushbutton and motion sensor components. Additionally, the sleep method is utilized to introduce delays, and the pause method is employed to manage interrupts.
By importing these libraries, you gain access to the functions and classes needed to control the camera, interact with GPIO components, handle delays, and manage interrupts during the execution of the program.
from gpiozero import Button, MotionSensor
from picamera import PiCamera
from time import sleep
from signal import pause
After importing the required libraries, you create objects that reference the pushbutton, PIR motion sensor, and camera. The pushbutton object is associated with GPIO 2, while the motion sensor object is linked to GPIO 4.
button = Button(2)
pir = MotionSensor(4)
camera = PiCamera()
Then, initialize the camera with camera.start_preview().
camera.start_preview()
If your camera is oriented in a way that the captured photos appear upside down, you can use the camera.rotation attribute to rotate the camera image by 180 degrees. This adjustment ensures that the photos are captured in the correct orientation.
To rotate the camera image by 180 degrees, add the following line of code before the camera.start_preview() line:
camera.rotation = 180
Next, you initialize an i variable that starts at 0.
i = 0
After defining the objects and their respective GPIO pins, we proceed to create the stop_camera() and take_photo() functions. These functions will be used later in the code for controlling the camera and capturing photos.
The take_photo() function utilizes the variable i to keep track of the image count and increment the number in the filename for each picture taken. This ensures that the images are sequentially numbered.
Here's an example of the take_photo() function:
def take_photo():
  global i
  i = i + 1
  camera.capture('/home/pi/Desktop/image_%s.jpg' % i)
  print('A photo has been taken')
  sleep(10)
In this function, we define the filename by concatenating the string “image_” with the value of i, and appending the “.jpg” extension. The camera.capture() method is then used to capture the photo and save it with the specified filename. After capturing the photo, a message is printed to indicate the successful capture, and i is incremented by 1 to prepare for the next photo.
You can modify the function according to your specific requirements, such as adjusting the filename format or adding additional functionality.
To capture and store a photo, you can utilize the camera.capture() method. Inside the parentheses, you specify the directory where you want to save the image. In our example, we're saving the images in the Desktop folder and naming them as image_%s.jpg. Here, %s represents the number incremented earlier in variable ‘i'.
If you prefer to save your files to a different folder, you can replace this directory with the path to your desired folder. Additionally, you can introduce a delay of 10 seconds, which means the camera captures photos at 10-second intervals as long as the PIR sensor detects movement. You have the flexibility to increase or decrease the delay time, but it's crucial to avoid overwhelming the Raspberry Pi with an excessive number of images by setting a too small delay time.
The stop_camera() function stops the camera with the camera.stop_preview() method.
def stop_camera():
  camera.stop_preview()
  #exit the program
  exit()
The purpose of this function is to terminate the camera preview and exit the program. By calling the exit() function, a window prompt will appear, asking for confirmation to close the program. Simply click OK to close it.
Lastly, you specify that when the pushbutton is pressed, the camera stops functioning.
button.when_pressed = stop_camera
Finally, you tell the camera to take a photo by triggering the take_photo() function when motion is detected.
pir.when_motion = take_photo
The pause() at the end of the code keeps your program running so that interrupts can be detected.
Demonstration
If you are using Python IDLE as your code editor, you can run the script by either pressing F5 or navigating to Run > Run Module. As the script runs, a preview of the camera's perspective will be displayed on your screen. To terminate the camera preview, simply press the pushbutton and click OK in the subsequent window prompt.
Alternatively, in the Terminal window you can type:
pi@raspberrypi:~ $ python3 burglar_detector.py
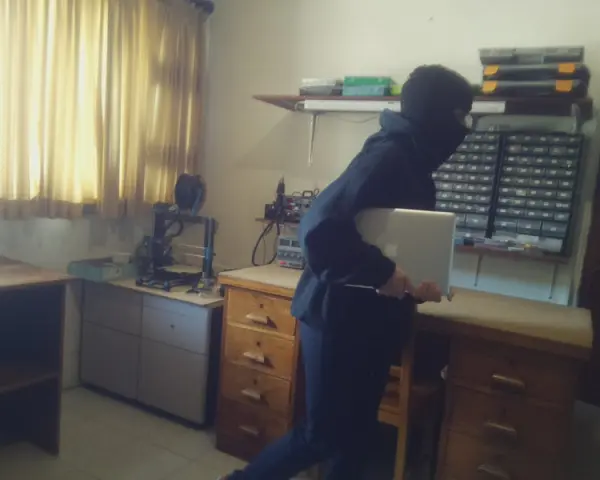
Congratulations! Your project is now prepared to detect motion and capture photos. You can strategically position this project in a desired location and return at a later time to review the saved images. The accompanying figure depicts a sample photo captured by this project.
Wrapping Up
Working with cameras on the Raspberry Pi is a straightforward task and can be utilized in numerous projects. The picamera and gpiozero libraries provide convenient methods to control the camera and GPIO pins of the Raspberry Pi.
Here are some additional camera-related projects using the Raspberry Pi that you might find interesting:
- Video Streaming with Raspberry Pi Camera
- Car Plate Recognition System with Raspberry Pi and Node-RED
- CCTV Raspberry Pi Based System with Storage using MotionEyeOS
- And many more exciting projects with Raspberry Pi…
The above information is an excerpt from our book titled “20 Easy Raspberry Pi Projects.” For a comprehensive overview of the book, you can watch the video provided below.